| Construction Rating: | starstarstar_borderstar_borderstar_border |
| Flight Rating: | starstarstarstar_borderstar_border |
| Overall Rating: | starstarstarstar_borderstar_border |
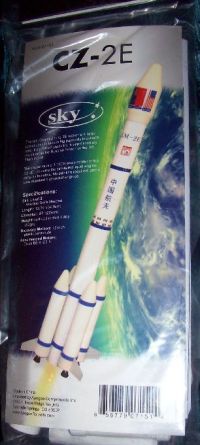
| Manufacturer: | Sky  |
Brief:
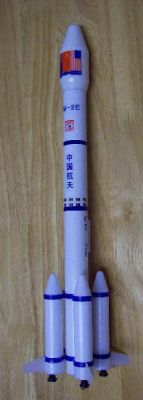
The Sky CZ-2E is a single-stage scale model rocket with parachute recovery. This is a 1:150 scale model of the CASC
Chang-Zheng-2E "Long March" rocket. Apogee Components imported this kit from Shaanxi Zhongtian Rocket
Technologies Co., Ltd. (based in central China), translated and re-printed the instructions, designed and printed an
English cover card insert, and offers the resulting kit at quite a low price.
Construction:
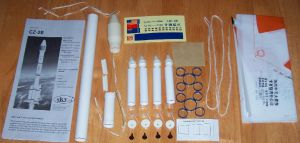
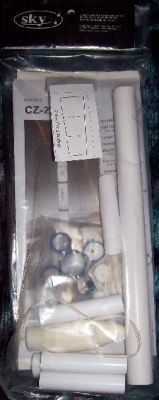
The Sky CZ-2E kit includes the following:
- 1 cover card insert
- 1 Instruction sheet, English only with diagrams, double-sided, 10-1/4" x 14"
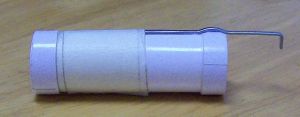
- 1 Nose cone assembly, molded white plastic, hollow, pre-installed shock cord
- 4 Nose cones, white plastic, rounded conical, 15mm O.D. tenon
- 1 Body tube, white, convolutely wound, 22mm OD X 260mm long
- 4 Body tubes, convolutely wound, 16mm OD x 70mm long
- 1 Motor tube assembly, 18mm ID, 2.4" long, pre-installed centering rings
- 4 End plugs, white plastic, 15mm OD tenon
- 4 Fin units, milky-white translucent plastic
- 4 Decorative nozzle units, black plastic
- 2 Strap-on booster mounts, blue plastic
- 2 Launch lugs with standoffs, molded plastic, 4.35mm ID, 30.5mm long
- 1 Motor clip, metal
- 3 Shroud lines, cotton, 820mm each
- 6 Clear plastic adhesive-backed discs
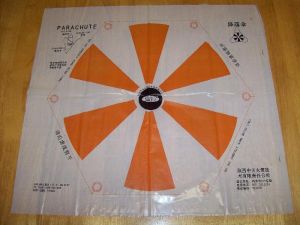
- 1 Parasheet, hexagonal, 325mm across flats
- 1 Shock cord mount, tri-fold, paper
- 1 Decal sheet, crack and peel
All of the tubes are convolutely wound, so there are no tube spirals. Instead, there is a single seam that runs along one side of the tube. The nose cone shows no seams and has impressive thick walls. A tri-fold shock cord mount was taped to the kit. I decided to use a Kevlar®/elastic shock cord mount arrangement, so I added the following parts:
- 1 Kevlar® cord
- 1 18mm Engine Block
- 1 fabric elastic, 1/8" wide x 300mm long
The instructions are a quite sketchy where plenty of explanation is warranted.
The first step is "Assembly of the motor mount". This step is simple and straightforward. I wanted to use the Kevlar®/elastic shock cord mount, so before mounting the assembly in the body tube, I tied a Kevlar® cord to a motor block glued the motor block into upper end on the motor mount assembly.
When test fitting the motor mount into the body tube, I noticed that the engine hook causes the main body tube to bulge out significantly. I figured that this would cause problems when sliding the strap-on booster mounts onto the body tube, so I delayed installing the motor mount until the booster pods were installed.
 Step 2 is "Strap on Booster Assembly". Here's where the instructions become very sketchy because there are a
lot of details that are not mentioned or that are shown in an illustration but are not mentioned in the written
instruction. Gluing the booster nose cones into the booster tubes is straightforward. The fit of the nose cones into
the tubes was pretty tight, needing a bit of sanding of the nose cone tenon edges to allow easy insertion.
Step 2 is "Strap on Booster Assembly". Here's where the instructions become very sketchy because there are a
lot of details that are not mentioned or that are shown in an illustration but are not mentioned in the written
instruction. Gluing the booster nose cones into the booster tubes is straightforward. The fit of the nose cones into
the tubes was pretty tight, needing a bit of sanding of the nose cone tenon edges to allow easy insertion.
I feel that gluing the booster end caps into the booster tubes needs more discussion that what is given by the instructions. The nozzle mounting holes in the end caps are significantly off-center. When the tubes are mounted in the strap-on booster mount, their seams should be toward the main body tube so that they aren't noticeable. The end caps should be mounted so that the nozzle holes are aligned furthest away from the seam so that they line up with the booster fins when they are mounted.
Next, the decorative nozzles are mounted in the holes in the booster end caps. This is straightforward. Finally, the fin units are attached. I feel that the instructions leave out some important alignment details here as well. To keep the tube seems toward the main body, the fin unit needs to be aligned away from the booster tube's seam. If the booster end caps are aligned as mentioned above, then the spacing between the fin and the nozzle will be uniform. Otherwise, it'll be noticeably out-of-whack. Also, the fin units can be mounted flush with the booster tube or flush with the end cap, but the instructions provide no guidance here. I mounted mine flush with the tube, leaving the end caps sticking out a bit.
There is a step missing in the written instruction that is poorly documented in a diagram, namely, gluing the booster tube assembly to the main body tube. The only dimension that is mentioned is the distance between booster mounts on the main body tube, but this dimension is kinda needless because it is forced by the booster fin units and by the seam between the booster tubes and their nose cones. What is missing is the alignment of the whole booster tube assembly with the main body markings and the distance between the end of the main body and the bottom booster mount.
By searching out some pictures of the actual CZ-2E rocket on the Internet, I had found that the strap-on boosters are generally mounted with two boosters straddling CZ-2E markings. For ease of assembly, mounted the bottom booster mount 11 mm from the rear of the main body tube. I found out later that the distance should have been greater to match the real CZ-2E, but they work OK the way I mounted them.
With plastic cement, I glued the bottom booster mount with the alignment I wanted and waited for the glue to dry. I did not glue the top mount until all pods were in place so that I could move the top mount to line up with the nose-tube seam of each booster tube as they were mounted. I then glued each booster assembly to both mounts, making sure that booster was in-line with the main body tube, and that the top booster mount lined up with the booster's nose-tube seam. Finally, I ran a bead of glue around the joint between the top booster mount and the body tube.
The instructions do not describe any of this and shows a diagram of the final assembly.
After waiting for the booster pod assembly to dry, I installed the motor mount assembly, completing the first step.
Step 3 "Launch Lug Attachment" is straightforward, but it specifies using wood glue to attach the plastic launch lug/standoff to the body. I was suspicious of this and used plastic cement instead.
 Most of the rest of the instructions give adequate detailed guidance and are easy to follow. I altered part b) of Step
5 "Nose cone and parachute assembly" for Kevlar®/elastic
shock cord assembly, tying the a separate fabric shock cord to the free end of the Kevlar®
cord and tying the free end of the shock cord to the shock cord that was pre-installed in the nose cone.
Most of the rest of the instructions give adequate detailed guidance and are easy to follow. I altered part b) of Step
5 "Nose cone and parachute assembly" for Kevlar®/elastic
shock cord assembly, tying the a separate fabric shock cord to the free end of the Kevlar®
cord and tying the free end of the shock cord to the shock cord that was pre-installed in the nose cone.
The instructions give an interesting detailed description for folding the parachute that I haven't seen in other kits.
A step is missing in the instructions regarding gluing the Shenzhou capsule nose piece onto the Shenzhou capsule. The nose piece is a weird looking piece of plastic that isn't mentioned anywhere in the instruction but is shown on the card insert and the first page of the instructions. It was easy to orient and cement into place.
Overall, construction was interesting and gratifying, if not well-explained. The instructions left out a few steps and some alignment specifics. The resulting product looks good and feels sturdy. Parts fit together precisely and snugly, though edges generally needed a bit of sanding to get things in place.
Finishing:
Step 7 "Decal Placement" shows where all of the decals should be placed. The crack and peel decals went on
without much trouble, mostly. They suffered from the same problem that similar decals have with other rocket kits, the
decals don't want to stick to curves very well.
I had some trouble with a couple of the body-wrap stripe decals. A couple of these wanted to delaminate rather than separate from the decal backing material. With some care, I managed to get these off the sheet in one piece and get them onto the rocket.
There's no painting required. The decals provide the finish. The end result is pretty good for crack-and-peel, but inferior to waterslide or rub-on dry transfer. The clear decal edges are easy to see and feel, but from a few feet away they don't look too bad.
Construction Rating: 2 out of 5
Flight:
First flight was during the first SAROS club launch of 2008 on May 4. The wind was variable, within 10 mph. I did not
have one of the recommended motors on hand, but I figured the CZ-2E should be okay with a B4-4. I poured a load of
cellulose insulation (dogbarf) into the body, powdered and folded the chute, then inserted the shock cord and chute and
nose cone. I inserted the motor and the clip held it securely. I inserted the igniter and igniter plug then slipped the
rocket onto a launch rod. I used an alligator clip to keep the motor a few inches away from the blast deflector. I
hooked up the igniter wires, went back to the launch controller, counted down, and pressed the launch button. The CZ-2E
boosted straight at first, then angled downwind. I suspect a gust caught it. It reached apogee, arched over, and the
ejection charge blew. Next time, I'll try a shorter delay.
Recovery:
I built my CZ-2E with a Kevlar®/elastic
shock cord which worked well for the first flight. It was easy to install, too, by installing the Kevlar®
cord and thrust ring into the top of the motor mount assembly. The parachute deployed perfectly and the descent rate
was about ideal. The CZ-2E landed gently, without any noticeable damage.
Flight Rating: 3 out of 5
Summary:
The Sky CZ-2E is an good buy for an attractive scale model of the CZ-2E. It looks good and flies great. There is
enough work with the booster pods to earn the kit's skill level 3 rating but is a straightforward build otherwise.
The negative things I've found with this kit are the short shock cord, incomplete instructions, crack-and-peel decals, and a couple of decals that started delaminating.
Overall Rating: 3 out of 5
 |
 |
Flights
|
|