| Manufacturer: | Smokin' Rockets  |
 (Contributed - by Dave
Rose - 10/20/01)
(Contributed - by Dave
Rose - 10/20/01)In keeping with the "stubby" theme that seems to be a common factor in many of my projects, I decided to build a 7.5-inch diameter Fat Boy. This is a kit produced by Bill Rossi at Smokin’ Rockets, which he calls the Chubsy. Standard with the kit is a fiberglass mosquito style nosecone by Scotglas. The airframe is PML 7.5-inch pre-slotted phenolic tubing wrapped with 2 layers of 6-oz woven fiberglass cloth. The fins are 3/8-inch, 9-ply Baltic birch plywood with beveled leading and trailing edges. I opted for the 54mm motor mount and also ordered the Alti-Tube altimeter bay. The bay, as you can see in the pictures, is mounted through the top two centering rings, parallel to the motor tube. Dual deployment will be achieved using a G-Wiz LC Deluxe 800 in conjunction with the Black Sky PRM II (pyro release mechanism). The initial ejection charge will deploy the nosecone and drogue parachute and the second charge will activate the PRM II, which will release a Nomex deployment bag that houses the main parachute.
The build was pretty straightforward with very easy to follow instructions. The motor mount/ fin assembly is built as a module and then installed into the body tube. This method made it very easy to reinforce the fin to motor tube joints, which I did with a layer of 6 oz. fiberglass cloth. T-nuts were added to the rear-centering ring for positive motor retention and also to the front centering ring to mount the PRM unit. The next step was to mount this entire unit into the main airframe with a liberal quantity of epoxy. The finishing touch was external fin fillets using a mixture of epoxy and micro-balloons.

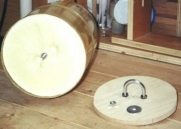

After calculating the CG for my intended motor, (a J415) it was determined that approximately twenty-two ounces of weight would have to be added to the nosecone. Sixteen ounces of steel shot, mixed with epoxy, was added to the nose around a piece of all-thread that extends the length of the nosecone and through the ½ inch plywood bulkhead. After this was completely set, I removed the bulkhead, and proceeded to fill the remaining area with 2-part expanding urethane foam. Due to the characteristics of the foam, this was done in small batches and allowed to cure, until it neared the top. Before pouring the final section, I wrapped the bulkhead in plastic wrap, and secured it to the threaded rod. When the last batch expanded, it came up to the bulkhead and cured in such a way that it provided a very smooth surface to permanently attach the bulkhead. The plastic wrap was removed and a generous amount of epoxy, as well as the supplied nuts and washers, were used to secure the bulkhead in place. A few small surface blemishes in the fiberglass nosecone were filled in, again using the epoxy / micro-balloons mixture.
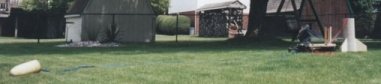
 I did a deployment charge test just prior
to painting. Only 2 grams of black powder were used and it not only separated
the nosecone twenty feet from the airframe, but also caused the airframe to
pull free from the band clamp and jump backwards a few feet.
I did a deployment charge test just prior
to painting. Only 2 grams of black powder were used and it not only separated
the nosecone twenty feet from the airframe, but also caused the airframe to
pull free from the band clamp and jump backwards a few feet.
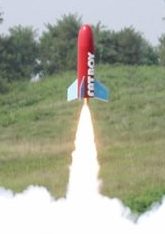
I painted it using the traditional Estes Fat Boy colors. I also had custom vinyl graphics made, identical to those on the original.
I used an Aerotech J412W reload and according to the G-Wiz Deluxe altimeter, obtained an altitude of 2,223 feet.
 |
 |