Clone Mini Bat Clone
Space Age Industries - Mini Bat {Kit} (K17) [1969-1972]
Contributed by Matt Gillard
| Manufacturer: | Space Age Industries |
| Style: | Glider |
Brief:
The Mini Bat is a simple balsa glider. When I first got into gliders and went looking for plans on the Internet, I waded through many that looked overly complicated and beyond my modeling experience despite having built chuck glider and RC balsa planes. The Mini Bat stood out because it has no specialist parts or moving mechanisms, just a straightforward chuck glider with a motor mount that used to win NAR competitions.
Construction:
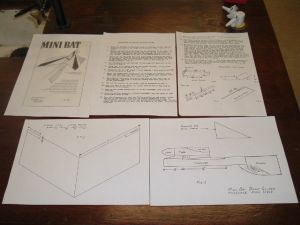
The plans can be found on Ye Olde Rocket Plans. They consist of five pages with two pages of 1:1 scale drawings on the balsa parts and two sheets of instructions. The pieces needed to build the Mini Bat are
- 1 launch lug
- Nose cone (not specified which type)
- Body tube or 18mm engine mount
- Balsa sheet 3/32"
- ¼" by ¼" by 4" block of balsa
- ¼" by 1" by 8" block of balsa.
To build the Mini Bat I used
- Model knife
- Fine sand paper
- White PVA glue
- Spray paint
- Aluminum tape
- Waxed sheet of paper
- Block of Plasticine.
Building the Mini Bat is straightforward as the instructions provided are easy to follow, and provided you give plenty of time for the glue to dry between stages, there should be no problems.
The wings have to be cut out from a balsa sheet using a template is provided with the plans. It is easier to sand and fill the wings at this stage than later.
The instructions tell you to make the elevons by cutting halfway through the wood on the trailing edge, however, I found it easier to cut the elevons completely out at this stage, and tape them back in later. The two wings are glues together so that the tip of one of the wings is 3 inches off the board where the other wing it taped flat, I used a block of Plasticine to achieve this. Leave the joint for as long as possible to ensure a strong bond.
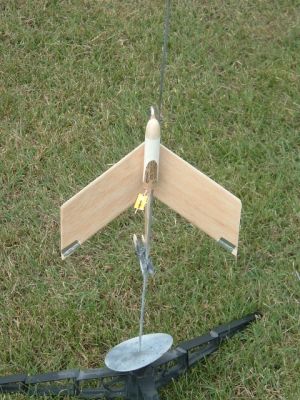
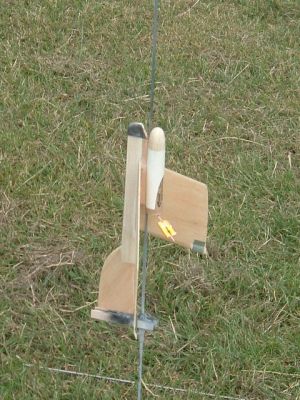
The fuselage section is made per the instructions. The nose is best rounded slightly, but no so much that it alters the mass at the front. The rear of the fuselage has to be tapered down to fit the rudder. The rudder is cut from the same balsa sheet as the wings, make sure that the grain is in the right direction.
 The motor mount tube is cut to allow easy ejection of the motor and then the nose cone is glued in, the ¼" by ¼" by 4" block of balsa is cut to make a pylon and then the motor mount is glued to the pylon. Glue the launch lug into the joint of the motor mount and pylon.
The wings are then sandwiched into the gap in the fuselage and the pylon. Make sure the angles are correct for the wing and don't skimp on the glue. The joints need to be strong or the wings will re-kit under boost. Fit the rudder and then sand the rear of the fuselage to fit. After everything has completely dried you can test fly the glider.
Finishing:
Make sure you have filleted every joint a few times. The glider is very stable in flight, and while I would not normally paint a glider, the flights don't suffer much from a quick spray of paint on this design to aid recovery in long grass. Also, I added a thin line of light CA glue to the edges of the wings to help prevent shreds.
The elevons are best taped in with aluminum tape as leaving them without tape will almost certainly see then being stripped off during boost.
Test flights are the most important thing for this glider. First, throw the glider upwards at a 45 degree angle to the ground and tilted at a 45 degree to the left if right handed (right if left handed). The glider should recover into a steady glide. If not, then alter the elevons/nose mass until a steady circle glide is achieved. Then I recommend gluing the elevons into a fixed position.
Flight:
I've had several flights on A8-3s. If trimmed for a circle glide the glider can almost return to you after two or three circuits. Most flights give good glide times, 20 to 60 seconds. Only one launch on an A8-3 produced a shred, and this was on a glider than had not been filled and sanded and had not had a CA glued wing tips.
One con of the design is that it rarely pulls out of a spiral dive. If the glider does not boost straight, the 3 second delay on a A8-3 leaves the Mini Bat pointing down and it heads straight to earth.
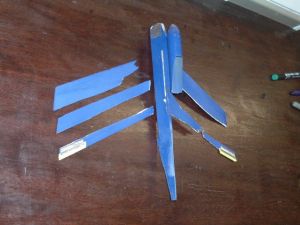
You might be tempted to move up to a B motor. Don't. I have flown on B motors a few times, you get a 50:50 flight to shred ratio. The balsa wings can't handle the power. If you look at the photo you can see that the shred is of the balsa wood and not a stripping of the wings due to weak joints. Still, sometimes the glider can handle a B and then you see a really good height and glide.
Recovery:
One problem that you might have at some launches is that the Mini Bat kicks the motor out. To get around this, you can add a steamer to the inside of an A8-3 motor as there is plenty of room provided that you use thin Mylar tape streamer concertinaed in. Make sure you put a small piece of wadding in first to protect the streamer or wrap a streamer around the motor as indicated by the instructions although I found this to be difficult to get the motor to sit straight in the mount.
Summary:
This is a good introduction to building gliders from plans and does produce a reliable, robust glider. The wing balsa can be changed to either 1/16" or 1/8" balsa, but the 1/16" would be marginal on strength, I have built one and it flys well and the 1/8" needs to be airfoiled.
Related Products
 |
 |
Flights
|
|