| Construction Rating: | starstarstarstarstar_border |
| Flight Rating: | starstarstarstarstar_border |
| Overall Rating: | starstarstarstarstar_border |
| Diameter: | 1.33 inches |
| Length: | 21.00 inches |
| Manufacturer: | Squirrel Works  |
| Style: | Sport |
Brief:
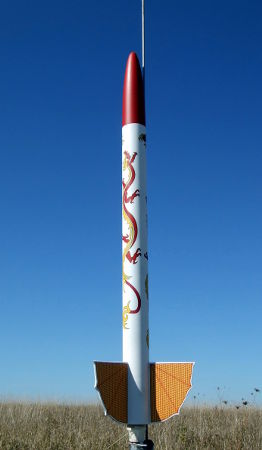
This is a basic 3FNC single stager, but the fin design and beautiful graphic decals help it stand out from the crowd.
Featuring a 24mm motor mount, it also pushes to more serious altitudes than many other designs of comparable
complexity.
Construction:
Component quality is quite impressive--balsa fins that are strong and finely lasered, body tube with very light
spirals, and a balsa nose cone that almost felt as though it were turned from very expensive hard balsa. The parts
included in this kit are:
- BT-55 body tube
- Balsa nose cone
- 3 Laser-cut balsa fins
- 24mm motor mount kit (BT-50, centering rings, 50/20 block, metal hook)
- 1/8" elastic shock cord
- 12" Mylar chute
- Waterslide decals
Construction is very easy on this, solidly in the skill level 1 class. I spent a fair amount of time on the finishing (maybe 45 minutes), but the construction itself probably took about half an hour.
Instructions were well written and the 13 steps fit on one side of a sheet of paper, including several computer-drawn illustrations.
The motor mount is straightforward, featuring an internal centering ring block, a metal hook, and a pair of external centering rings along with the 24mm motor tube. The completed assembly is flush mounted with the body tube, leaving the hook extending out a bit. Nothing wrong with that, but personally I prefer a rocket that stands on its own with the hook either forward of the rearmost fin edges or inside the body tube. In the case of a BT-55 body tube and 24mm motor, there just would not have been enough room though.
Marking the body tube is done using a wraparound marking guide. I tacked the three fins on with CA, then applied white glue fillets. The only tricky part of construction is making sure you've got the fins oriented correctly. There are two straight lines and a curved dragon's wing pattern on the third side. The longer of the two straight lines is the root, and the shorter of the straight lines is the leading edge. They're close enough in length that they could get switched around if you're not paying attention.
Finish up by gluing on the launch lug and the tri-fold paper shock cord attachment, glue in the screw eye to the nose cone shoulder, and everything is ready for paint prep.
Finishing:
Finishing is actually pretty easy on this, and I certainly spent more time than was necessary, not thinking all the
way through to the end. I spent some time applying and sanding down a layer of Elmer's Fill 'n' Finish to the fins, but
since the decals cover virtually all of the fin surfaces, this really isn't necessary. I also filled the tiny spirals
in the body tube, but as they were so small to begin with I think most builders would skip this as well.
The nose cone though, was a bit rough and took a liberal smearing of thinned wood filler. Once sanded down, it was beautifully smooth and you'd swear it was cast in a single-piece female mold.
Everything got two coats of primer, with a wet sanding using 400 grit sandpaper. I followed up with two coats of Rustoleum gloss white on the body/fins and two coats of red on the nose.
The waterslide decals are very good quality, a bit stiff sliding off the paper, and they do not like to be adjusted much at all once applied unless you wet them liberally. Once set in place, gently rubbing down with a paper towel smoothed all wrinkles/bubbles, and the finished decals look as though they were painted on.
Construction Rating: 4 out of 5
Flight:
This has a 24mm motor mount and is fairly lightweight. I didn't want to chance losing it in 8 mph winds blowing
towards the lake in our park and hadn't brought any C11s, so I fashioned a quick adapter out of a spent D12 case and
went with a C6-5. It flew perfectly straight, and the delay was about right, popping the chute out just past apogee.
Recovery:
This kit includes a very nice red mylar chute, and it was fine for our field with tall, soft grass. Flying on harder
surfaces, I'd think about going for a larger chute and slower descent rate though. Overall, I certainly rate the
quality mylar chute as a step up from the basic Estes plastic chutes.
Flight Rating: 4 out of 5
Summary:
I have to point out that of the dozen rockets I took out to the field that day, this one drew the most comments. The
fin styling and sweet decals make it a very cool looking model. It can fly OK on 18mm motors (with your own adapter) or
really smoke on a D.
Overall Rating: 4 out of 5
Other Reviews
- Squirrel Works Dragonfire By James Gartrell
This newest kit from Squirrel Works looks super! It's a BT-55 kit that should catch some big air on a 24mm motor with 12" parachute recovery. The face card in the kit is a true work of art, a signature of Squirrel Works kits. Parts quality is excellent, too. The decals really set this rocket apart. The parts list: 1 BT-55 kraft main body tube 1 BNC-55 balsa nose cone 1 laser ...
 |
 |
Flights
|
|