| Manufacturer: | Standard Rockets  |
Brief:
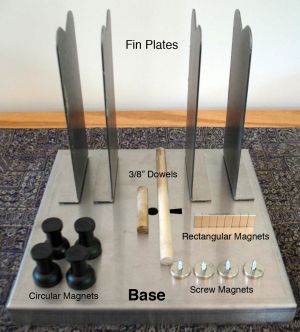
The Standard Rockets Assembly Tool is a fin alignment and attachment jig for low to mid power rockets. The tool
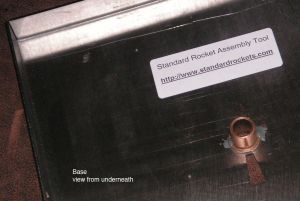
consists of a stainless steel 8" square base, four stainless steel fin plates, three sets of strong magnets, and
two 3/8" wood dowels. The device is used with printed templates for different fin thicknesses and configurations
to attach fins to a body tube. The templates do not come with the device but are available on the
Standard Rockets web site. At the time I initiated this review there was
only one template available to attach four 1/16" thick fins to a body tube. Additional templates have since been
posted.
Construction:
The tool includes:
- 8" square, 3/4" thick base made of 16-gauge stainless steel.
- 4 fin plates of 16-gauge stainless steel with 4 small magnets attached at the bottom
- 4 strong circular magnets in wooden holders
- 4 strong rectangular magnets (0.25" x 0.5")
- 4 strong circular magnets with protruding screws
- 1 3/8" wood dowel, 2" in length
- 1 3/8" wood dowel, 6" in length
The essential idea of the Assembly Tool is to position the body tube vertical and centered on the stainless steal base plate. Then, by use of the fin plates, magnets, and a fin alignment template, align and glue fins to a rocket body tube. Specifically, one of the 3/8" dowels is inserted into a spent 13mm engine. The spent engine is inserted into the engine mount of the rocket body tube and the dowel is inserted into the hole of the base plate thus holding the body tube in a vertical position. For rockets using an 18mm engine, the 13mm engine is inserted into a spent 18mm engine. For 24mm engines, the 18mm engine is inserted into a spent 24mm engine. Once the body tube is standing upright on the base plate, the fin plates are then aligned on the fin template, which has been previously taped to the base. The fin plates stay in place via strong magnets that are attached to the bottom of their base. The fins are held onto the fin plates and pressed up against the body tube via another set of strong magnets.
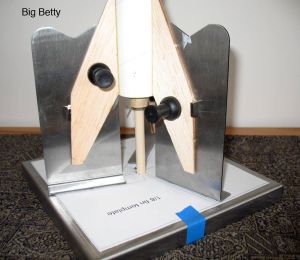
I used the Assembly Tool first on a Quest Big Betty that I had won as a door prize at NARCON 2009. The Big Betty has three 1/8" balsa fins. Since there was only the four 1/16" fin template available at the time, I emailed Lyle Merdin of Standard Rockets and he emailed me the three-fin template the next day. I taped the template to the top of the base, inserted the dowel/18mm engine assembly into the engine mount of the Big Betty and inserted the dowel into the center hole of the base. The dowel did not fit snug and square into the hole of the base (more on this later) and my Big Betty body tube was wobbly and leaning to one side. I rectified this by pushing the four fin plates up against the body tube of the Big Betty. This kept the body tube rigid and perpendicular. I put a bead of yellow glue on the root edge of the three fins and let stand for five minutes. I then placed the fins on the fin plates, pushed them up against the body tube and held them in place using the circular magnets. I also used the small rectangular magnets to press the fins up against the body tube. Looking side-on and top-down the fins looked great and I let everything dry overnight. Everything wasn't so great the next day as I found that I had glued the fin plates to both the body tube and the fins. Fortunately I was able to pry the fin plates off of the body tube and fins with minor damage that was repairable.

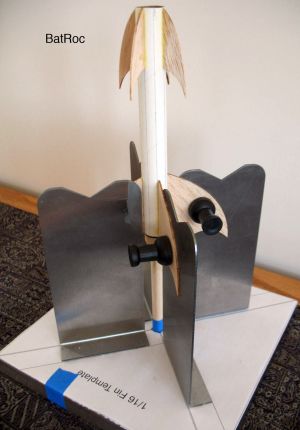 My next use of the Assembly Tool was with a Semroc Bat-Roc that we had
purchased also at NARCON 2009. The Bat-Roc has two sets of 1/16" balsa batwing fins--four small fins that attach
to the top of a 9" long body tube and four larger fins that attach to the bottom end of the same body tube. The
rocket was being constructed by a 12-year-old rocketeer who attached the upper fins the 'normal' way. I used the
Assembly Tool to attach the four lower fins. The dowel/18mm engine assembly was inserted into the engine mount of the
Bat-Roc, which in fact is its body tube since this is a minimal diameter rocket, and the dowel was inserted into the
hole of the base. Earlier I had emailed Lyle about the wobble and he suggested the use of masking tape around the dowel
to make a tighter fit. I did that and it helped a bit but did not solve the problem completely. I aligned the fin
plates on the four 1/16" fin template and placed the fin plates about 1/4" from the body tube. Glue was
applied to the four lower bat fins and let set for five minutes. The fins were then held onto the fin plates and up
against the body tube with the circular magnets, making sure the body tube was straight and fins properly aligned (by
viewing from above and side). I did not use the rectangular magnets this time. A note of caution, the magnets are very
strong and with 1/16" balsa fins, it would be very easy to snap one as the magnets are being applied. It is
important to have the fins sit flat on the fin plate before the magnets are applied. The next day I pulled everything
apart without any problems and the fins were on nice and straight.
My next use of the Assembly Tool was with a Semroc Bat-Roc that we had
purchased also at NARCON 2009. The Bat-Roc has two sets of 1/16" balsa batwing fins--four small fins that attach
to the top of a 9" long body tube and four larger fins that attach to the bottom end of the same body tube. The
rocket was being constructed by a 12-year-old rocketeer who attached the upper fins the 'normal' way. I used the
Assembly Tool to attach the four lower fins. The dowel/18mm engine assembly was inserted into the engine mount of the
Bat-Roc, which in fact is its body tube since this is a minimal diameter rocket, and the dowel was inserted into the
hole of the base. Earlier I had emailed Lyle about the wobble and he suggested the use of masking tape around the dowel
to make a tighter fit. I did that and it helped a bit but did not solve the problem completely. I aligned the fin
plates on the four 1/16" fin template and placed the fin plates about 1/4" from the body tube. Glue was
applied to the four lower bat fins and let set for five minutes. The fins were then held onto the fin plates and up
against the body tube with the circular magnets, making sure the body tube was straight and fins properly aligned (by
viewing from above and side). I did not use the rectangular magnets this time. A note of caution, the magnets are very
strong and with 1/16" balsa fins, it would be very easy to snap one as the magnets are being applied. It is
important to have the fins sit flat on the fin plate before the magnets are applied. The next day I pulled everything
apart without any problems and the fins were on nice and straight.
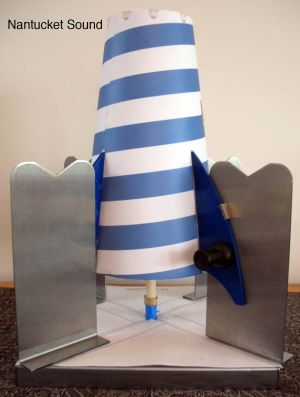 The third use was with the commemorative rocket of NARCON 2009, the FlisKits
Nantucket Sound. (With these three rockets along with a few others, several engines, a launch controller, this Assembly
Tool, and pair of rocket ear rings, we certainly did our part for economic stimulation!.) The Nantucket Sound is a 24mm
engine rocket with a wide and tapered 'body tube' made from a shroud and has four 1/8" balsa fins. At this point
there was still only one fin template available so I made my own four 1/8" fin template using the four 1/16"
fin template as a guide and Canvas 8 drawing application. I printed the new fin pattern and taped it to the base. I
still needed tape around the dowel to give a tight fit. I then aligned the fin plates on the template and placed them
about 1/4" from the body shroud. Since the shroud of the Nantucket Sound already has fin placement markings, this
made alignment somewhat easier (or more difficult, I'm not sure). My alignment template did not match the markings on
the shroud exactly but came pretty close and on a couple of the fins I shifted the fin plate to align the fins with the
shroud markings. There are balsa fin supports behind the fin markings on the shroud and I wanted the fins to have these
supports behind them. Once the fins were glued on, everything looked good from side-on and from top-down. The next day
I took it all down without any problems and the fins again were on nice and straight.
The third use was with the commemorative rocket of NARCON 2009, the FlisKits
Nantucket Sound. (With these three rockets along with a few others, several engines, a launch controller, this Assembly
Tool, and pair of rocket ear rings, we certainly did our part for economic stimulation!.) The Nantucket Sound is a 24mm
engine rocket with a wide and tapered 'body tube' made from a shroud and has four 1/8" balsa fins. At this point
there was still only one fin template available so I made my own four 1/8" fin template using the four 1/16"
fin template as a guide and Canvas 8 drawing application. I printed the new fin pattern and taped it to the base. I
still needed tape around the dowel to give a tight fit. I then aligned the fin plates on the template and placed them
about 1/4" from the body shroud. Since the shroud of the Nantucket Sound already has fin placement markings, this
made alignment somewhat easier (or more difficult, I'm not sure). My alignment template did not match the markings on
the shroud exactly but came pretty close and on a couple of the fins I shifted the fin plate to align the fins with the
shroud markings. There are balsa fin supports behind the fin markings on the shroud and I wanted the fins to have these
supports behind them. Once the fins were glued on, everything looked good from side-on and from top-down. The next day
I took it all down without any problems and the fins again were on nice and straight.
It was at this point that I emailed my review to Lyle as a courtesy and he saw what my 'wobble' problem was. A small brass collar that was soldered onto the bottom of the base had come loose during shipment. Its purpose was to give the dowel extra support, keeping it snug and perpendicular to the base. Its absence resulted in my wobble problem. I had seen the collar but thought it had another use. The collar fit perfectly into a spent 18mm engine and I had thought its purpose was to replace the use of a 13mm engine. And in fact that is how I had been using it. I think this points out the advantage of including a parts list and illustrated instructions with any kit or tool. Anyway, Lyle sent me a new base with a brass collar firmly attached to the underside and I gave the Assembly Tool two more tries. (Along with the replacement base came four additional circular magnets with 1/2" screws protruding. I was told by Lyle that these will now come standard with the Assembly Tool.) Lyle also emailed me a complete set of four fin templates.
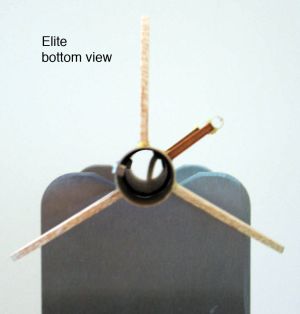
The first attempt with the new base was with a Custom Rockets Elite egg lofter. This is a simple rocket that uses a BT-20 body tube and 3 small 1/16" fins. This time the body tube fit very snuggly and upright on the base. The fins were aligned using a three 1/16" fin marking template I made (using the three 1/8" marking template as a guide and Canvas 8). The fin plates were aligned, placed about 1/4" from the body tube, and fins glued to the tube. The next day everything came apart easily and the fins were on nice and straight.
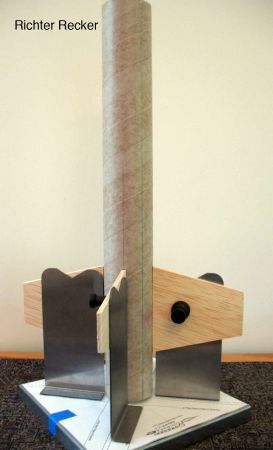
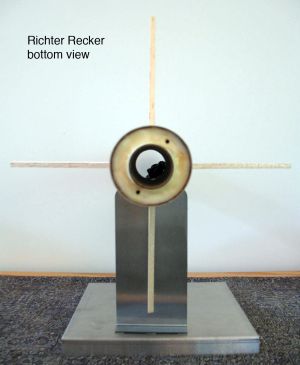
The final use was with a FlisKits Richter Recker. The Richter Recker comes as a three 24mm engine cluster, but I was modifying mine to accept both the cluster and a single 29mm engine (see EMRR Richter Recker review by Jason Toft). To create a dowel/engine assembly for the 29mm engine mount, I wrapped cardboard from a paper towel tube around a spent 24mm engine, glued it in place with CA and then wrapped that with masking tape until it fit snuggly into the 29mm engine mount. The short 3/8" dowel was inserted into an 18mm engine and this was inserted into the modified 24mm engine. This dowel/engine assembly was inserted into the 29mm engine mount that was already in the bottom BT-70 tube of the Richter Recker. Finally, the dowel was inserted into the base of the Assembly Tool. The Richter Recker uses four 3/16" fins. A template for four 3/16" fins was in the set that Lyle had emailed me earlier. The fins were attached as described above. Everything worked well and I was very happy with how the fins came out.
Construction Rating: 4 out of 5
Summary:
Pros: The Assembly Tool is easy to use and easily adaptable to most single engine rockets using 13mm, 18mm, 24mm, and
even 29mm engines. And I would think it could be modified to handle larger size engines as well. The adaptability is
due to the use of a flat, free-form base, strong magnets, and printed templates that can be modified as needed.
However, the free form nature also means that care must be taken in drawing the template, attaching it to the base, and
aligning the fin plates on it. On the five rockets I have used the Assembly Tool with so far, there was slight error in
the placement in all cases. None came out perfect, but this was due to my aligning abilities and not a fault of the
templates or tool itself. And even though the alignment was not perfect, it was a darn sight better than what I have
done in the past. The tool is small and easy to store--another pro. The price is also a pro. At $50.00, this is one of
the cheaper, if not cheapest commercial tool to align and attach fins that I've seen. A price that with the dozen or so
rockets per year that I construct or help construct, I could easily justify.
Customer service falls somewhere in between a pro and a con. The first few email messages I sent Lyle were answered within 24 hours and he emailed me the three-fin template also within 24 hours. However, after that I did not receive a reply to other emails I sent nor to my request for a four 1/8" fin template (and so I made my own for use on the Nantucket Sound). However, Lyle offered and sent a replacement base as soon as he noticed that the original base was defective.
Cons: The only limitation I see is with rockets that utilize engine clusters (canted or straight), non-standard fins (e.g. tube fins) or non-standard fin configurations. I don't think it would be impossible to use the Assembly Tool under these conditions but it could be a challenge. Another con is the lack of instructions. The kit arrived with no instructions or component parts list. A good set of illustrated instructions is needed. As of this writing, there was a complete set of both 4-fin and 3-fin templates on the Standard Rockets web site but not much else.
Still, I'm very tempted to give the Assembly Tool an overall rating of 5/5 because it is well designed, versatile and well built. I really do like it and think it is well worth the price. However, the lack of instructions, parts list, and mediocre web site necessitates something less. For now, I'll rate the Assembly Tool a 4/5. Once these items are remedied, it will rate a 5/5.
Overall Rating: 4 out of 5
 |
 |
|
|
J.S. (August 8, 2009)