Suborbital Flying Machines The Tube
Suborbital Flying Machines - The Tube {Kit}
Contributed by Nick Esselman
| Construction Rating: | starstarstarstar_borderstar_border |
| Flight Rating: | starstarstarstarstar_border |
| Overall Rating: | starstarstarstarstar_border |
| Manufacturer: | Suborbital Flying Machines |
I purchased the Suborbital Flying Machines (SFM) The Tube from Discount Rocketry because I was looking for something different and I had never built (or seen) a SFM kit before. What makes The Tube unique? Well, it’s sort of a pig-in-the-blanket, errrr, sorry how about a rocket-in-a-tube. It is a simple 3-fin and a nose cone rocket, with simple rectangular fins and a BT55 body tube, which is then surrounded by a BT80 tube. Kind of hard to describe so the pictures should help.
CONSTRUCTION: The kit came packaged in a plastic bag with a paper label that described the kit, contents, tools needed and recommended motors with predicted altitudes. The instructions added another 3 pages of assembly information and templates and a 4th page of general building and flight preparation tips that can be applied to any rocket. The instructions included diagrams that help in assembly and each main step had the necessary sub-steps to allow for a smooth and logic build. Assemble of the motor mount, shock cord mount (3-fold paper method), and fin attachment are all straight forward. The real fun begins in the additional of the "Tube". Here you are instructed to use a marking guide and to mark the BT80 tube and then cut the slots that allow the tube to pass over the fins. The instructions say, "If done correctly, the slots will not only mate perfectly with the fins from the previous step, but will partially self-align". Once the slots are cut in the surround-tube, then this is slid over the rocket and down onto the slots, maintaining equal distance from the inner body-tube. A concentric alignment disk is provided, which is cut from page 3 of the instructions. This is slide over the top of the body-tube to ensure the surround-tube is equally spaced at the end opposite of the fins. It would have been nice to have the concentric alignment disk a bit stiffer, like from cardstock, but the paper one worked. The objective is to then put a few "tack" drops of glue on the fins and surround-tube once aligned. Only a few drops so that if a mistake is made it could be cut-out and attempted again. Once set, then fin fillets are applied. The parachute assembly was next on the build list. It consisted of a heavy-duty (trash bag) black plastic hexagon parachute, six (6) tape dots and a length of 1/16" nylon shroud line that is cut into three (3) equal pieces. The shroud lines were definitely sturdy or as SFM says it, "Hunky-Duty". During this phase, the instructions recommend purchasing the Klutz Book of Knots to gain descriptions of the Prusik knot (#14) and the Harness Loop (#21) which would both be good knots for securing the shroud lines to the parachute. The instructions tell the builder to simply knot and glue at each tape junction. The instructions then describe a simple finishing technique with flat black paint and suggest using the orange and yellow decal tape provided. It also mentions using trim tape, that did not come with my kit. I painted my The Tube gloss black. I did not like working with this decal tape as I found it extremely thin which caused bubbles when I placed it. Overall, for CONSTRUCTION I would rate this kit 3 ½ points. The instructions are adequate for someone with a couple of rocket builds prior. The components are of good quality. I would like to see a thicker concentric ring and the old 3-fold paper method should probably go to a Kevlar to motor mount method. Did not like the decal tape at all. FLIGHT/RECOVERY: The recommend (or not) motors that SFM outlines are as follows: My first flight was on the B6-2 and it was more than "pathetic" but not because of the kit. I was at my newly found flying field and was in a big hurry to get a flight off and capture it on camera. Well, I missed the shot, it was a low altitude flight, and the rocket fell swiftly after ejection. While falling, I immediately remembered that I didn’t put in any wadding. The parachute as melted together so that it was unusable. On the other hand the "Hunky-Duty" shroud lines looked great. I had a 3" x 2’ streamer so I threw that on The Tube (and used wadding this time) and installed a C6-3 (note: above, I believe SFM’s recommendation of a C6-5 should be a C6-3). The flight on the C6-3 was perfect with a slow lift-off, straight flight and ejection right at apogee. Descent on the streamer was a bit fast but not enough to cause damage. In fact, I like the streamer and will probably go to a 4 foot one. The third flight was on a later day and I used the C6-3 again. Another very nice flight, although ejection was very near apogee but still nose cone up. Upon the descent with the streamer it seemed like the air passing through the tube was trying to make if fly around. It didn't fall straight it sorta flew left then turned and flew right and then etc all on a fairly rapid descent rate. I'm sure the parachute would have prevented that, but I like the rate with the streamer. Using my idea of hiding the Launch Lug on the main body-tube verses on the outside of the surround-tube worked fine and looks great. I’d recommend this change. My next planned flight will be at NARAM on a D21-4 that I anticipate being a great flight. Watch my flight logs! For FLIGHT/RECOVERY, I would rate this kit 4 points. It does look neat on the pad and flying. It gives slow lift-offs on the B6 and C6 to allow some time to enjoy lift off. It is not a maximum altitude performer, but that isn't my flying game anyway. I'm sure the parachute would have worked fine and it was much sturdier than an Estes parachute. I feel SFM made a mistake on the C6 motor delay. Overall, The Tube is a unique looking rocket that most builders could assemble and enjoy. I would suggest hiding the launch lug like I did and by all means use wadding (silly me)! It is a nice small field rocket using your Estes B6 and C6 motors which allows for a greater range of fliers to enjoy it. I'm pleased with the purchase and it makes a nice addition to my fleet. I give the kit an OVERALL rating of 4 points. Now, after writing this review and enjoying the kit, I've just discovered that Suborbital Flying Machines is no longer in business! Bummer, I guess there won't be any The Tube II's. If you hurry, Kevin at Discount Rocketry says he still has a few.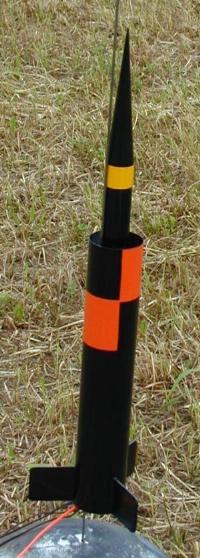 The kit includes a 18" BT55 main body-tube, a 14" BT80 surround-tube, three (3) ¼" balsa fins, and a sharp-point plastic nose cone. It also comes with an 18mm motor mount with retention and 1/16" plywood centering rings. A 48" elastic shock cord and a 14" plastic parachute with "Hunky-Duty" shroud lines (1/16" nylon) make up the recovery system. A 3/16" launch lug and some decal tape wrapped up the kit.
 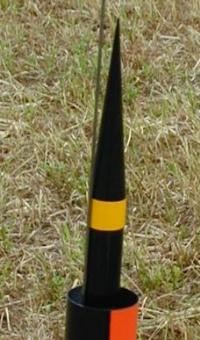 During this assembly step is where you are to attach the Launch Lug to an outside fin fillet, however, I didn’t like the idea of my launch lug in showing on the outside and I must have lost the 3/16" lug provided. What I did was to take two 1/8" lugs and glue them on the inside body-tube, hidden by the outside surround-tube. I used a 1/8" rod to maintain alignment onto the body-tube.
 |
 |