Sunward Aerospace CFX-Six Footer!
Sunward Aerospace - CFX-Six Footer! {Kit}
Contributed by Glenn Little
| Construction Rating: | starstarstarstar_borderstar_border |
| Flight Rating: | starstarstarstarstar_border |
| Overall Rating: | starstarstarstarstar_border |
| Manufacturer: | Sunward Aerospace  |
Brief:
I bought this to use up some 24mm engines. Plus, I couldn't resist the idea of a 6' rocket so bought it as a novelty
item. I later found out a second review was requested, so here we go...
This skill level 2 rocket tops out at around 6 1/2 feet. As mentioned in the previous review, there are some things to consider that aren't necessarily in the instructions. Overall, it's a fairly straightforward 4FNC rocket. Quality was an issue with some of the components, but nothing that required a significant workaround.
Construction:
The components were packaged like most other rockets: a sturdy plastic bag with the glossy freeze-frame action-shot
picture on the front. Nothing was missing. The kit included:
- 4 body tubes
- 3 couplers
- nose cone
- balsa sheet with pre-cut fins
- card stock with fin tabs
- recovery kit (shock cord, parachute, etc)
- engine mount (tube, centering rings, block, motor hook, etc.)
The body tubes were sturdy and the fins were thicker balsa than typical. During a dry-fit I noticed that everything had such a loose fit that it wouldn't stay together.
 The shock cord is a piece of elastic--not very heat-friendly but designed to be over 6 feet
from the ejection charge so it's probably OK. The nose cone was symmetrical, but was "fuzzy" and required
sanding and sealing.
The shock cord is a piece of elastic--not very heat-friendly but designed to be over 6 feet
from the ejection charge so it's probably OK. The nose cone was symmetrical, but was "fuzzy" and required
sanding and sealing.
I found the instructions easy to follow but some were written in such a way that could be confusing. Every step had hand-sketched pictures. The procedure was fairly straightforward: engine mount, fins, couplers, insert engine mount, parachute, paint.
In some places I went a little out of order. For example, I prefer to insert the engine mount into the body tube prior to attaching the fins.
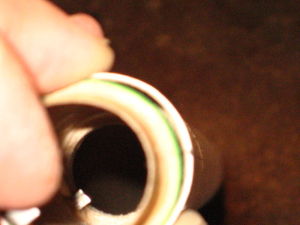
Because of a very loose fit, I tried "building up" the centering rings with glue, but this didn't help. The instructions called for applying glue to the centering rings prior to installing them, but I chose to put epoxy inside the body tube at the appropriate locations. I put epoxy on forward ring location first, installed the motor mount halfway, then put epoxy at the aft ring location.
One of the pictures shows a centering ring in comparison to the body tube. The gap was easily 1/16th of an inch.
 The only "gotcha" involved paper tabs/laminates that are attached to the root
edge of the fins prior to assembly. I was initially confused by the instructions, but after a few re-reads they made
sense. Even so, I bagged the whole idea of the tabs/laminates and used glue to tack the fins on and made epoxy fillets
after assembly.
The only "gotcha" involved paper tabs/laminates that are attached to the root
edge of the fins prior to assembly. I was initially confused by the instructions, but after a few re-reads they made
sense. Even so, I bagged the whole idea of the tabs/laminates and used glue to tack the fins on and made epoxy fillets
after assembly.
My concerns about the couplers being so loose abated when I glued the tubes together. They seemed to stick just fine.
Early on I decided to change the design. Instead of being one long rocket with ejection occurring at the nose cone, I chose to make it separate in the middle to make handling easier. This required changing the location of the shock cord. The elastic wasn't designed to be so close to the engine, but it's still 3' from it so it should be OK.
Finishing:
Finishing such a big rocket proved to be a little tricky because I don't have painting stands, etc. I found that my
saw horses were leaving marks. The rocket is too long to hold it with a stick or something put in the aft end.
I already attached the shock cord, which was an oversight on my part: 6 feet is a long way to reach if I'm holding it by the aft end. I ended up painting one half at a time even though the shock cord made this quite awkward.
If I were to do this rocket again, I would wait to attach the shock cord until painting was completed.
I used bright yellow to help it stand out. I usually don't apply the decals (my son usually picks the colors/scheme and decals rarely look OK), but did this time. No problems.
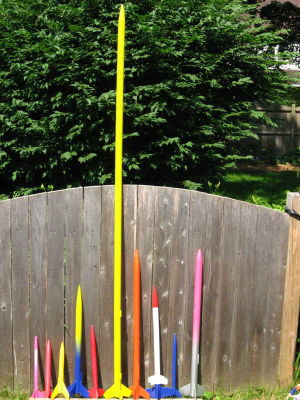
In the "fleet photo", the Six-Footer clearly stands out. For comparison, the fence is nearly 4 feet high.
I gave construction only a 3 1/2 because I felt the components were too loose, and some of the instructions required a second reading (though this is a Level 2 rocket, so presumably it's not the builder's first rocket and likely the directions aren't entirely necessary).
I think it would be easier to finish if the builder kept the rocket in two halves until after it's painted then finish assembly (either as one large rocket or two 3' sections).
Construction Rating: 3 out of 5
Flight:
Prep is straightforward and easy due to the diameter of the body: 3-4 pieces of wadding, parachute, engine, and it's
done. It comes with an engine clip for retention. I will likely purchase a piece of Nomex®
to use instead of the wadding.
The rocket is designed for D12 engines. It could probably handle more power ("E" engine) if the builder is confident of the strength of assembly.
This is a fun rocket to fly. I'm enjoying it as much as some of my others. For me, still being a new BAR, sending a rocket this tall to around 1000 feet under the power of a controlled explosive is a lot of fun. When it's on my launch stand, the nosecone is well over 8 feet high, which looks very impressive on the field. Also, due to it's weight, the lift off is a little slow at first then rapidly picks up momentum. This creates a rather large puff of smoke at lift-off.
The flights have been straight and have had no issues...until the third or fourth time I used it, I didn't pack the wadding correctly and melted the chute. It came down pretty fast with the shock cord making the 2 halves tumble so violently I couldn't catch it. The body has some "compression damage" above the engine mount. I think this can easily be fixed by cutting it open and inserting a coupler at that location to reinforce it.
Recovery:
The included parachute is huge, and the rocket drifts a bit. I've been flying this with a smaller parachute than it
came with. I made pretty strong fillets with JB Weld and have had no problems with the faster descent until the
parachute melted a bit.
I don't think I'm a fan of an all-elastic shock cord system, but it makes sense if it's built in two 3' sections. I'd guess that as the halves come apart during ejection, they have a good amount of inertia and the elastic prevents zippering.
As I'm writing this, I thought an alternative would be to model this rocket after the Quest "Super Bird" and have it come down as two halves.
Flight Rating: 4 out of 5
Summary:
I like this rocket, and if something happened to it, I'd likely purchase it (or a similar one) again. There are only
a few things I'd change about this rocket. I wish the couplers had a tighter fit, and I'd recommend assembling it so it
is in two 3' sections. If building this in 2 parts, I recommend waiting to attach the shock cord until after it's
painted. If you want it as one large rocket, I'd assemble it in 2 halves, paint it, then glue the halves together. The
instructions have some quirks (what's up with those cardstock tabs?) but for the most part are easy enough to follow.
Other Reviews
- Sunward Aerospace CFX-Six Footer! By Frank Casey (October 24, 2007)
( Contributed - by Frank Casey - 10/24/07) Brief: I purchased this kit from a rocketry vendor on eBay for short money, however, when I received it I found that two of the tubes were partially damaged--not badly but there was some creasing (3 inches and 11 inches, respectively) along the length of two of the tubes. Modifications: What I decided to do was to modify the rocket ...
- Sunward Aerospace CFX-Six Footer! By Chan Stevens
Brief: A "lite" Mean Machine, towering at about 6-1/2 feet tall, this longneck is likely to be one of the tallest rockets at any launch. It's a fairly simple build and flies fine on a single D12-5. Construction: I was cleaning up a few loose ends and decided to pull my prize from EMRR's Longneck contest out of my build pile. I'm glad I did as this is a pretty nice kit. ...
 |
 |
Flights
|
|