| Manufacturer: | Sunward Aerospace  |

(Contributed - by Chan Stevens)
 Brief:
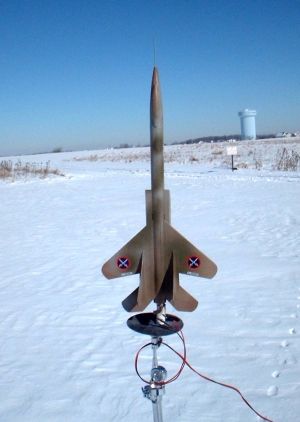
Part of Sunward Model Aerospace's Canadian invasion, this sharp-looking fighter
plane is a nice addition to your fleet. Requires good modeling skills;
accurately rated a skill level 3 kit.
Construction:
In addition to the basic body tube, plastic nose cone, laser-cut balsa fins
(wings) and motor mount, there's a pattern sheet printed on cardstock for a few
of the details. Also included is an 18" plastic chute and peel & stick
decals. The nose cone is very cool with the cockpit cast right into the mold.
Beginning with the motor mount assembly, I noticed a rather unusual approach to motor retention. Rather than the typical motor clip, Sunward has adopted an L-shaped arm that screws into one of the centering rings, and the L can be turned "open" or "closed" for motor installation and retention. I found this approach interesting, and will be curious to see how it holds up over time.
The rest of the motor mount assembly is fairly standard, with an 18mm tube, a couple of centering rings, and internal engine block.
Tube marking is a little trickier than your typical 3 or 4 fin rocket. This is due to the fact that there's an intake assembly that covers about half the tube that must be carefully aligned for proper flight. This assembly is made by cutting the pattern from the cardstock sheet, carefully folding and gluing the edges, then gluing it to the body tube. If you want to get crisp, sharp fold lines, try using the back (dull) side of your utility knife to lightly score the fold lines. Score the "inside" edge (the side that won't be seen). This makes the fold a lot easier, and avoids the sloppiness of a not-quite-straight edge. White glue works best for the paper bonds, and I used yellow glue to attach the intakes to the body tube.
Once the intakes have dried, it's time to bond the rear wings to the fuselage (body tube). The instructions call for bonding the aft wings, followed by the forward wings. Since they adjoin, I decided to bond my aft and forward wings together before bonding to the fuselage. This allowed me to get a perfect fit. I also achieved good alignment by stacking a couple of books on them while they dried to keep them absolutely flat.
Rather than fillet the wings, the instructions call for using reinforcements cut from the cardstock sheet. I went ahead per the instructions, and still found a bit of wiggle, so added a thin yellow glue fillet for added strength. This was especially necessary for the upper twin rudder/tail fins.
While the assembly and alignment of fins seemed fairly obvious from the illustrations, there were some inconsistencies in the instructions and pattern sheets between "top" and "bottom". I'll be the first to admit that my head sometimes winds up in excessively close proximity to my colon, but if you pay close attention to the illustrations and not worry about the labels, you'll be fine.
Following up on the trimming, there are a pair of reinforcing "plates" from cardstock that bolster the intakes. I'm not sure if this was cosmetic, as the intakes seemed fairly strong on their own, but this was a very tricky fit, and I had to trim the pattern down a bit with a sharp X-Acto knife when mounting these.
Recovery is through an 18" plastic chute, with the typical modroc paper tri-fold and elastic shock cord routine. I upgraded mine to a Kevlar® line attached to the motor mount assembly, though the elastic would probably hold up fine for several flights. The plastic chute seemed sturdier than the typical commercial chutes, and includes a nice Sunward logo.
Finishing:
The color illustration on the bag liner shows a very cool camouflage blend of
light and dark blues. Since I didn't happen to have any colors close to that, I
opted for more of a desert camo theme using tans, olive drabs, and various
earth tones. This lead to what looks more like Sunward's Desert Fox kit than
the Ice Storm, and my version is definitely not going to sneak up on anyone in
the frozen Arctic region. However, if I had another shot at it, I'd find a
couple of decent blues and try to match the illustration.
There are plenty of decals, enabling the modeler to choose from a variety of themes, including US and Canadian air forces.
Construction Rating: 4 out of 5
Flight:
First flight for the Ice Storm was naturally, just after a very heavy snowfall
and single-digit temperatures. With hardly a trace of wind though, I couldn't
pass up the opportunity to fly this.
I loaded an Estes C6-5, though the delay sure seemed more like a 7 as I counted it off. After leaving the rod and reaching a little over 100 feet, this arched a little bit and headed out across the field. In heavier winds, I'd be very worried about the weathercocking potential of this one.
At ejection, the chute popped out but seemed a little too bashful to expose itself in the freezing weather so the model tumbled back to the ground rather quickly. Fortunately, the snow provided a nice cushion and there was no damage to the kit.
Recovery:
Recovery seems durable enough, though I was clearly jinxed a bit today.
Flight Rating: 3 out of 5
Summary:
Very cool-looking design, although it might be too risky for windy days. I'll
also try switching to a 48" rod to see if this helps future flights.
Overall Rating: 4 out of 5
Other Reviews
- Sunward Aerospace Ice Storm By Kevin Timmins
Brief: The Sunward Ice Storm is a Spaceplane designed to fly on 18mm B & C motors. This is a very detailed kit , consisting of very high quality parts. It is not a simple kit to build and takes time. But if you do take the time required, your efforts will be rewarded. In flight this is a beauty, with realistic barrel rolls. Construction: The kit contains:- Set of ...
 |
 |
Flights
|
|