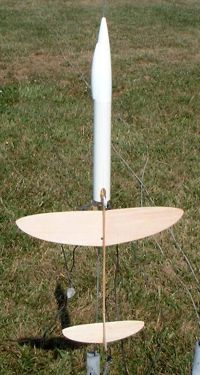
Sunward Aerospace Rocket Glider
Sunward Aerospace - Rocket Glider {Kit} (014) [?-?]
Contributed by Chan Stevens
| Construction Rating: | starstarstarstarstar_border |
| Flight Rating: | starstarstarstarstar_border |
| Overall Rating: | starstarstarstarstar_border |
| Length: | 14.00 inches |
| Manufacturer: | Sunward Aerospace  |
| Skill Level: | 5 |
| Style: | Glider |
Brief:
Slightly misnamed, this is a boost glider, not strictly a rocket glider. It's a standard boost pod configuration made from laser-cut parts with an easy to build design.
Construction:
Parts were all good quality and the laser-cut work was very good with clean cuts and only small areas needed to be finished off to free the parts. In the surprisingly large bag I found:
- BT-56 (8") body tube
- Plastic nose cone with canopy
- BT-20 motor tube
- 20/56 centering rings
- Metal motor clip
- Balsa wing halves
- Balsa stabilizer halves
- Balsa rudder
- Balsa boom
- Streamer/rubber shock cord
- Peel n stick trim decals
Construction is fairly easy on this although is a bit time consuming. It is rated a skill level 4 kit, however, I think that could be overstating the complexity a bit. I wouldn't necessarily recommend this as a first glider, but if you have any previous boost glider experience under your belt you'll find this fairly easy.
Sunward's instructions are clearly written and include decent illustrations, and if you're so inclined are written in both English and French. Not knowing French, I find the duplication distracting and would rather see them go the route that most instruction manuals take these days--written start to finish in one language (English), followed by start to finish in a second language.
The pod assembly is quick and easy work: slot the BT-20 motor tube, slip on the motor hook, glue on a couple of centering rings, then glue the assembly inside the larger pod tube. You'll finish it up by gluing on the launch lug and a retainer assembly where the glider hook slips in during boost. I can understand the efficiency of using Sunward's stock BT-56 tubing and nose cone, but for this glider design, the larger/bulky pod tube is a bit of a weakness. Most other boost gliders use minimum diameter tube in their pod design.
The glider construction is where the real work takes place. While there are a few low-effort designs out there (any Edmonds kit, Quest QEZ glider, etc.), most gliders involve a lot of sanding and hand work to properly airfoil the flying surfaces. I spent a good hour progressing from 120 grit down to 400 grit, working the airfoil into my wings and stabilizer. For this design, only the top surfaces are airfoiled.
The wing halves are designed to be mounted at an 18 degree dihedral. This is a pretty detailed measure, and I think most builders would benefit by having the math done for them by calling out the target height of the wing tip from a flat surface instead of a dihedral angle.
After sanding, you can bond the wing halves, stabilizer halves, and rudder to the boom. The instructions were not that clear, but if you pay careful attention to the drawings, you'll see that the stabilizer is to be mounted flat on top of the boom. I deviated a bit from the plan, and in order to build a slight incidence into this (generating more lift), mounted them to the side of the boom at a slight cant.
Construction wraps up with attaching the rubber shock cord via paper tri-fold mount to the BT-56. (I'm not big fan of paper tri-fold, but noticed this pattern appeared a little too small for the width of the supplied rubber.)
Finishing:
Gliders in general should not be painted. The header card for this one shows an unfinished bird, trimmed with a couple red checkerboard pattern decals. That's the scheme I went with, but you could also consider using a light thinned dope on this or Japanese tissue or even colored magic markers. If your glider goes very high or far, coloring can aid quite a bit in tracking and recovery.
Construction Rating: 4 out of 5
Flight and Recovery:
The recommended motors for this are A2-2 (good luck finding those in the US), B4-2, and B6-3 (or in the US, probably have to go with a -2).
Prior to flight, I spent an evening hand tossing and trimming the glider for flight. After following the instructions for glider construction (with noted slight deviation for stabilizer), I found my CG well aft of the wing aft edge. As a general rule of thumb, the CG of a glider should be right at the CP, which tends to be where the wing's airfoil is (roughly a third of the way back from the front edge). I needed to add 5 BBs for nose weight before I could get the glider to fly through a stall.
For the first flight, I opted for a B4-2. I got a very good boost, looping a little during coast phase. At apogee, I got a clean transition and the glider spun around into a decent glide for around 60-90 seconds although it still showed a bit of a porpoise stall. I added a little clay and flew it a second time, after switching to a B6-2. The B6 turned out to be too much thrust and I lost one wing half during boost. The wings mounted at a dihedral angle are very precariously bonded to my boom.
Having had to reattach the wing, I'll now be looking at more trimming/adjusting, although based on the first flight, I would rate this a pretty good glider.
Flight Rating: 4 out of 5
Summary:
I would rate this a 4 as a good boost glider although it's not exactly high performance. It's heavy duty enough to handle winds of 6-8mph, so you don't have to wait for one of those perfect weather days to fly.
Its main PROs are solid/stable design and it is fairly easy to build. It's main CON would be the short, fat pod. I'd also consider changing to a pair of tip dihedrals rather than a single wing center dihedral.
Overall Rating: 4 out of 5
 |
 |
Flights
|
|
Kirk Greenfield (July 5, 2014)
Thank you for the review and suggestions. I found an old dusty package for this kit at the area hobby shop and invested. I too find the English and French instructions interspersed a distraction, but acceptable.
Noticed this is a skill level 5, somewhat more advanced than I have attempted before, but with about five rockets from level 2 to 3 under my belt, I figure I'm ready to try this. Plus, I got a deal on it, and the hobby shop clerk got to move something that wasn't moving.
I'm curious about where to position the launch lug on the body tube. Should it be at the base, flush with the end of the tub, as the rudder is? The instructions don't say and there is no diagram.
Second, why is there no instruction on how to hold the wings while they are gluing to the boom? So you're supposed to hold them to 18 degrees each. Just how is one supposed to do that AND attach them to the boom? The boom is only 1/8 inch wide on top...that's 1/16 or LESS to adhere to. Plus, how does one hold it in position long enough for yellow wood glue to dry? Seems like there has to be a better way to communicate this or SHOW how it is to be done. I guestimated, and found I have 14 degrees dihedral angle...not the 18 recommended. I've been told to attempt to fly it this way and add some weight to the nose to trim it. But the instructions fail to say HOW or WHERE to add the weight other than "use some scrap wood on the nose"... HUH? .
|
|
H.W.H. (May 8, 2007)