| Construction Rating: | starstarstarstarstar_border |
| Flight Rating: | starstarstarstar_borderstar_border |
| Overall Rating: | starstarstarstarstar_border |
| Manufacturer: | Tango Papa  |
Brief:
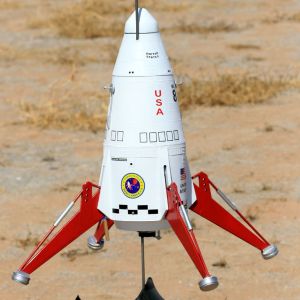
2x upscale of classic Estes Mars Lander. 38mm motor mount accommodates a range of recommended motors in the G-I
range, some of which require a 29mm adapter.
Construction:
Parts list:
- 1 7.5" x 7" long PML phenolic body tube
- 2 7.5" tube couplers
- 1 Nose cone
- 1 3" dia long parachute tube
- 1 38mm motor mount tube
- 1 set assorted plywood centering rings
- 4 pre-cut plywood lander legs
- 8 pre-cut balsa gear housings
- Lots of assorted pre-printed shrouds, gear supports, gear housing covers, wrap-ons, etc.
- 8 1/4" dia aluminum rods for use on lander leg bottoms and internal supports
- 11 dowels for construction of landers lags
- Assorted hardware (screw eyes, screws, washers, nuts, bands, Kevlar® cord, etc.)
- 1 length of plastic tube for internal hinges and leg strut cylinders
Included instructions are thorough and probably mirror the techniques used in the 3.9" and 1.6x upscales offered by Tango Papa. Instructions basically follow the logical sequence introduced by the Estes Kit 40-odd years ago. Since this is complex mid-to-high power rocket, previous experience is a must. No real "gotchas" discovered by me, just make sure you read through the instructions several times to become familiar with the steps. If you take your time, follow the instructions, and build to fly, this model has the potential to be a great performer.
Be careful rolling the two major shrouds. They'll crease if you're not careful. Other than that, just have fun building this beast.
Finishing:
Pros: The fabric paint provides a nice touch to the external detailing although in reverse compared to the classic
Estes kit (fabric paint is raised, Estes wraps are embossed and therefore the detail is recessed.)
 It's not that easy to get continuous straight lines with this stuff, so practice, practice,
practice. One good thing is you can easily remove the paint (wet or dry) to make corrections. Just let adjacent paint
dry before you proceed so you don't mess up the acceptable work.
It's not that easy to get continuous straight lines with this stuff, so practice, practice,
practice. One good thing is you can easily remove the paint (wet or dry) to make corrections. Just let adjacent paint
dry before you proceed so you don't mess up the acceptable work.
One gotcha that eventually worked itself out for me was painting the landing strut cylinders. Those clear plastic flexible tubes on the upper dowel of the legs. Standard silver paint just would not dry once applied and stayed tacky for months. I decided to just cut the tubes off and start over. I cut new tubes from hardware store bought tubing. I slit it lengthwise so I could apply it over the dowel, secured with a bit of medium or thick CA. Then I took plain white mailing labels with sticky back and cut to size to completely cover the rubber tube. This also provided an additional way to secure them to the dowels since I had to slit them to get them to fit over the dowel. Once those were complete I soaked the mailing labels with thin CA and let dry before sanding smooth and painting them silver. This solution was perfect and the paint dried perfectly.
I used Wal-Mart gloss white in a spray can to finish the body before applying the provided decals. I used similar red and silver paint as appropriate. Tom's decals are excellent quality and I had no problems applying them. I haven't applied a gloss coat yet, maybe after the next flight.
 Tom provides no ballast for this beast. Tom calls for 13 ounces I hollowed out the nose cone
with a spade bit and used 5 ounces of fishing weights. I think I actually used a bit more than 5 ounces - maybe 6 or 6
1/2 ounces to be on the safe side and account for excess epoxy used during construction of the aft end of the rocket.
For the weight in the ascent shroud, I used 8 ounces of sticky-back thin lead weights I bought at a Hobby Bench. I
applied them around the inside circumference of the ascent shroud, ensuring I left enough space near the top of the
shroud to clear the parachute tube. I then secured each strip of weights with a good slathering of epoxy. This method
worked for me and should keep the weights secured to the inside of the ascent shroud.
Tom provides no ballast for this beast. Tom calls for 13 ounces I hollowed out the nose cone
with a spade bit and used 5 ounces of fishing weights. I think I actually used a bit more than 5 ounces - maybe 6 or 6
1/2 ounces to be on the safe side and account for excess epoxy used during construction of the aft end of the rocket.
For the weight in the ascent shroud, I used 8 ounces of sticky-back thin lead weights I bought at a Hobby Bench. I
applied them around the inside circumference of the ascent shroud, ensuring I left enough space near the top of the
shroud to clear the parachute tube. I then secured each strip of weights with a good slathering of epoxy. This method
worked for me and should keep the weights secured to the inside of the ascent shroud.
Another item you'll need to provide is an inch or so of 38mm motor tube for the landing pads. Where Estes used an 18mm engine block between the two discs, Tom tells you to cut some 38mm motor tube. You should have some left over from the engine mount construction. Also, the landing pads (2 discs for each leg) are thick balsa. You might upgrade these by visiting a craft store and look for some round wooden discs. For the top discs, you'll need to cut an oval for the smaller end of the landing legs to fit into, but carefully placed holes with a drill bit should accomplish that, followed by cleaning up with a small rasp or file. The small balsa side pieces on the pads can also be upgraded with hardwood from the hobby shop balsa display. Use plenty of epoxy when gluing everything together and they should hold together. The token amount of added weight over balsa should be negligible when using the powerful motors while providing additional strength to the landing pads.
Construction Rating: 4 out of 5
Flight:
Tom provides a table of recommended motors to include expected altitude, velocity, ejection delay, ejection velocity,
and which motors work best with engine ejection and electronic ejection. The primary concern being shredding the chutes
if the expected ejection velocity exceeds the "speed of nylon."
Despite starting my lander in fall of 2006, I completed all the major subassemblies to flight specs including the entire airframe within a couple months then I let it sit for a few months. I decided to finish my lander in time for the March 10, 2007 Superstition Spacemodelling Society launch at Rainbow Valley Arizona.
Recovery:
The kit provides for some Kevlar®
thread that attaches to the forward motor mount centering ring. I secured that in two places, forming an upside down
"V". At the apex of the "V" I attached the supplied half-inch elastic shock cord, which is quite a
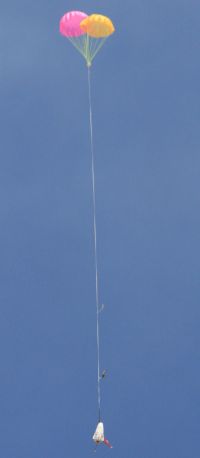
few feet long. I ordered the kit with dual 36" nylon 'chutes. Nose cone has three screw eyes, one for the shock
cord and each of the chutes. For recovery I slipped a 24" long Nomex®
shock cord protector on first then attached a Nomex®
chute protector for a 4" tube above that. I folded the shock cord into several individual packets, each secured by
a wrap of clear tape. After loading those into the chute tube, I affixed a smaller Nomex®
chute protector on the shock cord and finally prepped and packed the twin chutes according to the kit instructions. At
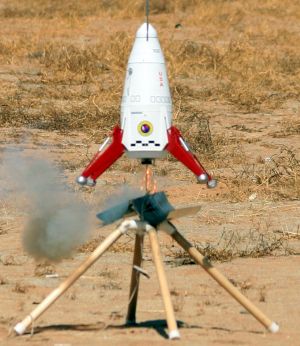
the launch site, I prepped the I211W in the 38/480mm casing. Because the motor included a medium delay element, I
removed delay about a 1/4", thinking I'd be removing about 4 seconds of the delay. Launched from a far pad, the
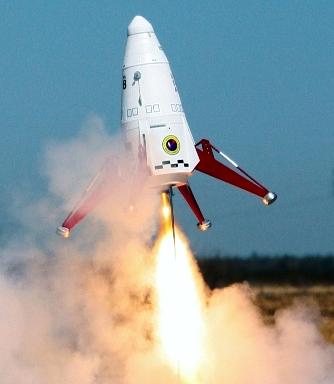
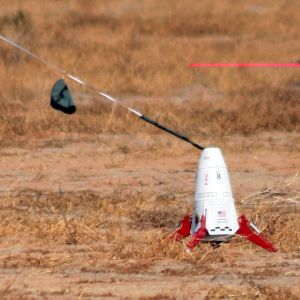
I211W ignited immediately and the lander shot off the pad with a roar. Ascent was dead straight though ejection
occurred a bit early.
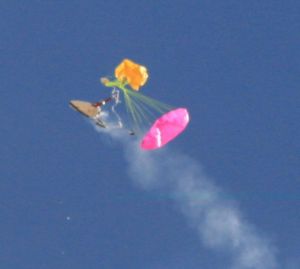
In the end I might have removed a bit too much because I had a fairly early ejection that may have caused the minor damage experienced. That damage was limited to the shock cord apparently tangling around a lander leg and literally removed it from the internal mounting lug. Through my camera lens I noticed the leg falling to earth and it was recovered near touchdown location. The chutes deployed perfectly and the lander settled into a respectable descent, eventually landing upright on the three remaining legs. Upon reaching the lander, I discovered not only had the leg been removed but the associated landing pad assembly at the end of the leg had been violently removed. Fortunately, it was all repairable. I also noticed there was some minor nose cone damage from impacting the leg and a missing antenna assembly, which also was recovered thankfully. Rubber bands for the leg shock absorption could be upgraded by builder to springs. I used some small springs from hardware store on 2 legs to test versus the bands. Both worked equally well, but the leg that was torn loose had bands on it--maybe that helped minimize damage?
 Overall, the launch and landing was a real crowd pleaser with many folks
stopping by before and after to inspect my modest collection of various landers I was hoping to launch that day.
Overall, the launch and landing was a real crowd pleaser with many folks
stopping by before and after to inspect my modest collection of various landers I was hoping to launch that day.
Flight Rating: 3 out of 5
Summary:
Excellent selection of components by Tom Prestia allows the experienced builder to create a 2x jumbo version of the
Mars Lander with minimal additional effort of parts scrounging. This is a very cool kit! I am definitely considering
adding the 1.6x and 3.9" versions to my fleet.
Pros: Almost perfectly mimics Estes' version to the letter. Instructions fairly easy to follow. Nice of Tom to include a motor chart with expected engine performance.
Cons: Not too many I can think of. I'm not sure why I had trouble with the paint drying on the shock cylinders. Maybe it was my choice of paint. A recommendation in the instructions would be nice.
Overall Rating: 4 out of 5
 |
 |
Flights
|
|