| Construction Rating: | starstarstarstarstar_border |
| Flight Rating: | starstarstarstarstar |
| Overall Rating: | starstarstarstarstar |
| Manufacturer: | Tango Papa  |
 Brief:
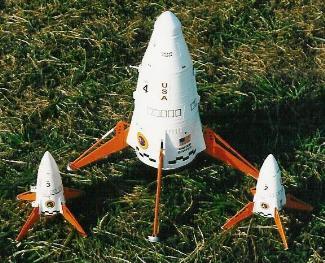
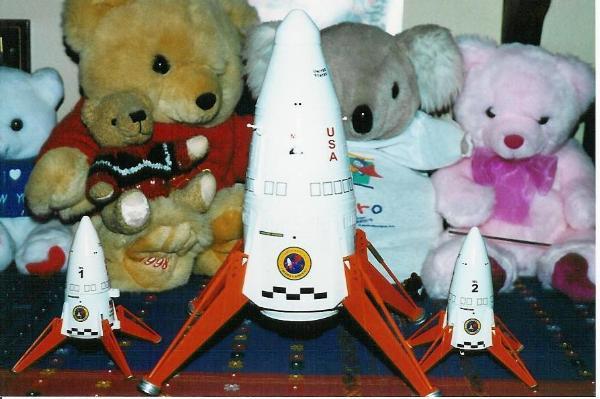
The Tango Papa 3.9 Lander is technically an upscale of the classic Estes K-43 Mars Lander, first released in 1969. In one of those ‘what were they thinking’ decisions, Estes discontinued the Mars Lander kit in 1983, and original Estes Mars Lander kits now go for major bucks on eBay, with even mediocre partially built kits selling for well over $100. Fortunately, the Tango Papa 3.9 Lander is so close in size to the original (roughly 5% larger) that even sitting close to an original most people will never notice the difference. I had built an original Estes Mars Lander back in 1970, and it was one of my favorite rockets. When I became a BAR last year, building a new Mars Lander was high on my priority list. The Tango Papa 3.9 Mars Lander appeared to be an ideal alternative. As it turns out, the Tango Papa 3.9 Mars Lander is actually a much better kit than the original.
Construction:
I ordered my 3.9 Mars Lander direct from Tango Papa via snail mail. Although you can download an order form off the Tango Papa website - www.tangopapadecals.com - you cannot order online. You must either call in your order (if paying by credit card) or send it in via snail mail. The kit showed up about 10 days after I mailed my order, which was quite impressive given that I’m located on the opposite coast, plus I had ordered several sheets of decals along with the 3.9 Lander. Tom Prestia sells his Lander kits with or without parachutes – the 3.9 Mars Lander can be had with either a single 24” or dual 18” parachutes. Since I have a supply of good quality 24” nylon parachutes I ordered mine without a ‘chute. Aside from the intentionally omitted parachute, all the parts were present when I opened the bag. The kit includes all the parts necessary to build the 3.9 Mars Lander except for the required nose ballast (more on that later).
The basic layout and construction of the kit is very similar to the Estes original. The kit contains three body tubes – the main body tube is a PML 3.9 phenolic tube that appears nearly indestructible, the parachute tube is a generic BT-60, and the engine mount is a foil lined ‘toast resistant’ BT-50. There is a large pre-cut sheet of heavy card stock centering rings, another pre-cut sheet of lighter card stock parts, several sheets of shrouds and wraps, laser cut balsa legs, dowels, aluminum rods, both Kevlar® and elastic shock cords, decals, a balsa nose cone, etc. In other words this is a large, complex kit. All of the parts in my kit were of very high quality and arrived in good condition. The balsa nose cone did have some small dents but they were easily repaired with Elmers wood filler. One minor quibble – the BT-50 and BT-60 body tubes were not cut to length (in fact they had a rather rough cut on one end) – you are instructed to cut them to length during construction. Tom P. has made several improvements compared to the original. The 3.9 Mars Lander is much stronger, using the incredibly strong PML main bodytube and aluminum rods in the legs and leg supports. Plus, the base of the rocket can be readily removed to remove and (if necessary) repair the landing legs. Unfortunately this adds considerably to the weight, and while the original Estes Mars Lander was designed for 18mm motors, the 3.9 Lander is designed for 24mm motors - needed for a rocket this big and heavy. If you are thinking of an even bigger motor, conversion of the 3.9 Mars Lander to a 29mm mount would be problematic for two reasons: First, any extra motor length would eat into the already marginal parachute volume. Second the legs attach to the motor mount tube – changing the motor mount to a larger diameter would necessitate significant rework of the leg attachment.
Like the original, the 3.9 Lander is a complex rocket, and it took quite a while to build. Although the kit includes an illustrated booklet of instructions, theses instructions could use some work. I sometimes struggled to understand what was being said in the 3.9 Lander instructions. On several occasions I had to refer to a copy of the original Estes Mar Lander instructions to completely understand what I needed to do. The instructions also assume a certain level of experience and competency in building rockets (which is probably fine for the BAR, but could prove problematic if someone relatively new to the hobby is trying to build it). I’d definitely recommend going to Jim Z’s site and downloading a copy of the original K-43 Mars Lander instructions as an aid to building the 3.9 Mars Lander. Despite the difficulties with the instructions, the Lander was reasonably straight forward to build (given the kits complexity), and the pre-cut parts all fit together nicely ! with a minimum of trimming and/or sanding. While unusual in a model rocket, the aluminum rod was easy to work with – it’s easily cut with a razor saw, and adds greatly to the strength of the Lander’s legs and leg hinges. I ended up using my Moto-tool to cut the leg slots in the PML main body tube. The tube is so hard and strong that a brand new X-acto blade barely scratched it. One other construction tip – the kit includes six small plastic beads. Although the instructions do not mention this, they are two different sizes – the four larger beads are for the leg hinges, the two smaller beads are for the Lander antenna.
Unlike the original, which included embossed wraps, the 3.9 Lander wraps are simply printed on heavy stock. To get the raised effect of the original embossed wraps, Tom includes a bottle of fabric paint, which you can use to ‘paint’ the raised lines on the wraps prior to assembly. Although the fabric paint produces a nice raised effect, getting straight raised lines ‘freehand’ proved nearly impossible, at least for my less than steady hands. The end result doesn’t look all that bad on my finished Lander, but it could be much better. I’m going to experiment with methods of using a straight edge to help get straight lines with the fabric paint. If I come up with a good method I’ll add it later as a tip.
As noted previously, the base of the Lander is removable, allowing access to the leg hinges. This allows complete removal of the legs and replacement of the rubber band “springs”. The base is held in place by some two-piece plastic rivets, which can be accessed by removing the main engine nozzle (which is a simple friction fit over the engine tube). The space is tight, and installing or removing the rivets requires care and some good tweezers or small needle nose pliers.
Finishing:
Finishing of the 3.9Mars Lander was straight forward, especially since you can remove the legs and engine nozzle and paint them separately. The seams on the PML body tube are rather pronounced, and filling them took two applications of filler (I used Elmer’s Carpenter’s Wood Filler, thinned with a little water), but the filler, a couple coats of primer, and two coats of Krylon gave a nice, smooth finish. The decals are typically high Tango Papa quality, but the decal film material is thin so you need to use care to make sure the decal doesn’t tear or curl over. Tom P. also had a little fun with the decals – the Mars Lander “emblem” decal reads “Tango Papa Mars Lander” (instead of Estes), and the “Martin Marietta” decal reads “Tango Papa Aerospace” rather than Martin Marietta. If you'd rather have the original “Estes” and “Martin Marietta” decals, those are also available from Tom P.
To counteract the effect of the heavy duty construction on the rocket’s CG, you must add ballast to the front and/or nose of the 3.9 Mars Lander. I hollowed out the balsa nose, and epoxyed in 2 ounces of lead shot, which was just right to get the desired CG. You can also add ballast to the inside of the front shroud during construction, which may be a good idea since having all that weight in the nose could result in some significant damage if it hit the body of the Lander when the parachute deployed. The Tango Papa 3.9 Mars Lander is much heavier than the Estes original. Mine weighs in at just over 10 ounces – 12 ½ ounces flight prepped with an E18-4 RMS (compared with the admittedly optimistic 3.0 ounce weight Estes listed in their catalog for the original Mars Lander).
I'm giving the 3.9 Mars Lander a 4 1/2, downrating only for the marginal instructions.
Construction Rating: 4 out of 5
 Flight:
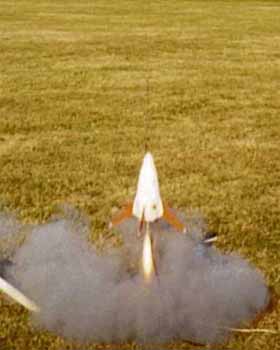
The 3.9 Mars Lander can use most short delay 24mm motors. Tom includes a list of popular E and F composite motors that he recommends, along with the estimated altitude and ejection velocity for each motor. However an Estes D12-3 will also work nicely. Engine retention is by the good old Estes engine hook, which works well for the 24mm motors.
I used an E18-4W for the maiden flight of my 3.9 Lander, and it was spectacular. Noisy, smoky, and nearly straight up to an estimated 350 feet. Ejection was well past apogee, but otherwise the flight was perfect and very favorably received by the small crowd. For its second flight, I decided to try an Estes D12-3. Unfortunately that didn’t go as well, but it was my own dumb fault. The flight was again nearly perfect (estimated altitude 200 feet), right up to the point where the parachute didn’t open (whoops). Apparently I didn’t use quite enough recovery wadding, and the ejection charge made a small spot weld on the nylon parachute, in just the right place to effectively prevent it from unfurling. The Lander impacted sideways, doing serious damage to two legs and lesser damage to a third. Having the landing legs readily removable was a huge benefit, making it relatively easy to repair and repaint the damaged legs, and my 3.9 Lander was nearly good as new just 24 hours after the hard landing.
Recovery:
The 3.9 Mars Lander uses a combination of both Kevlar® and elastic shock cord (a technique I regularly use anyway), which worked nicely. As noted, Tom gives the option of either two 18” or one 24” parachutes. I opted for the single 24” in part because I felt a single ‘chute was less apt to get tangled, however the dual 18” ‘chutes give a little more effective parachute area (and maybe the chances are better of at least one opening?). At any rate the single 24” parachute provided a nice touchdown when it opened, with the Lander remaining upright after landing.
Anyway I give it a perfect 5 for flight and recovery, since the melted parachute was user error. I just need to be more careful packing the parachute and wadding next time.
Flight Rating: 5 out of 5
Summary:
Overall this is a great kit, as good or better than the original Estes Mars Lander in almost every respect. It’s a complex, involved rocket to build, but then again so was the original. Tom P. has done a superb job of recreating one of rocketries all time classics, and even improved on it in the process (specifically making it stronger, and making the legs removable). In addition to the 3.9 Mars Lander, Tom also offers a 1.6X Mars Lander (for 29mm motors) and a 2.0X Mars Lander (for 38mm motors). He also sells “downscale” Mars Lander decals, which fit the OOP Estes Mini Mars Lander and RTF Mini Marz Lander (which are a nearly perfect half scale of the original). I’ve already obtained a 1.6X Lander and just need to find the time to build it, and I’ll probably get the 2.0X Lander even though we don’t currently have anyplace locally to launch high power right now.
Overall Rating: 5 out of 5
 |
 |