The Blue Camero - 2010 Design This Spaceship Contest Entry
By Jim Bassham
2011-05-01
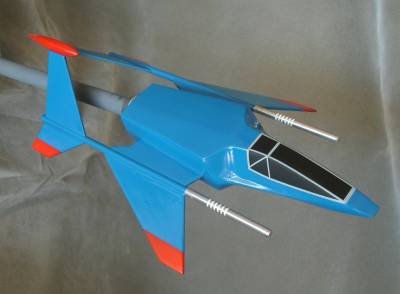
This is my entry for the 2010 design this spaceship competition. It is a plane-like rocket with a 24mm motor mount and utilizes rear-ejection for parachute deployment.

In looking over last year’s “Design this Spaceship” pictures I was really at a loss for what could possibly fly. I chose the blue plane-like design ( #4), because it seemed to be a shape that might fly with enough nose weight. But I had my doubts.
Materials and Assembly
2011-05-01
This rocket uses:
- BT-50 Tube 5" Long
- BT-55 Tube 5" long
- BT-50 to BT-55 centering Ring (2)
- BT-50 to BT-60 Centering Ring
- BT-50 Thrust Ring
- "E" motor Clip
- Two BT-5 nosecones (BNC5E and BNC5AX from Balsa Machining)
- 1/4", 1/8" and 3/16" sheet Balsa
- 5/16" birch dowels 12 3/8" long (2)
- 3/16" launch lug
- Lead Sheet for weight
- Heavy Kevlar Cord
The construction begins by cutting out a fuselage profile from 1/4" balsa. Cut out the nose weight area and fill with lead sheet. It is important to get as much weight forward as you can. Cut a groove in the 1/4" sheet and glue in the shock cord with epoxy or slow CA. When done sandwich the lead and Kevlar in place with profiles cut from 1/8" balsa. Press under books and let dry.


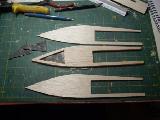
While that dries, cut out and glue up the three pieces that make up the side panels. Be careful to get the grain direction correct for maximum strength.

Glue the thrust ring 3 1/4" from one end of the BT-55. Cut a 1/8" slit behind thrust ring and insert engine hook. Hold it in place with tape.
Cut slots in one 50-55 ring and in the 50-60 ring to clear engine hook. Slide the 50-55 ring onto the rear of the tube, over the hook, and glue it 5/8" from the rear of the tube. Butt the 50-60 ring against it, and glue in place.
Cut a slot in the remaining 50-55 ring deep enough to clear the shock cord. Thread the shock cord through the BT-55 and glue it into the fuselage profile centered in the slot. Thread the Kevlar through the 50-55 ring and glue it to the entire length of the engine mount with epoxy or thick CA. Glue the 50-55 ring flush to the front of the tube.


Glue the assembled sides to the body and the main tube.


Block off the end of the BT-55 tube with scraps of balsa.

Enclose the main tube with the Nacelle parts. Cut the parts from the patterns in 3/16" balsa and rough in the shapes. Fit the cockpit sides over the Nacelle covers and to the sides - bevel the edges of the parts as needed for a good fit.


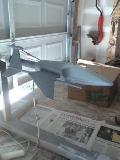
After the shape has dried, begin roughing it in with 50 grit sandpaper, forming the final shape. Refine the shape and work with finer and finer grit papers until you have a fairly smooth shape sanded to 100 grit.

Fill the gaps in the rear of body with scrap balsa.

Using Elmer's carpenter's wood putty, fill and smooth the shape giving it the curved look. Keep sanding and filling until you get the shape where you want it. At the same time cut out and fill all the remaining fin shapes
.

Cut the shoulders off the nosecones and glue them back-to-back. Fill and seal them with the fins.

Bevel the 50-60 centering ring to accept the paper tailcone and attach it.

With the two 12 3/8" dowels, make three marks from the back at 1/4", 2 7/8", and 4 1/4" from the back.
Tack the dowels to the fuselage with the 4 1/4" mark at the back of the fuselage.

Tack the nosecones to the top of one tailfin with thin CA, (You may need to "cup" the top of the fin for a good fit).

Tack glue both tailfins to the nosecones and the dowels between the two remaining marks. Check your alignment, and adjust if needed.

Tack glue the lower tail fins and wings to the dowels. I canted the wings downward to a bit more than in the drawing - it looked more stable that way. Once you are satisfied with the fin positions fillet everything with thick CA for a final glue joint.


Glue a 3/16" launch lug along the bottom centerline.

Painting and Finishing
2011-05-01
The rocket was first primered and then wet-sanded to 400 grit.The first color I painted was gray for the canopy outline.

I then painted the white for the gun stripes and the red wingtips.


I masked the gray lines for the canopy and the white stripes for the guns, then painted the canopy panels black.

After masking off the canopy completely and the wingtips, I painted the guns silver. With guns masked I was able to paint the rest of the rocket blue.

When everything was unmasked, i finally got to see the result. I thought it came out pretty close:


Flight
2011-05-01
My flights can be seen at:
http://www.youtube.com/watch?v=GervJfLPd4g
All my flights were made at Tripoli Central California's "October Skies" event on 10/16/10.
Per the contest requirements, this rocket uses rear-ejection and a 24mm motor mount. In this design, the chute has to be wrapped around the motor tube, the shock cord coiled and inserted into the front of the tube, and everything slid in the back. I was able to get a 20” plastic chute around the motor tube, but I could not fit a fabric chute as planned. In retrospect, it would be better to make the main tube a BT-60 and I would recommend that to anyone crazy enough to try and build this thing. But, since it was far too late to change that, I stuffed a 20” chute in there and put a D12-5 in the back (With a spacer, since this rocket can fit an “E”), and confidently took it to the pad as if I had every belief it would fly. The winds were fairly strong, blowing a steady 5 to 10 mph all day. I thought it had about a 50/50 chance of going higher than 10 feet before going into a death spin, so when they held my flight for an aircraft in the vicinity, I had to laugh. The chances of my reaching 1000 feet where the plane was flying seemed a bit remote to me. After the aircraft cleared, they lit it, and to my surprise it took off with authority. The craft spun very rapidly, and weather-cocked pretty good, but it definitely flew. It was going very fast at ejection, and the plastic chute really never had a chance. It shredded at apogee, and the rocket came in by parawad pretty hard into a plowed field. The chute was shredded, but to my surprise the rocket was in one piece. The nose was chipped up pretty bad, but it was still flyable, so I got another chute and tried again.
For the second flight I pulled out the spacer and put in an E9-4, and a new plastic chute. The rocket took off like a bat out of hell and spun like a top but flew really fast and surprisingly high. This time the chute came completely free and floated away, while the rocket plunged down in a “tumble” recovery into the same plowed field.
The tail was scorched from the flight, and the nose was pretty beat up, but it definitely had the “up part” of the flight down. I just needed better recovery.
For the last flight, I decided to try a contest streamer I had on hand. With some duct tape I attached the 50” streamer onto the motor mount and managed to stuff it into the tube. I put in a C11-3 and took it out to the pad.
The third flight went up fine. The spin wasn’t too bad, and it went straighter than previous flights. The streamer deployed perfectly, and stayed with the rocket, but barely slowed the decent. As luck would have it, the rocket came down between vehicles and didn’t hit anyone or anything. So I called it a day at that point.
Overall Impression
2011-05-01
This rocket needs a good, nylon or cloth chute to take the force of the rear-deployment. In order to fit that, there needs to be more space between the motor mount and the body tube. I believe this could be built with a BT-60 instead of a BT-55 and there would be enough room – Lesson learned.
This rocket is a real head-turner and looks really cool in person. With it's heavy weight, however, it really needs a cloth or nylon chute to take the stress of deployment, and that requires more space in the tube for a parachute.
It is a great-looking rocket that goes up cool, but comes down too hard.
 |
 |