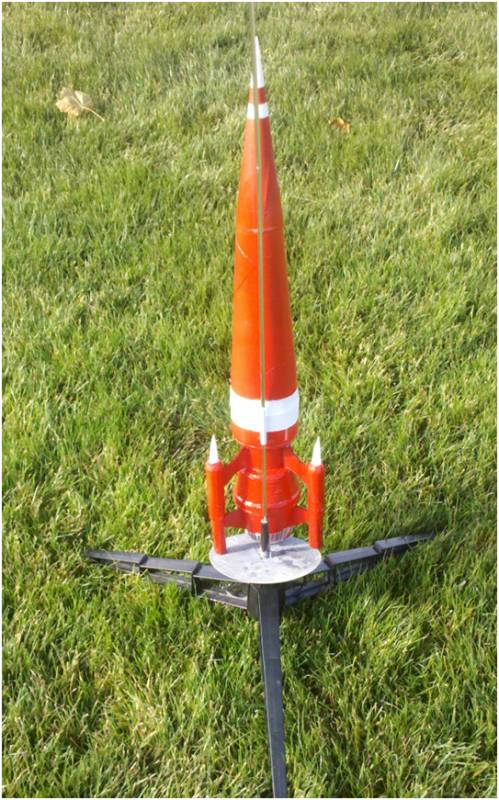
The Red Corkscrew - 2010 Design This Spaceship Contest Entry
By Tucker Lund
2011-08-15
The Red Corkscrew is my entry in the Spaceship Design Contest.
The Red Corkscrew
2011-08-15

Construction List:
-
2- Polystyrene cups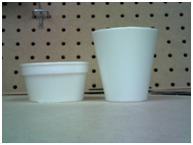
- 1- Burned out 24mm engine
- 1- Toilet Paper tube
- 1- Plastic Water Bottle (28 oz. / see picture below)
- 1- 1/4" Acrylic Sheet
- 1- 1/8" Cardboard Sheet
- 1- 1/8" Sheet of Particle Board
- 1- 18"x9" Sheet of Posterboard
- 1- 1/8" Balsa Sheet
- 1- 1" Styrofoam Sheet
- 1- 3 1/4" BT-50 Tube
- 1- 2 1/2" BT-60 Tube
- 1- 2 1/4" BT-20 Tube
- 3- 2 3/4" BT- 20 Tubes
- 3- 3/4" BT-20 Elliptical Nose Cone (Balsa)
 3- 4" BT-5 Tubes
- Masking Tape
- 1- 8-11" Sheet of Copy Paper
- 1-1/4" Dowel
- 3- 1/2" Wire Connectors
Assembly:
Bottom Section
1. Cut the lip off one of the Styrofoam cups.
2. Make a mark 1 1/4" from the bottom of the cup and cut.
3. Drill a 1" hole in the base of the 2nd cup.
4. Mark it 2" from the bottom and cut. Save the bottom half.
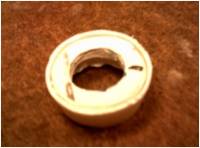
5. Using a 1" Forstner Bit drill a hole in the Acrylic Sheet.
6. Find the center of the hole and, using a 2" hole saw bit, drill around the hole, making a centering ring.
7. Place the new centering ring in the bottom half of the 2nd cup until it's tight. Then make a cut so the cup is flush with the centering ring.
8. Glue the centering ring into the cup.
9. Cut 1/2" from the burned out engine. This makes the centering ring.
10. Glue it into the BT-50 body tube until it's flush. 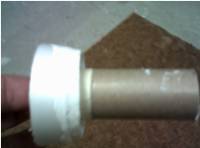 11. Glue the body tube into the acrylic centering ring. The body tube's engine block end should be flush with top of the acrylic centering ring.
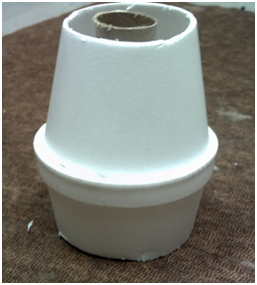
12. Drill a 1 3/4" hole in the cardboard
13. Find the center of the newly drilled hole and, using a 2 7/8" hole saw bit, drill around the hole. Making a larger centering ring than the acrylic one.
14. Glue the cardboard centering ring into the lip of the 2nd cup.
15. Apply a bead of glue the inside of the cardboard centering ring. Then, place the BT-50 tube with the centering rings into the cardboard. The body tube should stick out of what would be the top of the cup. This will make the bottom portion of the cup, (in the tube's centering ring,) fit snuggly into the hole in the cardboard.
16. Glue the first, taller, cup onto what you just glued. The wider part of the cup should fit somewhat into the 2nd cups lip.
17. Glue the toilet paper tube to the top of the bottom portion. It should fit right on top of the acrylic centering ring.
18. In the balsa, drill a 1 3/4" hole.
19. Find the center and, using a 2 1/2" hole saw, drill around the previous hole. As you might have guessed this creates a balsa centering ring.
20. Sand the balsa centering ring down at a slant.
21. Glue around the toilet paper tube and around the top of the bottom section. Slide the balsa centering ring on.
Nose Cone
1. Mark the 18" side of the posterboard at 9".
2. Cut a piece of yarn about 19" long.
3. Tie the yarn into a loop. It should be able to reach the other side of the paper without going over. If the loop is too long or too short, you may have to play around with the length.
4. Put 2 pencils in the loop and pull apart. Place one pencil at the 9" marker, and hold it there tight.
5. With the other pencil, try to pull away from the 9" marker and let the pencil draw a semi-circle.
6. Cut out the semi-circle.
7. Form the semi-circle into a cone so that the base is 3" in diameter and the top is 1 5/8" in diameter. Then tape the cone to hold it in place.
8. Using a can of 3M Super 77 Multipurpose Adhesive spray glue, coat the inside of the cone with glue, creating somewhat of an airtight seal. Let it dry.
9. Cut the water bottle off 2 3/4" from the top or until it starts to curve inward to form a hand hold.
10. Cut out the pour spout or the part where you'd suck out water.
11. Drill a hole in the lid just shy of 1 3/4".
12. Cut the base of the bottle off at 1/8".
13. Drill a hole 1 3/4" in diameter in the piece of bottle you just cut off.
14. Make a centering ring from the one inch sheet of Styrofoam. Drill the first hole 1 3/4" in diameter then make the outer edge's diameter 3".
15. Glue the centering ring onto what used to be the base of the bottle.
16. Glue the base of the bottle to what used to be the top of the bottle.
17. Glue the cone you made earlier onto the top of what is the base of the nose cone. Make sure the cone is sticking straight up.
18. Glue the BT-40 tube into the top of the cone. Make sure it's straight as well.
19. Now cut the sheet of copy paper in half length wise.
20. Roll half of the copy paper into a cone. The tip should come to a point and the base should be about 2" in diameter.
21. Make two centering rings out of the particle board the outer diameters should be 1 5/8" while the inner diameters should be able to fit snuggly around the BT-50 tube.
22. Glue the centering rings onto the top and bottom of the BT-50 tube. The top ring should be 1/4" of an inch away from the top of the tube.
23. Glue the pointed cone to the top of the body tube. The centering rings should fit into the BT-60 tube loosely and the pointed tip of the nose cone should fit over the top of the bigger cone you made earlier.
Fins
Honestly, making the fins is a lot of guess work, but here is how I was able to do it:
1. Go to the EMRR website and copy the picture of the rocket you're trying to replicate.
2. Crop the picture down enough so that you only see the fins.
3. Play around with different sizes. This is a lot of the guess work. You have to play around with the size, and then print it to see if it's the right size. If it is, the root length for the top fin should be about 1 1/4" and the bottom fin's root length should be about 1 1/8". The top fin should stick out 1 1/4 inch and the bottom fin should stick out about 1 inch.
4. Cut out the fins to make a pattern for the top fin and bottom fin.
5. Trace the patterns on to the 1/4 inch of cardboard. Make 3 shapes for each fin so you end up with 6 fins.
6. Cut out the fins.
7. Glue the top fins on to the toilet paper tube so that the bottom touches the balsa ring above the polystyrene cup. Make sure it's sticking straight out. Then glue the bottom fin so that the top is touching the lip where the two cups came together. Make sure the fins are lined up with each other.
Now to make the pods that are connected to the fins.
8. Glue the three balsa nose cones into the three 2 3/4" BT-20 tubes.
9. Cut 1/4" off from the top of the tube. Sand it until flat, if necessary.
10. Glue the 1/2" Wire Connectors onto the nose cone.
11. Stick the 1/4" dowel in a hand pencil sharpener. Once pointed cut off point at the base of the tiny cone. Repeat 2 more times.
12. Glue these tiny cones to the tops of the wire connectors.
13. Take the BT-5 tube and wrap masking tape around the top of it until it fits into the BT-20s.
14. Glue the tubes in.
Overall: Glue all pieces together. Add a straw for the launch.
Paint the rocket. Make sure the primer on the base of the rocket is free of acetone or any other paints with acidic qualities. You have to do this or the paint will eat right through the polystyrene base. I find that your typical craft paints work very well.
For the Recovery system I used an 18" parachute.
Flight Log:
- Date 10/29/10
- Motor Estes D12-3
- Ejection/Altitude 80 feet
- Wind 5-10 MPH
Notes: Prototype- First Flight. Unstable. The problem lied in that the fins were not glued on straight. Still has a possibility of flying. The model I had on RockSim worked and was stable.
Status: Irreparable
Note: Crooked Fin
 |
 |