The Union Stadt Zeppelin Works Die Fledermaus
The Union Stadt Zeppelin Works Die Fledermaus
Contributed by Matt Gillard
| Construction Rating: | starstarstarstar_borderstar_border |
| Flight Rating: | starstarstar_borderstar_borderstar_border |
| Overall Rating: | starstarstar_borderstar_borderstar_border |
Brief:
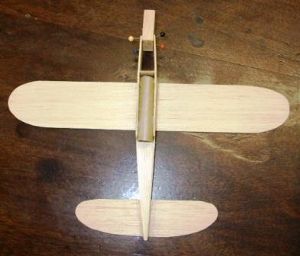
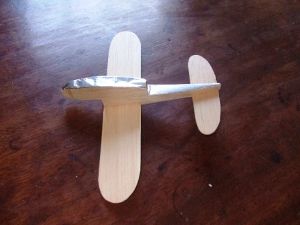
A rocket glider made by The Union Stadt Zeppelin Works, called "die Fledermaus" that I got off eBay. It
dates back to the seventies. It was not a great performer for me.
Construction:
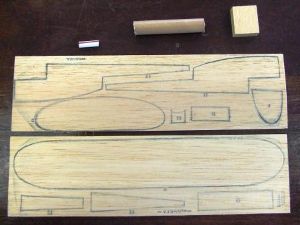
The kit consists of:
- two sheets of printed balsa
- one instruction sheet printed both sides, one of which shows what the plane will look like.
- a bit of drinking straw as a launch lug
- a block of balsa
- BT5
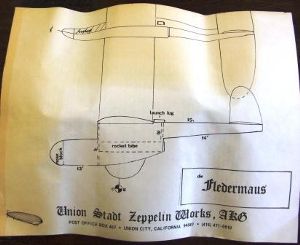
The instructions are terrible. Looking through them, it looks like the modeler has to think their way through the kit.
The block of balsa is to make the nose cone.
Step one is to cut the two fuselage side out, and then glue them together at the rear.
As this joint will be taking some stress during the next stages, where the front end has a bulk head and nose cone fitted, the glue has to have set hard.
Next step is to glue the nose cone in place--the nose cone is a block of balsa! I did this a step later. Instead I put in the two struts for bulkheads. Even though the two sides came from the same sheet of balsa, one of the sides is stiffer than the other and there is some warping. It still should help with a circular glide!
At this stage, I think I'm treating this as a prototype and I'll build a second one with better balsa afterwards.
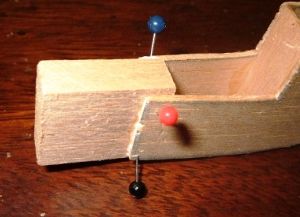
Next comes gluing in the motor tube. The BT-5 in the kit was too long so it is cut down to size. The motor must pop out at ejection, which means the bulk head--a thin sheet of balsa--is going to take a hit each time. And the tube must be flush with the bulkhead--no gaps. I filleted the tube and the fuselage wall, as I don't want this bird to rip herself to pieces and I risked the extra weight.
The balsa block supplied is far too big and is very hard for balsa. The instructions show it being glued to the front edges of the fuselage. I opted for sitting it back by about 5mm as this will give it a lot more strength. Heavy sanding later would take the front nose mass back to where it should be. The block was pinned whilst it dries. Again, the one stiff fuselage is distorting the weaker side.
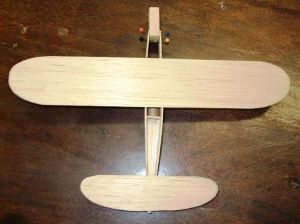
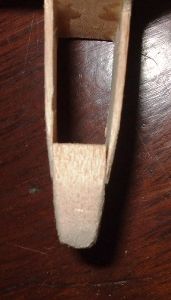
The next step is to start adding the wings, etc. I'm not sure about the lack of dihedral, or that the tail and wing are perfectly aligned with no lifting surface on either. The model plan shows a large curve for the wing, but that is impossible to achieve with the thin balsa supplied. I then added the bottom of the fuselage and the rudder, which also has the grain in the wrong direction, and then more of the fuselage sections. The nose cone was sanded to a better profile. I still got the lug and the bottom piece added too, and it was nearly finished.
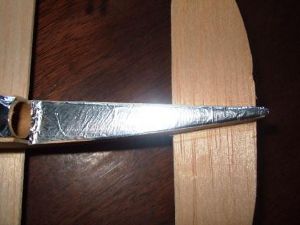
Stupidly I gave it a quick hand toss in my lab. It looked like it needs more nose mass but the last piece may take care of that. I put a small dent in the tail. Silver foil was added to the base to prevent motor flames from setting it on fire. The launch lug was added to the top of wing off center to avoid the rudder.
It needed to be trimmed as it was tail heavy at the moment. The open cockpit was a perfect place for clay weight. I needed 2g to make it balance.
Finishing:
I have not gone for any sealing, as I reckon that there would be some warping on the thin balsa.
Construction Rating: 3 out of 5
Flight:
First flight. After trimming, I prepped her with an 1/2A3-2T. The instruction recommend a 4 second delay, which would
be too much. I popped her on a rod with a stand off and launched. And there she sat: rod bind. The ejection charge was
powerful enough to eject the motor and to blow a 13mm hole through the front bulk head. The silver foil on the rear
fuselage held up well, and was coated in black power residue. On the positive side, this would probably have happen
even if she had got into the air. I double checked to make sure that the motor (and therefore the line of thrust) was
in line with the lug, which it was.
I mended the bulkhead, trimmed down the launch lug to 8mm, cleaned and graphite rubbed the rod, so I hoped for a better second flight...
Second (and final) flight. No rod bind this time. She arched straight off the rod, hit ground under full power, and snapped into two halves.
To be fair to the kit, others have cloned this rocket--plans have been posted to TRF, and with some modifications their planes flew, returning with over 40 seconds of glide, which isn't bad.
Recovery:
I can't really comment on flight recovery, as she never flew!
Flight Rating: 2 out of 5
Summary:
I liked the build of this unusual rocket, and judging by the amount of rocketeers on TRF that wanted the plans, so do
other people. My rocket might have failed just down to my poor build or being unlucky. Hopefully, others will build her
and if they have better luck, then I'll rebuild.
There are some modifications that are needed--better balsa, a heavier bulkhead, thrust ring, and maybe canting the motor mount.
Overall Rating: 2 out of 5
 |
 |