| Construction Rating: | starstarstarstar_borderstar_border |
| Flight Rating: | starstarstarstarstar |
| Overall Rating: | starstarstarstarstar_border |
Brief:
First, I want to point out that there is already a review of this product, and I concur with EMRR’s opinions. However, I received this kit as a prize from the Fantasy Rocket Photo Contest, and felt that the least that I could do is write a review. When EMRR offered me the Snipe as a replacement for the advertised kit (which was a no-show), it didn’t take me long to warm up to this nice sized, 24mm cluster rocket. I haven’t built many clusters, and thought this one would be fun on a trio of E9s.
 Construction:
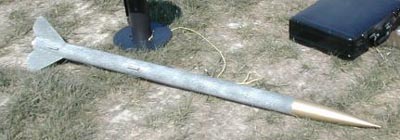
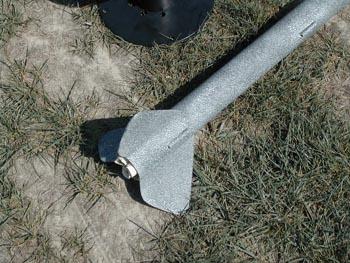
The Snipe is 2.6” in diameter and 58.5 inches long (actual measurement - the instructions say its only 56”). The main tube is 30” long, the payload bay is 15”, and the plastic nosecone is 13 inches. The three rounded fins remind me of a template that Estes used to provide in their Designer’s Special, and which I had used many years ago for a rocket I built for my daughter. The fins, payload bulkhead, and two centering rings are all 1/8” ply. While the fins were very neatly cut, the rings were slightly rough. This, however, isn’t a problem. There are three long 24mm motor tubes, which are long enough to handle any available 24mm motors. The recovery system consists of an 18” steel cable, ~9’ length of ½” elastic, and a 28” nylon chute. The cable is pre-attached to the front CR and has a loop on the other end. An eyebolt is used to attach the elastic to the payload bulkhead plate.
 This is an easy rocket to build. The instructions are on one double-sided 8 ½” x 11” sheet and are generally adequate. I first built the fin can per the instructions. I did this while I was working on a bigger project and went ahead and glued on both rings. I normally don’t glue on the rear ring until I’ve had a chance to add internal fillets, but wasn’t paying attention this time. Unfortunately, the fins only have ½” tabs, which are not long enough to reach the motor mount assembly. Having had mid power rockets with both through the wall and surface mount fins, I know that internal fillets would have been a good idea on this rocket. It was suggested that I could glue on the fins, add internal fillets, and notch the forward CR so the motor mount would slide in. However, I found that one of the notches would interfere with the steel shock cable that was pre-installed. Therefore, I punted.
 The fin slots are not pre cut, but were pre-marked. I didn’t trust the marking so I double checked them, finding that they were very accurate. The slots were easy to cut with a sharp Exacto knife. I inserted the motor mount and then glued the fins on with hefty doses of the black rubberized CA. Since the fin tabs are only about half as long as the fins, I was able to partially extract the mount and gain access to the back of the tabs. I formed thin rolls of LocTite epoxy putty and laid them against the fin tabs. I used a long thin screwdriver, dipped in rubbing alcohol, to compress them against the fin joints. I have never tried this before, only time will tell whether it was a good idea.
The payload assembly was typical, consisting of a coupler, pre-drilled bulkhead, and eyebolt hardware. For motor retention, I cut the head off a small bolt and epoxied it into the gap between the three motor tubes. A small washer and a bolt should hold the three motors nicely.
Finishing:
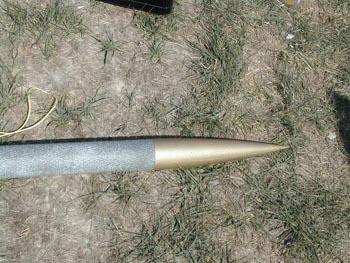
I filled the fins with Fill ‘n Finish and gave it one coat of white primer. For the first time, I tried plasti-kote Fleck Stone. I got the ‘Manhattan Mist’, which is gray with black and white spots. This is interesting stuff. It spurts out of the can like a giant ‘raspberry’ and leaves a coating that looks like a stone surface. Maybe not optimal for rockets (too rough), but interesting. I bought this brand over the competitor because it was cheaper, only to find that you also need a sealer, which the competitor includes. After some testing, I used Testor’s clear acrylic over the Fleck Stone finish. Finally, to add some contrast, I painted the nose cone with Rustoleum Hammered Gold.
Construction Rating: 3 out of 5
Flight:
I used the parachute that was supplied with the kit and a home-made protector made from a car air bag. I wrapped tape around three E9-4’s and then installed the nut and washer to hold them in. For ignition duties, I used three Igniterman igniters. These long igniters are easier to prep, and provided an added guarantee of reliable ignition. They are overkill for these BP motors.
The kit weighed in at 22 oz on my home scale and Rocksim said it would be about 28 oz with the E9s (I didn’t have the motors to weigh it loaded). The launch was slow and there was a slight wobble in the first 20 feet until the rocket came up to speed. It easily reached 1000 ft, and ejection appeared to be just before apogee. The stock chute seemed fine. The rocket banged into the side of a metal barn, but was undamaged.
Flight Rating: 5 out of 5
Summary:
Even though this is a standard 3FNC rocket, its styling is somewhat unique due to the curved fins and long nosecone. It was easy to build, but the fin tabs should be long enough to touch the motor mount assembly. Barring this, the instructions should have told you to wait to glue in the rear CR until you have added internal fillets. The flight on the E9s was cool. Three F’s should really rock!
Overall Rating: 4 out of 5
Other Reviews
- THOY Snipe By Nick Esselman
I was really enjoying my 24mm RMS system on my Nordic Rocketry Meanie and Ascender , as well as other rockets when I started getting the "cluster" urge. I looked for 24mm cluster rockets and found very, very few. When I spotted the THOY Snipe, I jumped at it. THOY says "the Snipe is an easy to build rocket with great eye appeal. This high performance sport rocket is capable of achieving high ...
 |
 |
Flights
|
|