Thrustline Aerospace Astral Lance
Thrustline Aerospace - Astral Lance {Kit}
Contributed by Ron Wirth
| Construction Rating: | starstarstarstarstar_border |
| Flight Rating: | starstarstarstarstar_border |
| Overall Rating: | starstarstarstarstar_border |
| Manufacturer: | Thrustline Aerospace |

Brief:
The Astral Lance from Thrustline Aerospace is described as "a high
performing versatile rocket that will become the pride of your fleet."
This 30 inch long rocket has 8 fins and motor choices from a C engine to an E
engine. This was primarily the reason that I choose to purchase this kit. I do
not get to a larger field all that often so I need a rocket capable of low
flights. The added bonus of the long body and sleek fin configuration would
certainly draw the attention of the kids and adults at the field. (The kids
seem to prefer the bigger rockets. Go figure). It is always a good feeling to
get some curious onlooker interested in the hobby.
Construction:
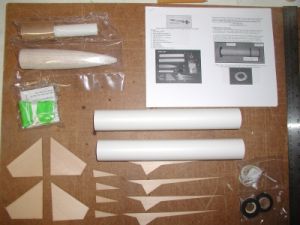
The kit comes with 2 sections of BT-60 paper tube, 1 coupler, 1 light plywood
bulkhead ring with center hole, 1 balsa nose cone, 1 six inch engine tube, 1
engine thrust ring, 3 large centering rings, 1 small centering ring (used at
the end of the boat tail), 4 laser cut basswood main fin pieces, 4 laser cut
basswood aft fin pieces (attaches to main fin), 4 laser cut basswood forward
fins, 1 launch lug, 1 Kevlar®
and elastic shock cord kit, 1 steel eyelet, 1 eighteen inch Mylar parachute kit
(I opted for the rip-stop nylon chute), 4 pages of single sided printed
instructions with black and white photos, 2 pages of cardstock with boat tail
pattern and fin marking guide. Most items are sealed in separate plastic bags
within the kit.
 The small centering ring was missing in my kit. It was quickly replaced with an
extra I received with my Thrustline Pumpkin Head kit. One comment I will add
regarding John Rowan-Stern, owner of Thrustline Aerospace: It is my
understanding that he hand packs all the kits himself. I had ordered 4 kits
with this purchase. 3 of the 4 kits had a missing or incorrect part. John was
very apologetic and quick to make things right. I appreciate great customer
service in a company, and that is what I got with Thrustline.
The small centering ring was missing in my kit. It was quickly replaced with an
extra I received with my Thrustline Pumpkin Head kit. One comment I will add
regarding John Rowan-Stern, owner of Thrustline Aerospace: It is my
understanding that he hand packs all the kits himself. I had ordered 4 kits
with this purchase. 3 of the 4 kits had a missing or incorrect part. John was
very apologetic and quick to make things right. I appreciate great customer
service in a company, and that is what I got with Thrustline.
As a side note, on the product page at the website, you are given the option to "add" the nylon chute for an additional price. This would imply that the Mylar chute would come with the kit. It did not. I only realized this fact now while writing this review.
This is one of the few kits available from Thrustline that include pre-cut fins. I was worried that this would take away from the satisfying building experience you get when constructing one of their kits. This was not the case. In fact I can imagine what a nightmare it would have been trying to cut the forward fins to the tapered points. Laser cut basswood saves the day. There is no reference to the skill level for this kit but I would easily put it at 3 of 5. There are some delicate construction tasks and alignments that are not for a beginner.

There are 20 separate steps listed in the instructions with a total of 11 pictures to guide you through construction. The entire construction only took several days. A few special construction considerations worth mentioning;
- During the motor construction, you are required to glue two of the centering rings together and attach them 1½ inch from one end of the tube. One ring will be the lip for the boat tail and one for the body tube. The placement needs to be exact. After cutting 3 boat tails from the card stock provided, I finally got it to fit properly. Once it is glued into place, you should coat it as instructed with either yellow glue or CA to make it rigid.
- You will need a drill to make two 1/16" holes in the bulkhead where you tie the Kevlar® cord to anchor the recovery system.
- I choose to use yellow glue for the entire rocket with the exception of attaching the trailing edge of the main fins. This way I was sure to have proper alignment on the thin fins before the glue set.
Finishing:
The instructions give some finishing techniques to create a sharp looking
rocket. I choose to fill the tube spiral, nose cone, and fins with
watered-downed Elmer's Carpenters Wood Filler from a tube. I used a light
application straight from the tube on the paper boat tail always only sanding
with 400 grit paper on this section of the rocket. There is plenty of sanding
with eights fins and 30 inches of rocket. I then put on heavy coat of gray
sandable auto primer. After more sanding, come two coats of white primer. I
have been using Rustoleum Painter's Touch White Primer with very satisfying
results. The suggested paint scheme is to paint the rocket a bright color such
as red or yellow. I choose red with metallic gold and silver highlights for the
fins, nose cone, and boat tail. There is a lot of masking with the fins being
so finely tapered to a point. There are no decals with this model. The entire
rocket was coated with Future floor wax.
Construction Rating: 4 out of 5
Flight:
This rocket does not have a motor retaining clip so you are required to
friction fit the motor with masking tape. The recommended engine for the first
flight is a D12-5. I choose to go with the C11-3 because of the field size. The
motor mount is designed for a 3¾ inch E engine so you are required to
make an adapter from a spent 24mm engine casing which I did not have. I did
purchase a 24mm motor adapter kit from Thrustline when I placed my order.
Unfortunately since I have not flown E engines before, I forgot to put in the
adapter before friction fitting the motor.
When I slid the rocket onto the launch pad (standard Estes pad), the motor sat flat on the blast plate. This is the first boat tail rocket I have built so this might be common. To be able clip the launch controller to the igniter, I propped up the rocket with a spent engine casing on its side. With the C11-3, the rocket left the pad slow and steady. There seem to be a slight wiggle in the tail and the rocket angled about 10 degrees into the wind coming off the pad. It was not a very high flight but satisfying nonetheless.
I went to reload the motor with a D12-5 for a second flight. This is when I noticed that I had forgotten to insert the 24mm motor adapter. This might explain the slight flight angle. The masking tape held the motor almost perfectly where I placed it before. Regrettably I left the adapter at home on the workbench, so there was no second flight of the Astral Lance on this day.
Recovery:
The recovery system consists of a Kevlar®
cord attached to the light plywood bulkhead at the tube coupler. The elastic
shock cord is tied to the Kevlar®
cord so that this remains in the body tube to prevent zippering during flight.
I prepped the rocket with a 4" x 4" Nomex®
heat shield and the rip-stop nylon chute. The chute deployed real close to
apogee with the NC still pointing up. It slowly floated back to ground with no
damage sustained.
Flight Rating: 4 out of 5
Summary:
This is a very sleek and impressive looking model. I like the original rocket
designs from Thrustline. You usually get quality and value for your dollar.
This kit is no exception. I was looking for a rocket that offered flight
versatility and would get the kids at the field interested in rockets. I got
what I wanted with the Astral Lance.
Overall Rating: 4 out of 5
 |
 |