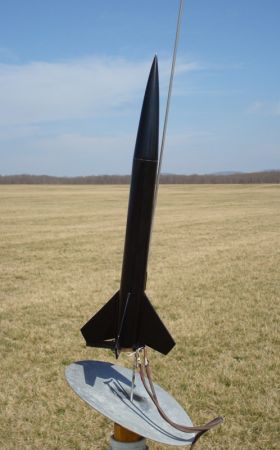
Thrustline Aerospace Black Shadow
Thrustline Aerospace - Black Shadow {Kit}
Contributed by Matthew Bond
| Construction Rating: | starstarstarstarstar |
| Flight Rating: | starstarstarstarstar |
| Overall Rating: | starstarstarstarstar |
| Manufacturer: | Thrustline Aerospace |
[Editor's Note: This review is a clone of the Thrustline Aerospace Black Shadow. Thrustline was out of business for a period of time (when author was cloning the rocket). Thrustline has recently returned to business selling the Black Shadow as a kit.]
Brief:
In one of my previous incarnations as a BAR I happened upon Thrustline Aerospace, a fairly new (in the summer of
2004) web based company that offered an assortment of original kits and basic building supplies. I ordered several
Thrustline's kits and over the next year or so as John Rowan-Stern's product line expanded, I built and flew a great
number of his designs. After a self imposed hiatus from the BAR world I recently returned to the fold, only to discover
that Thrustline Aerospace was no more. I was saddened by this not only because I was looking forward to building and
flying more of John's designs, but because he was always very enthusiastic about his participation and support of the
addiction.
So what to do... I was starting from scratch since I had unloaded my entire rocketry "stash" when I jumped on the wagon (don't be alarmed I do this all the time). Obviously I would need to clone some of my favorite Thrustline kits. The Black Shadow was the first Thrustline rocket I built and flew, and even though it is in essence a simple 4 fin and Nose Cone (4FNC) design, it always made the starting lineup when I went out to fly. Many of John's designs "fit" my eye in terms of size, scale and line, and the Black Shadow was the epitome of that sentiment. It always just looked "right" to me, and I knew I needed to start my latest fleet off with this rocket. I figured that I could build this rocket from memory. The only thing I was really needed help with was the body tube length and fin template. I noticed that Ye Olde Rocket Plans had recently added several Thrustline kits to their library but no Black Shadow. Luckily, the RockSim file attached to the existing EMRR review had everything I needed to get this one going. Hopefully this review will allow anyone to build this bird.
Construction:
The parts you will need to clone the Black Shadow are simple and readily available. For those of you without RockSim,
the fin template picture should be the only additional piece of information you need.
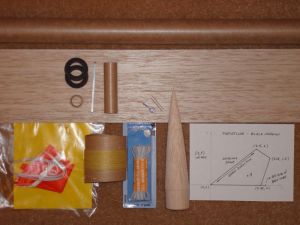
- BT-55 body tube – 10 inches
- BNC-55AC (I used a Semroc BNC-55ACP which isn't an exact match of the original)
- 18mm engine mount for BT-55 (I used one from FlisKits)
- 3/32" Balsa Sheet
- shock cord system–-I used 20" of 100lb Kevlar® and 20" of 1/8" sewing elastic
- 1/8" launch lug
- small screw eye, attaches shock cord to nose cone
- recovery device–-your choice, however, the original kit came with a 9" Mylar parachute
There are no real tricks to building this rocket, and I would imagine that anyone who has built a kit or two could get this done without any trouble. My standard routine is to assemble the engine mount first, which includes cutting a slit in the motor tube for the hook, gluing the thrust ring into the fwd end of the motor tube, securing the engine hook to the motor tube with a wrap of masking tape, and then gluing the centering rings to the motor tube, approximately 1" from the aft end and ½" from the fwd end of the tube, making sure there is a notch in the inside edge of the aft ring to allow the engine hook to flex. At this time I also attach the Kevlar® shock cord to the motor mount by tying it around the motor tube between the centering rings, and then cutting a small notch in the outside edge of the forward centering ring to allow the cord to reach the front of the rocket. I finish all my recovery system knots with a drop of CA glue, and I also reinforce the centering ring to motor tube joints with glue fillets.
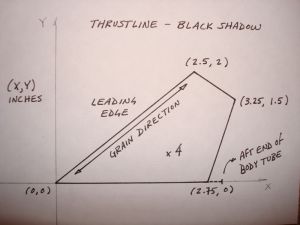 While the motor mount glue is drying I cut out my fins, making sure I know where the leading
edge is to get the grain orientation right. A sharp knife and a metal straight edge make this task very simple. I stack
the fins together and sand the edges so that they are identical then round the leading and trailing edges.
While the motor mount glue is drying I cut out my fins, making sure I know where the leading
edge is to get the grain orientation right. A sharp knife and a metal straight edge make this task very simple. I stack
the fins together and sand the edges so that they are identical then round the leading and trailing edges.
Installing the motor mount is next. First I thread the Kevlar® back through the motor tube to keep it out of the way and test fit the motor mount to make sure it slides easily into the body tube. Next comes a ring of glue inside the body tube near where the forward centering ring will rest and then the motor mount slides into position with the end of the motor tube even with the end of the body tube. After the glue is dry I will also add a fillet to the aft centering ring where it meets the body tube. At this point I will usually sand the body tube lightly to scuff up the glassine coating, which I believe helps the gluing/finishing process (not scientifically proven, that's just my opinion).
There are several options for marking the body tube for fin placement. There are programs that can create templates for you, you can draw your own in your favorite computer application, or you can download the plans for any 4 fin BT-55 kit (Estes Goblin) and use that. I use a section of small aluminum angle from a local hardware store to draw my fin/lug lines. Fins for the Black Shadow are attached ¼" forward of the aft end of the body tube and the launch lug is attached 3" from the aft end of the body tube. The fins and launch lug are attached with a small bead of wood glue and reinforced with wood glue fillets.
Several final assembly steps are completed after the finishing process. I typically install the screw eye by screwing it part way into the base of the nose cone, removing it, adding a large drop of medium thickness CA glue and then screwing it all the way down. Finally, I tie the elastic cord to the Kevlar® line and then to the nose cone with a drop of thin CA glue on all the knots.
Finishing:
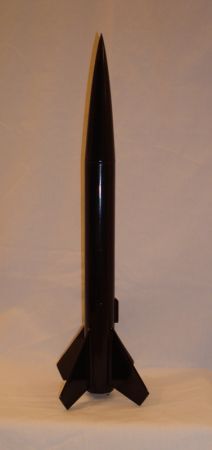
One color, no decals, simple as it gets. In my opinion, the black finish on this rocket only enhances its aesthetic
appeal, although one of the great things about this hobby is that as long as the CP stays behind the CG, you can pretty
much make it look however you want. I used Elmer's Wood Filler to get smooth fillets along the fin and launch lug
joints, and in the case of the Black Shadow I also filled the spiral grooves on the body tube. The nose cone and fins
were sealed with two coats of SIG Sanding Sealer. My standard finishing routine is 2 coats of primer (Rustoleum
Painter's Touch Sandable Primer) and then 2 coats of Krylon spray enamel, working down to 400 grit sandpaper before the
final coat. Although finishing my rockets is a despised chore, I am usually patient enough to get a decent finish on
the final coat of paint. This particular rocket however, would have none of that, and I sanded off several coats of
paint before deciding that I was just going to have to live with a few drips.
Construction Rating: 5 out of 5
Flight:
Recommended motors for the Black Shadow include the standard range of black powder 18mm Estes/Quest Motors. I have
yet to find the courage to put an 18mm composite motor in my Black Shadow, but if you do, make sure you've got a good
team of spotters. Flight preparation is standard: hook up your recovery device, add some wadding, install the motor,
insert the igniter, and head to the pad. My original Black Shadow logged thirteen flights in all from California to
Ohio, in all kinds of conditions with fast straight flights every time. The majority of those flights were with C6-5
motors which this rocket loves and will top out at around 1000ft. The best part about the Black Shadow is that it looks
good on the pad, it looks good in the air, and it won't get completely out of sight on BP motors so you'll be able to
fly it over and over. My new Black Shadow clone has flown on B and C motors so far and is every bit the reliable
performer that the original was.
Recovery:
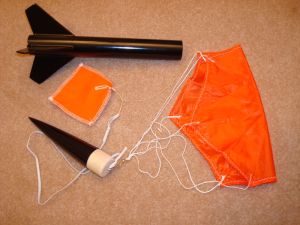
The original kit came with an unassembled 9" Mylar parachute and mine was orange which I thought was cool. The
chute held up through all thirteen flights with only a few small burn/melt through spots. The Kevlar®
shock cord on the original model was threaded under the forward centering ring next to the motor tube but never had any
issues. For most of the later flights, I switched from normal wadding to a Nomex®
heat shield without any issues. A 9" chute is just the right size for this bird, but you can still be in for a
long chase on windy days. A streamer might be a good option, and since the fin design is fairly compact, the rocket
should hold up pretty well. My new Black Shadow clone flies with a 3"x3" Nomex®
heat shield and a 9" nylon parachute, which makes the whole package a little heavy (1.8oz without a motor) but
very sturdy and reliable.
Flight Rating: 5 out of 5
Summary:
Yeah it's only a 4FNC, but the Black Shadow has that classic vibe. It looks good and it flies good. You will always
find room to bring this one to the range, so go build one.
PROs: Basic 4FNC rocket with a great look, good performance, and simple construction. This is a well thought out design and the motor selection and recovery system are well matched to the size of the rocket.
CONs: None. This is a great rocket!
Overall Rating: 5 out of 5
Other Reviews
- Thrustline Aerospace Black Shadow By Clive Davis
Brief: This is a great little sport kit that is easy to build and performs well. I got the kit as a prize by participating in one of EMRR's Virtual Rocket Contests. I didn't place in the top five, but I still participated and interestingly I would have selected the Black Shadow as my prize had I finished first... So the moral of the story is this: take advantage of the EMRR contests. ...
 |
 |
Flights
|
|
|
|
G.W. (February 13, 2008)