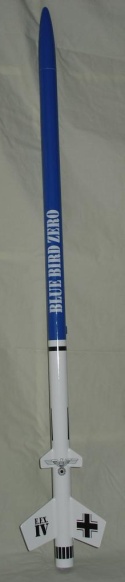
Thrustline Aerospace Blue Bird Zero
Thrustline Aerospace - Blue Bird Zero {Kit}
Contributed by Matthew Bond
| Construction Rating: | starstarstarstarstar_border |
| Flight Rating: | starstarstarstarstar |
| Overall Rating: | starstarstarstarstar_border |
| Manufacturer: | Thrustline Aerospace |
Brief:
The Blue Bird Zero is one of Thrustline Aerospace's "Replica Rocket Parts
Packs" line of clone kits. The original BB0 was an Estes kit produced from
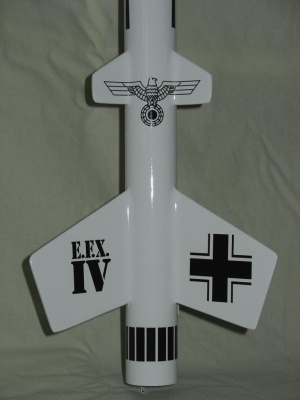
1980 to 1985. The BB0 is a fairly long, BT-55 based rocket with a single 18mm
engine mount, 3 large primary fins, 3 small secondary fins, and an awesome
decal set with German military styling. The original kit was listed as a skill
level 2.
Construction:
This kit arrived in my mailbox securely packed and undamaged (the postal
service has yet to score damage points on any of the dozen or so orders I've
received from Thrustline). The following items are included with this kit:
- BT-55 Main Body Tube (2x18")
- BT-55 Tube Coupler (1)
- 18mm Motor Mount Tube (1)
- BT-20/55 Centering Rings (2)
- Balsa Nose Cone (BNC-55AO)
- Steel Eyelet (1)
- Balsa Fin Stock
- Launch Lug (1)
- Elastic Shock Cord (1)
- Mylar Parachute Kit (18")
All tubes were standard white, glassine coated paper, and the centering rings were the black fiber type. The nose cone was balsa as opposed to the plastic one that came with the original kit. The balsa sheet stock was standard quality, with enough extra to make a spare set of fins. The elastic shock cord measured out at 18 inches, and the Mylar parachute came unassembled with a separate page of instructions. True to the original kit, there is the standard paper tri-fold shock cord mount, and no engine block (thrust ring) included. You may have also noticed that there are no decals mentioned with this kit. Thrustline has worked out a cooperative deal with Excelsior Rocketry to carry decals for their clone kits. On the plus side, Excelsior makes outstanding decals, but on the minus side it means having to place a second order to get everything you need.
My original motivation for building the Blue Bird Zero was to have a big brother for my Gooney Bird Zero, a Baby Bertha kit bash from Excelsior Rocketry. It was fun to build them both side by side. There are no instructions included with the Thrustline kit (it really is just a parts pack), so the first step is to go and download them from JimZs website. The instructions are standard Estes (I can almost quote the steps from memory) and included a set of hand drafted fin templates which were obviously not required in the original kit.
The motor mount is assembled first and installed in the body tube. It is necessary to cut a notch in the aft centering ring to allow for movement of the engine hook. This can be accomplished with a X-Acto knife, but I have also had good luck using a hole punch on the thin fiber centering rings. Per the original design, this motor mount did not include a thrust ring, but since I don't trust the hook by itself, I cut my own out of a spent engine case.
While the motor mount glue was drying, I traced and cut out the 2 sets of fins. These were match sanded with rounded corners and then airfoiled. The standard Estes tube marking wrap is used to set the fin location, and I use a length of aluminum angle stock to mark the fin lines on my rockets. At this point I noticed that the spacing on the hand drawn fin template attached to the instructions from JimZ was different than what was called out in the Estes instructions. There was an inch difference in the placement of the smaller fins, and I went with the Estes instructions. My standard routine for attaching fins is to tack them on with Titebond wood glue, add a second wood glue fillet, and then a final fillet of Elmer's Wood Filler. I attached the fins in pairs, sighting between the two to get them aligned to each other. Due to the large size of the main fins, I decided to strengthen them up with a coat of thin CA glue, spread across the fin with an index card and sanded smooth. The launch lug is cut into two pieces and attached in the same fashion.
On rockets with multiple sections of body tube, I try and attach the fins to the lower section first to avoid having a long tube to work with and bump into. At this point I decided to upgrade the recovery system. I will never again use the old paper tri-fold shock cord mount, and have a large spool of Kevlar® cord on hand to make sure I never have to. I decided to use the tube coupler as my anchor point. I tied a bulky knot in the end of the Kevlar®, laid it in the tube and installed the coupler (picture the Kevlar® in between the coupler and the BT). Before the glue sets, pull the cord gently until the knot is resting up against the coupler, and then put a hefty drop of glue on the knot. The upper section of BT is installed the same way. First thread the Kevlar® through the new section of tubing, and then apply glue to the inside of the BT and slide it onto the coupler, keeping the Kevlar® cord taut. I'm not sure there are any pros or cons to this versus attaching it to the motor mount, but I did save almost 2 feet of Kevlar® cord that way.
[Note: This method only works with the lighter weight Kevlar® string that one would typically use in model rocket construction. For mid-power birds, the heavier string will put a noticeable bump in the body tube, so use the motor mount or a separate centering ring as your anchor point.]
The final bit of construction involves installing the eyelet in the balsa nose cone by screwing it half way in, removing it, filling the hole with CA glue and screwing it all the way down. The 18" Mylar parachute comes unassembled, but it's a fairly simple job to attach the reinforcement disks, cut and tie the Kevlar® shroud lines and girth hitch everything to the swivel.
Finishing:
The basic paint scheme for the Blue Bird Zero is simple, white on the bottom,
blue on the top. The real impressive look for this rocket comes from the
decals, which I had ordered from Fred Talasco at Excelsior Rocketry. As with
all of Excelsior's decals, the sharpness and detail is awesome, and the full
8½" x 11" sheet actually includes more decals than the
original kit. For example, there are enough fin decals to decorate all three
fins instead of just two like the original kit. I have found this attention to
detail in all of the decals I've ordered from Excelsior and am very impressed
with "Phred's" operation.
The balsa nose cone and 6 fins were coated with thinned down Elmer's Wood Filler, and sanded smooth. Next came two coats of Rust-Oleum Painters Touch Sandable Primer, followed by two coats of Krylon spray enamel. The two color paint scheme is about as simple as you can get, painting the bottom of the rocket white, masking off the body tube and painting the upper section and nose cone blue. By the time I got to the second coat of primer, I had worked my way down to 400 grit for the in between sanding.
When you order decals from Excelsior they come with a full page of instructions for prepping, applying and finishing, and they recommend Microscale brand products (Decal-Set and Micro-Sol) for accomplishing the job. I have not yet tried any of Microscale's products, having used Testor's Gloss-Cote (#1216) with good results. First I give the decal sheet 2 light coats of Gloss-Cote. Next the decals are cut out and applied with the standard warm water dip, slide into place and blot dry routine. After the decals have completely dried, I add a final spray of Gloss-Cote to the whole rocket. The finished product looks awesome and the Gloss-Cote seems to play nice with both the paint and the decals. I finished up the recovery system by attaching the elastic shock cord to the Kevlar® cord, and then to the nose cone, and putting a drop of CA glue on all the knots.
Construction Rating: 4 out of 5
Flight:
The initial flights of the Blue Bird Zero were conducted on hot and, in one
case, windy Ohio summer days. The Estes instructions recommend either a B6-4 or
C6-5 motor. The published weight for this kit is 2.7oz. Including the
parachute, my version of the BB0 weighed in at a fairly hefty 3.5oz. Flight
preparation is standard, with then engine installed underneath the engine hook
and igniter inserted. The recovery system is simple as well. I fly this rocket
with a 4"x4" Nomex®
heat shield, also purchased from Thrustline, which is attached to the Kevlar®
shock cord through the installed eyelet. The heat shield is followed by the
dusted and folded parachute. There is plenty of room in this rocket so loading
everything up is easy.
Because of the extra weight that I always seem to build (and paint) into my rockets, I have only flown the Blue Bird Zero on C6-5s. This is a pretty large bird, longer than the standard Estes launch rod. On the day of the first flights it was quite windy, around 15 knots, and the launch rod was angled slightly into the wind. This big rocket swayed pretty good sitting on the pad, so I waited for a lull before a quick count and go. Even in a strong breeze, the BB0 boosted straight with no noticeable weathercocking. The best way to describe the way this rocket flies is "smooth". It isn't fast, it isn't slow, it isn't high, it isn't low, it just flies a very nice profile and looks "smooth" doing it.
Recovery:
The Blue Bird Zero Recovers on an 18" Mylar parachute. Ejection with the
C6-5 happens just past apogee, and I've gotten good deployments on all flights
so far. Because this is such a long bird, there isn't much danger from heat
damage from the ejection charge. I fly with a Nomex®
heat shield which fits snugly in the body tube, so I don't have to worry about
the parachute shifting and possible tangling during boost. The 18" chute
is a little bit too big for this rocket, but since it doesn't fly really high,
there isn't really any danger of losing it even on a windy day and I like the
fact that this cool looking rocket comes down nice and easy.
Flight Rating: 5 out of 5
Summary:
Thrustline Aerospace and Excelsior Rocketry (along with a growing number of
companies) has brought "cloning" within reach of us short attention
span BARs that can't/don't/won't take the time to round up all the bits and
pieces to build those birds we wish we had when we were kids. Keep 'em coming
guys!
PROs: The Blue Bird Zero is a great looking rocket from "back in the day". It's big and bad and flies like it knows it!
CONs: Having to place two orders to get everything you need to put this bad boy on the pad. Honestly, I think the arrangement between Thrustline and Excelsior takes advantage of the strength of both companies, but I would still rather pay a couple bucks more and get everything in one bag. My only other gripe is that I think every rocket should come with a Kevlar® based recovery system, even the clones.
Overall Rating: 4 out of 5
 |
 |
Flights
|
|