| Construction Rating: | starstarstarstar_borderstar_border |
| Flight Rating: | starstarstarstarstar_border |
| Overall Rating: | starstarstarstar_borderstar_border |
| Diameter: | 1.33 inches |
| Manufacturer: | Thrustline Aerospace |
| Style: | Clone |
 Brief:
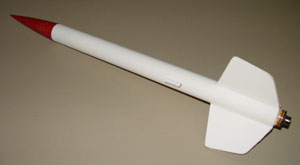
This is a single stage three finned rocket with a balsa nose cone. It is a simple clone kit of a very popular high performance rocket offered by Estes from 1970 to 1972 as the "Astron Cherokee-D" and from 1973 to 1983 as the "Cherokee-D".
Construction:
I believe this was the very first kit offered by what is now known as Thrustline. I purchased it on eBay in late 2001 to early 2002. It arrived shortly in a plastic ziplock bag. The only differences that I noted in it and the original estes kit is that it came with elastic for the recovery system where the original had a rubber band, the parachute was mylar where the original had a standard estes orange and white plastic chute, and the fins were not pre-cut as were in the original kit.
After outlining the fins on the balsa sheet and cutting them out with a very sharp X-Acto knife I used a piece of masking tape to hold all three of them together as I sanded the edges to make them uniform. They look exactly like the originals. I then used yellow wood glue and an Estes fin alignment guide to mount them perfectly. Over the period of a few days I added yellow wood glue fillets by applying two while the rocket laid horizontally, allowed 12-24 hours to dry, turned and repeated twice.
I modified the recovery system by using a piece of Kevlar mounted to two sides of the motor mounts. I then tied a knot near the middle as to have a double fireproof mount where if one side burns through the other will still hold. I then tied a smaller knot near the top and added a small snap swivel to allow parachutes or streamers to be easily swapped out. I also discard the short piece of sewing elastic that came with the kit and added my own 6 foot long piece of 1/8" elastic. I also put the mylar chute in my range box and selected a 10" yellow nylon rip stop chute.
Finishing:
Finishing was simple. All I applied was about 3-4 coats of flat white primer. It filled the spirals on the body nicely. The nose cone received two coats of gloss red. The decals that came with it looked very original and to scale. Unlike the original Estes water-slide decals the instructions indicated that the decal sheet must be sprayed with clear coat and allowed to dry before using them. As I did not have any clear coat handy I just skipped the decals. On an interesting note I misplaced the decals over time yet was still able to order a replacement set from Thrustline in the summer of 2004. I still have not applied them.
Construction Rating: 3 out of 5
Flight: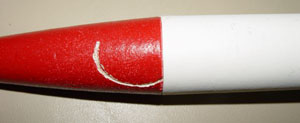 After years of just sitting there it's first flight was at Rushing Park in Katy Texas on June 12th 2004 with the Challenger498 Club event. Wind was a little more than ideal with gusts of around 10mph. I selected an Estes C11-5 and up it went very nice and true. Even with the smaller 10" cloth chute it drifted about 200 yards all the way into a cow pasture and landed right in front of a long-horned bull. Impressed with the flight I loaded another C11-5 into it and up it went again. Same type of flight and again drifted about 200 yards and landed in nearly the same place. Even with my 6 foot piece of the nose cone kissed the body tube fairly hard putting a deep core into the cone. I ordered a replacement nose cone but have not installed it yet.
The third and fourth flights were again at Rushing Park on July 10th 2004 with the Challenger498 Club event. Third flight was again on a C11-5. This day wind was much lower and it landed only 300-400 feet away. So finally for the fourth flight I popped in a D12-5 and it flew great. I really like how this rocket performs. It rode the D12-5 straight up to over 1000 feet.
Recovery:
The shock cord provided was too short. The mylar chute is attractive and is better than what came with the original kit but I prefer rip-stop nylon chutes for long term durability. The Astron Cherokee-D was the third rocket that I ever built in the mid 1970's and I always enjoyed it's flights. This clone did indeed remind me of exactly how the original flew. I am very pleased with it.
Flight Rating: 4 out of 5
Summary:
This is such a simple rocket that you do not need to purchase a kit to build it. It can be scratch built with a BMS nose cone and an accurately sized fin template that can be download from the Internet. Decals can be purchased from Tango Papa however they are more expensive than the ones that came with this kit. I am pleased with the kit as it provided me with everything I needed to replicate one of my all time favorite classics, all in the same bag. I feel that the kit should come with die-cut or laser-cut fins to simplify the build and be more true to the original kit which came with die-cut fins.
Overall Rating: 3 out of 5
Other Reviews
- Thrustline Aerospace Cherokee D By Bill Eichelberger
ThrustAero Rocketry is another of the growing list of vendors serving the (hopefully) burgeoning OOP cloning aftermarket. They sell versions of several Estes classics, including the Cherokee D, one of the early K-kits whose name once included the Astron qualifier. While it's 3FNC design qualifies it as a fairly basic project, it's paint and decal scheme were well thought out and turning out a ...
 |
 |
Flights
|
|