| Construction Rating: | starstarstarstarstar_border |
| Flight Rating: | starstarstarstarstar_border |
| Overall Rating: | starstarstarstarstar_border |
| Manufacturer: | Thrustline Aerospace |
Brief:
The Double Up is an original design from John Rowan-Stern at Thrustline
Aerospace. The Double Up is a fairly simple two stage rocket with a four fin
design, friction fit motor retention, gap staging, and streamer recovery. The
kit is rated skill level three but I would rate it closer to skill level two
based on its straightforward assembly.
Construction:
This kit arrived in my mailbox securely packed and undamaged (the postal
service has yet to score damage points on any of the dozen or so orders I've
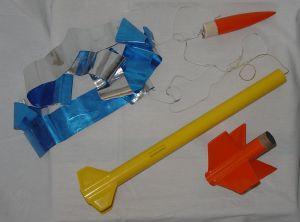
received from Thrustline). The following items are included with this kit:
- 1 BT-50 main body tube
- 1 BT-50 booster body tube
- 1 BT-50 tube coupler
- 2 18mm motor mount tubes
- 4 BT-20/50 centering rings
- 2 BT-20 engine block rings
- 1 balsa nose cone
- 1 steel eyelet
- Balsa fin stock
- 1 launch lug
- Kevlar® cord/elastic shock cord
- 1 mylar streamer
All tubes were standard white glassine coated paper and all centering rings were the heavy paper type. The balsa nose cone appears to be about a 4:1 ogive but was not specified. The balsa sheet stock was standard quality, with enough extra to make a spare set of fins. The Kevlar® and elastic shock cord each came in about 2 foot lengths and the blue Mylar streamer measured in at 2 inches by 5 feet.
I must now admit that the Double Up sat in my project box for close to eight months before I actually spread it out on the counter and went to work. There are 5 pages of instructions which include almost 20 separate pictures to highlight the steps. The instructions included in my kit were printed in color. I noticed that John had signed and put a "#2" on the cover sheet--I must have got my order in quick on that one! The directions were clear and easy to follow and soon I had the motor mounts assembled and installed in the body tubes. I have become a solid convert to the Kevlar®/shock cord recovery system. Attaching the cord to the motor mount is a simple task, even though it requires cutting a shallow groove in the forward centering ring. At this point I discovered the one (and only) flaw in the instructions. The tube marking guide which was included along with the fin templates was obviously the wrong size. I cut it out anyway, but only confirmed that it was a BT-20 sized wrap that would not fit around my BT-50 tube no matter how hard I tried. It was a simple task to print out the correct one from my computer. A quick email to Thrustline verified that the correction to the plans had indeed been made some time back. [Note: If you are still using door jambs and/or window sills to mark fin lines on your body tubes, go down to your local hardware/home improvement store and buy a length of aluminum angle stock. The smaller sizes will fit on any mod roc tubing and your fin lines will be perfectly straight. The fin templates were printed on cardstock, which was a very nice touch and marked to show the leading edge for proper orientation on the balsa stock. After tracing, cutting and match sanding, I had two neat stacks of fins. I decided to try something a little different shaping by going for a simple rounded leading edge with a beveled trailing edge. The initial results were very sharp but the finishing process would take its toll. My standard routine for attaching fins is to tack them on with Titebond wood glue, add a second wood glue fillet, then a final fillet of Elmer's Wood Filler. I decided to attach the booster and sustainer fins in pairs by using strips of masking tape to hold the booster in position on the sustainer tube. This worked very well and the fin alignment came out close to perfect. The launch lug is attached as a single piece in the same fashion. At this point the instructions recommend coating the trailing edge of the booster fins with thin CA glue to strengthen them for tumble recovery but I chose to omit this step. The instructions also direct you to punch two vent holes in the booster body tube. I had been worried about this step, but my hole puncher did the trick and punched two clean holes. The final step involved installing the eyelet in the balsa nose cone by screwing it half way in, removing it, filling the hole with CA glue and screwing it all the way down.
Finishing:
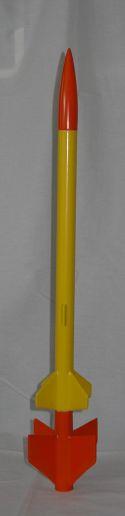
There are no decals included with this kit and no suggested paint scheme. After
calling upon my engineer sized artistic prowess I decided to go wild with a two
color paint scheme: yellow sustainer and orange nose cone and booster. With 8
fins and a balsa nose cone, the filling duties are not trivial. Two coats of
SIG sanding sealer, followed by two coats of Rust-Oleum Painter's Touch
Sandable Primer, followed by two coats of Krylon spray enamel. By the time I
got to the second coat of primer I had worked my way down to 400 grit for the
in between sanding. As mentioned earlier, the nice sharp bevels I had put on my
fin trailing edges took a beating through the multiple sandings. Although the
finished product didn't look bad, I will need to come up with a better plan for
finishing that fin shape. At this point I decided to go back and follow another
suggestion from the instructions and coat the inside of the booster coupler
with epoxy to cut down on damage from the sustainer motor ignition. This step
went fairly smooth, considering it was actually the first time I had ever used
epoxy of any sort. Since I mixed up a little more than I needed, I coated the
outside of the coupler as well, figuring that I would sand it down to a perfect
fit. I'm sure everyone who has ever sanded epoxy by hand is laughing at me
right now, but it only took me about three hours to get the booster to fit back
into the sustainer and learn a valuable lesson. I finished up the recovery
system by attaching the Kevlar®
cord to the elastic and then to the nose cone followed by putting a drop of CA
glue on all the knots. I attached the streamer to a short harness and swivel.
Construction Rating: 4 out of 5
Flight:
The initial flights of the Double Up were conducted on a fine Ohio spring day
at a regularly scheduled launch of the Queen City Area Rocket Klub (QUARK). The
instructions that came with my kit recommend only the B6-0 for the booster and
long delays for the sustainer. More recent versions of this kit allow for
either a B6-0 or C6-0 booster and shorter delays on the upper stage. Including
the streamer, my version of the Double Up weighed in at 1.7oz, which is a
little heavier than the 1.35oz weight quoted in the specs. There are no engine
hooks with this kit, so a wrap of masking tape around the engines is necessary
to get a good friction fit. As with all multi-stage kits, take an extra look to
make sure the upper stage motors are installed with the nozzles pointed the
right way. Since this rocket uses gap staging, there is no need to tape the
engines together. You just install the motors and assemble the stages. The
recovery system is simple as well: 2-3 sheets of recovery wadding followed by
the rolled up streamer. This rocket is fairly long, so loading everything up is
easy. I used the B6-0 booster for all three flights and worked my way up in the
sustainer from A8-5 to B6-6 to C6-7. All three flights experienced the same
phenomenon, with the rocket taking about a 10-15 degree heading change as soon
as it came off the rod. Each time it was in a different direction and none of
them were into the wind! Staging was smooth on all three flights with ejection
at or just past apogee on every flight and the rocket arcing over in a
horizontal attitude. I am not quite sure why the rocket doesn't like to boost
straight off the pad. It may be that the extra weight of my version needs to
carry a little more speed off the rod. I will continue to evaluate flight
characteristics the next time out using C6-0 boosters. Except for the less that
straight boost, the rocket performs well and should be capable of impressive
altitude with the C6-0 booster.
Recovery:
Recovery of the booster section is standard tumble, with the sustainer coming
down under the mylar streamer. Using the B6-0, the booster never got outside of
30 feet from the pad and came through 3 flights with only a couple of minor
paint dings. I never got a straight boost from this rocket and as a result, all
ejections happened while the rocket was arcing over, more or less horizontal at
apogee. The blue Mylar streamer deploys easily and is highly visible, which
helps in tracking. On the first flight the sustainer motor got ejected which
allowed for a nice slow descent, but even when the motor is retained properly
the streamer brings the model down at a reasonable rate. On the second flight
the nose cone did come back and impact one of the fins, but damage was limited
to the paint job. I think this would be less of a hazard if I could figure out
how to get a straight boost off the pad. After three flights there was a tiny
bit of charring at the base of two of the sustainer fins, which I believe
happens at stage separation but no other damage. The epoxy coated coupler
section on the booster showed no damage at all.
Flight Rating: 4 out of 5
Summary:
The Double Up is a very well thought out rocket which goes together well and is
simple to prep and fly. There is a fairly wide range of motor combinations
which allows for some flexibility but this bird is definitely not a
small field flier. The only down side to my Double Up is that it doesn't want
to leave the pad straight. I believe that this is due to the heavier finished
weight of my particular model. Maybe with a C6-0 booster I will find a motor
combination that works or perhaps a longer launch rod. Hopefully a solution
will present itself as I would hate to leave this rocket on the shelf.
Overall Rating: 4 out of 5
 |
 |
Flights
|
|