| Construction Rating: | starstarstarstarstar_border |
| Flight Rating: | starstarstarstarstar |
| Overall Rating: | starstarstarstarstar_border |
| Manufacturer: | Thrustline Aerospace |

Brief:
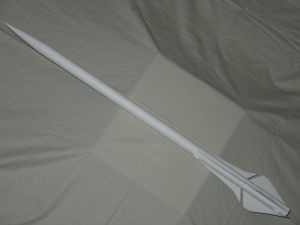
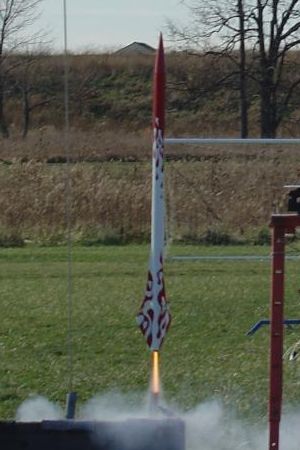
The Duster is an original design from John Rowan-Stern at Thrustline Aerospace.
The Duster is a fairly large, high performance model rocket designed to fly
primarily on Estes 24mm black powder motors (C11/D12) and is rated a skill
level 2/3 build. The Duster is built around a BT-55 airframe, sports a sleek
split fin design, and a conical nose cone. The best way to describe this rocket
is that it looks fast!
Construction:
This kit arrived in my mailbox securely packed and undamaged. The Postal
Service has yet to score damage points on any of the dozen or so orders I've
received from Thrustline. The following items are included with this kit:
- 2 BT-55 Main Body Tube, 17" long
- 1 BT-55 Tube Coupler
- 1 24mm Motor Mount Tube
- 2 BT-50/55 Centering Rings
- 1 24mm Engine Block
- 1 Steel Motor Retention Hook
- 1 Balsa Nose Cone
- 1 Steel Eyelet
- Balsa Fin Stock (1/8"x4")
- 1 Launch Lug
- 48" Kevlar® Cord
- 38" x 1/4" Elastic Shock Cord
- 18" Mylar Parachute
All tubes were standard white, glassine coated paper and centering rings were the black fiber type. The motor mount tube was sized for 24mm x 70mm motors. The conical nose cone (BNC-55AC) was 5.5" long high quality balsa with very tight grain. The balsa sheet stock was standard quality with enough extra to make a spare set of fins. The Mylar parachute was unassembled and included Kevlar® shroud lines, reinforcement tabs, and a brass swivel.
As with most of the rockets I acquire, the Duster spent some time in the project box before I moved it to the workbench. I had been on a tear building short stubbly "Goony Birds" and needed to work on something that would rip. The Duster came with 3 pages of instructions which included pictures to highlight most of the steps. The directions were simple and easy to follow with only one confusing area regarding cutting out the fins.
 The
first step is to assemble the motor mount. I had corresponded with John at
Thrustline about the stability margin of his design, and decided to upgrade the
motor mount with a longer tube and hook to accommodate an Estes E engine. I
also did not attach the Kevlar®
cord to the motor mount, deciding instead to use the tube coupler as my anchor
point.
The
first step is to assemble the motor mount. I had corresponded with John at
Thrustline about the stability margin of his design, and decided to upgrade the
motor mount with a longer tube and hook to accommodate an Estes E engine. I
also did not attach the Kevlar®
cord to the motor mount, deciding instead to use the tube coupler as my anchor
point.
While waiting for the motor mount glue to dry, I turned to cutting out the fins. The fin templates are marked such that both sets of fins are cut in two separate pieces and then glued together to form the final shape. This was obvious for the forward fins since there are two distinctly different leading edges. I could not figure out, however, why the aft fins needed to be cut in two sections since there is only one leading edge. I consulted the parts drawing on the first page of the instructions and this only added to my confusion since the fins that are traced on the balsa sheet in the picture did not have the leading edge parallel to the grain of the balsa (per the instructions). After figuring out that the picture was wrong, I decided that I would just cut out the aft fins in one piece and went to trace them out on the balsa, only to discover that the fin pattern was wider than the standard 4" balsa sheet! Well that mystery was solved. I happened to have some 6" balsa sheet stock, so I was still able to cut the aft fins in one piece. After tracing, cutting and match sanding I glued the two piece forward fins together using thin CA glue, and then rounded the leading and trailing edges.
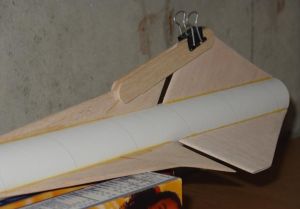 My
standard routine for attaching fins is to tack them on with Titebond wood glue,
add a second wood glue fillet, and then a final fillet of Elmers Wood Filler. I
attached the aft fins first and then the forward fins, using a simple jig of
craft sticks and a paper clip to get them perfectly aligned. The launch lug was
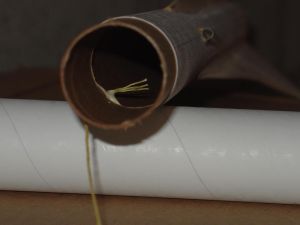
cut in two and attached in the same fashion. I joined the two sections of body
tube together and installed the Kevlar®
shock cord in between the body tubes and coupler. This is accomplished by tying
a large knot in the end of the Kevlar®,
laying it in the body tube and installing the coupler on top of it. Before the
glue set, I pulled the Kevlar®
tight, so that the knot was snug against the coupler, and added a large drop of
glue to complete the anchor point. The final step involved installing the
eyelet in the balsa nose cone by screwing it half way in, removing it, filling
the hole with CA glue and screwing it all the way down. I finished up the
recovery system by attaching the elastic shock cord to the Kevlar®
cord and then to the nose cone, and putting a drop of CA glue on all the knots.
My
standard routine for attaching fins is to tack them on with Titebond wood glue,
add a second wood glue fillet, and then a final fillet of Elmers Wood Filler. I
attached the aft fins first and then the forward fins, using a simple jig of
craft sticks and a paper clip to get them perfectly aligned. The launch lug was
cut in two and attached in the same fashion. I joined the two sections of body
tube together and installed the Kevlar®
shock cord in between the body tubes and coupler. This is accomplished by tying
a large knot in the end of the Kevlar®,
laying it in the body tube and installing the coupler on top of it. Before the
glue set, I pulled the Kevlar®
tight, so that the knot was snug against the coupler, and added a large drop of
glue to complete the anchor point. The final step involved installing the
eyelet in the balsa nose cone by screwing it half way in, removing it, filling
the hole with CA glue and screwing it all the way down. I finished up the
recovery system by attaching the elastic shock cord to the Kevlar®
cord and then to the nose cone, and putting a drop of CA glue on all the knots.
Finishing:
There are no decals included with this kit and the recommended finish is
"paint it any color you want". Normally, finishing a rocket is the
least fun part of the whole project for me. The fins and nose cone were sealed
with thinned down Elmer's Wood Filler and sanded smooth. I got two coats of
Rustoleum Painter's Touch Sandable Primer on this bird and then took it to the
field and flew it a couple of times. The first time it left the pad, I decided
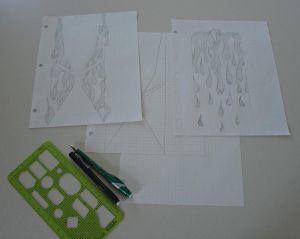
that I would need to put a little effort into the final finish. This rocket is
just too cool! I decided to stick with a two color paint scheme, but tried to
pull off some very elaborate masking for what I call the "dripping
paint" look. I started out with a Krylon spray enamel gloss white base
coat. Drawing, cutting, and applying the masking tape took several evenings. I
went with red for the highlights and just managed to get it painted before the
cold season. The results were disappointing. Either the masking tape I'm using
isn't good enough or (more likely) I'm just trying to do too much with it. The
look was awesome, but there was a lot of bleeding under the tape. From the
launch table it looked pretty good but up close it was a mess. Luckily, I will
have a chance to improve the look of this rocket when I build version 2.
Construction Rating: 4 out of 5
Flight:
My first Duster logged 4 flights before heading up into the wild blue yonder,
never to return. I flew it a couple of times after I got the primer on and
twice more after the final paint job. All flights were conducted on standard
cold and windy Ohio fall days. My version of the Duster weighed in at 3.2oz,
slightly heavier than the advertised weight of 3.0oz. Flight prep is standard.
As mentioned above, I had built the Duster with a longer motor mount, so flying
standard sized 24mm motors requires a spacer. I make it a point to always cut a
few spacers out of spent 24mm casings after every launch so I have a good
supply in my range box. I usually tape the spacer to the engine with a piece of
clear tape to make removal easier. Folding and loading the chute is simple
since there is plenty of space in this rocket. The Duster logged flights on a
C11-5, D12-5, D12-7, and E9-6, all in fairly windy conditions, anywhere from 10
to 15 knots. This is a fairly big bird and will sway quite a bit on a standard
1/8" rod on a windy day. All boosts were high, straight and fast with no
weathercocking and the rocket was arcing over into the wind at ejection. The
longer delays would be better suited for calm days, while I prefer a slightly
shorter delay for windy days. The Duster is big enough to track without to much
trouble and even on its last flight on the E9-6, I had no difficulty keeping an
eye on it. Unfortunately, seeing it land and finding it after it lands are not
always the same thing. At least I've still got an F21 waiting for when I build
the next one.
Recovery:
The Duster comes with an 18" chute, which would probably be about right if
you stick with the recommended motors. I fly this bird with a 4"x4"
Nomex®
heat shield looped onto the Kevlar®
shock cord. The heat shield is a pretty snug fit inside the BT-55 which keeps
the shock cord and chute from sliding back and getting tangled during boost.
After the first flight on a C11-5, I swapped out the 18" chute for a
12" chute and finally went with a 2" x 60" streamer for the E9
flight. The bottom line is that this rocket is designed to fly fast and high.
Unless you fly over hard dry ground, leave the 18" chute at home and when
(not if, but when) you move beyond the D12, get a nice long streamer
that is easy to see and a bunch of friends with good eyes to help you keep
track of this baby! I fly over tall grass and vegetation, so all of my landings
are essentially damage free, but the fin layout is pretty compact on this bird
so it should stand up to some rough landings.
Flight Rating: 5 out of 5
Summary:
The Duster is a high performance bird, period. It just begs to be flown fast
and high. With that in mind, this is not a rocket that you can just stick a
motor in and rack up another whoosh-pop. You need to use your brain when you
fly this bird or you will lose it! Of course there is a good chance you may
lose it even if you do have a brain, so my advice is order a spare nose cone,
save the fin templates and go for it!
PROs: Nice large high performance model rocket for a reasonable price that can handle way more motor than its specs call for. This is a great looking rocket with very clean lines. If you want a taste of high speed and high altitude, this is the bird
CONs: None, unless you count the temptation to get carried away with motor selection and lose your rocket! This really isn't a problem with the rocket but rather the rocketeer. The minor confusion caused by cutting the fins in multiple pieces and the incorrect parts drawing should all be corrected by now, which could be simplified even further by including 6" balsa sheet for the aft fins (or better yet how about some nice laser cut basswood). The 18" chute is OK if you stick to the recommended motors, unless you are flying over very hard ground then a 12" chute is a better choice for windy days. Of course when you start moving up into E30s and F21s, you will need a streamer and a good spotter or two!
Overall Rating: 4 out of 5
Other Reviews
- Thrustline Aerospace Duster By Matthew Bond
Brief: This is a single stage sport rocket with a long airframe and split fin design which give it nice lines and makes for a lot of curious rocketeers at any launch. Construction: The kit is composed of two 1.325" diameter body tubes, balsa nosecone, eyelet, motor tube, two centering rings, metal engine hook, launch lug, Kevlar ® and elastic shock cords, 18" ...
 |
 |
Flights
|
|