| Construction Rating: | starstarstarstarstar_border |
| Flight Rating: | starstarstarstarstar_border |
| Overall Rating: | starstarstarstarstar_border |
| Manufacturer: | Thrustline Aerospace |
Brief:
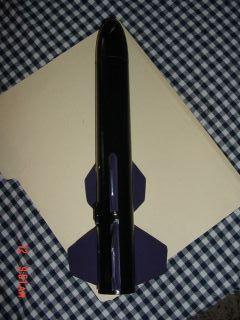
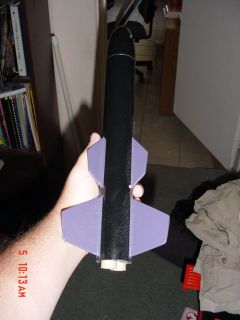
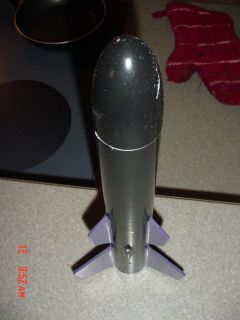
A short and fun two motor cluster rocket with 6 fins with a cool military-esque
style.
Construction:
THe kit contains:
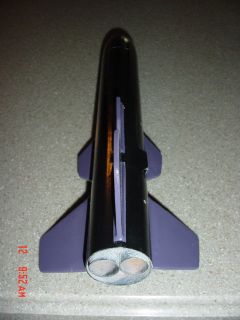
- BT-60 Elliptical nose cone
- BT-60 tube (10.75")
- Balsa fin stock
- 2 BT-20 motor tubes
- Thrust rings
- Light ply centering rings
- Launch lug
- Shock cord
- BB's for nose weight
This rocket is quite simple to construct and uses many of the features that we rocketeers consider to be the best way to do it. For example, the centering rings are laser cut light ply, the shock cord mount is 'Quest' style, and everything is high quality. In my kit, I used wood glue and CyA for all construction. It is amazingly simple to build. Basically, all you do is glue the motor tubes together along with the thrust rings, attach the Kevlar® shock anchor by drilling a hole through the top centering rings, cut and fill the fins, attach them, add nose weight, launch lug, and parachute, paint, and fly! Plenty of everything is supplied in this kit, and you have enough left over to build another, albeit smaller, rocket with the excess.
 The
centering rings are laser cut 1/8" thick light ply. They are strong and
durable; in my opinion, it is borderline overkill. You could easily go with
fiberboard with this motor configuration and have no troubles.
The
centering rings are laser cut 1/8" thick light ply. They are strong and
durable; in my opinion, it is borderline overkill. You could easily go with
fiberboard with this motor configuration and have no troubles.
The fins are 1/8" balsa that you have to cut out from a pattern. This is easy to do and if this is one of the qualifications to make this a "builder's kit", it definitely passes. I personally enjoy cutting out fins for kits, as it provides me with a sense of accomplishment.
With this kit, you may get a plastic nose cone or a balsa nose. I got a plastic nose and I think I prefer it over the balsa cone. The instruction have you drilling several holes into the balsa cone and covering it with epoxy, yet with the plastic cone, just drop the weight in, secure it with the epoxy, and go! Easy enough.
Finishing:
I finished this rocket with yellow glue fillets, then use Elmer's Fill 'n'
Finish (and sand and sand and sand if you know what I mean) to create some very
nice fillets. I trimmed the ends of the launch lug at an angle to make it look
better.
 I then
used a coat of Krylon Gray primer to find spots, filling the most noticeable
ones, and then covered it with a coat of white gloss as a basecoat. The entire
model was painted black, then masked off the fins and painted them glossy
purple, however, because of the black basecoat, they turned out to be a flatter
purple. Remind me not to do that again!
I then
used a coat of Krylon Gray primer to find spots, filling the most noticeable
ones, and then covered it with a coat of white gloss as a basecoat. The entire
model was painted black, then masked off the fins and painted them glossy
purple, however, because of the black basecoat, they turned out to be a flatter
purple. Remind me not to do that again!
Construction Rating: 4 out of 5
Flight:
For the first flight, I used a pair of A8-3's and the supplied 12" nylon
chute. You could easily describe this as a lob flight. The burn on the two A8's
is so short that it just barely cleared 75 feet before they burned out. Apogee
was at about 150-175 feet, and then it landed about 40 feet from the pad.
Great, smooth flight but it needed more power.
For the next flight, I used 2 B6-4s. This time I used a red Rockethead mylar chute and the flight was much more satisfying. Very quick off the pad with an apogee of around 500 feet and it landed about 70 yards from the pad.
 In my
opinion, B6-4s are the best choice for this rocket. I have yet to try it on
C6-5s, but I think it will be just peachy...and very, very fast!
In my
opinion, B6-4s are the best choice for this rocket. I have yet to try it on
C6-5s, but I think it will be just peachy...and very, very fast!
Flight Rating: 4 out of 5
Summary:
I feel that this is a great little rocket and it makes for a great park flyer
on A8s and B6s. As a Skill Level 2 kit, it makes for a good weekend build and
is challenging enough to be fun. Thrustline has a great thing going with their
new line of kits and I recommend you get this one. It'll be great fun!
Overall Rating: 4 out of 5
 |
 |
Flights
|
|