Thrustline Aerospace Pumpkin Head
Thrustline Aerospace - Pumpkin Head {Kit}
Contributed by Ron Wirth
| Construction Rating: | starstarstarstarstar_border |
| Flight Rating: | starstarstarstarstar |
| Overall Rating: | starstarstarstarstar |
| Manufacturer: | Thrustline Aerospace |
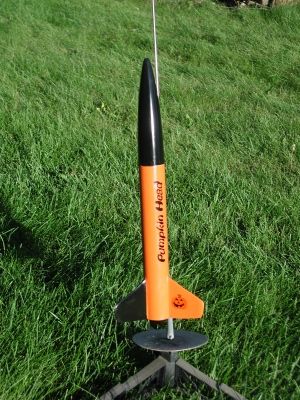
Brief:
When it comes to picking out a kit to purchase, there are several things I look
for in a rocket. Naturally the looks and performance are taken into
consideration but another factor for me is the name. So when I was looking for
a kit to purchase and found myself browsing the selections on the Thrustline
website, how could I pass on a rocket called Pumpkin Head? There are number of
different options when ordering the kit with a choice of motor mount (18mm or
24mm) and parachute type (mylar or rip-stop nylon). I selected the 24mm motor
with the Orange rip-stop chute (like there should be any other color option for
a rocket called Pumpkin Head) and placed my order.
Construction:
This kit along with three others ordered at the same time was delivered to my
home by the USPS within a week. I was slightly worried when opening the package
since the box was mangled at one end. All the contents however, were undamaged.
The kit contains:
- 1 Body tube
- 1 Balsa nose cone
- 1 Engine tube
- 1 Engine hook
- 1 Engine trust ring
- 1 Engine clip retaining collar
- 2 Fiber centering rings
- 1 Kevlar® shock cord and elastic shock cord
- 1 Launch lug
- 1 Steel eyelet
- 1 Balsa sheet for fins
- 1 Decal sheet
- 1 Rip-Stop chute with swivel (option upgrade)
- 1 Instructions

There are 15 steps listed on the instruction sheets with a B&W photo for nearly each step. The kit assembles by starting with the motor mount and this is where I ran into a problem. The centering rings that were packed in the kit were the wrong size. When I emailed John at Thrustline, I promptly received a reply within 10 minutes and the proper parts were in the mail the next morning. Once the rings arrived, I continued with construction. The motor mount steps are common to most rockets:
- Insert and glue engine thrust ring
- Attach engine clip and retaining collar
- Slide on and glue the centering rings
During the assembly of the motor mount, you are required to notch the lower ring for the engine clip. The Pumpkin Head instructions do not indicate how but in the Mighty Mick instructions (being built while waiting for my new rings) have a nice picture of a paper hole punch doing this. You will also need to drill a hole in the upper ring to be able to pass the Kevlar® cord through after attaching it around the motor mount to anchor the recovery system.
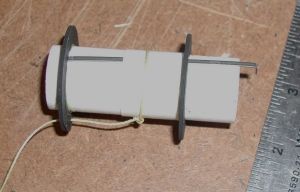 Once the motor mount is dry, it is glued into the body tube. Then you are
instructed to mark the body tube for fin and lug placement using the provided
fin guide. There were no problems encountered during these steps. You then
proceed to start working on the fins. The fins are cut from the sheet of balsa
after being marked from the fin pattern guide. I would have favored cardstock
for this guide instead of the paper one that is supplied. The balsa is good
quality and there is plenty of it just in case you make a mistake. I had no
issues cutting the fins. You are instructed to apply a balsa sealer and sand
before gluing. I skipped the sealer and just sanded them. The fin leading edge
is supposed to be straight by the pattern but I sanded them with a slight
concave curve to give the Pumpkin Head some more character.
Once the motor mount is dry, it is glued into the body tube. Then you are
instructed to mark the body tube for fin and lug placement using the provided
fin guide. There were no problems encountered during these steps. You then
proceed to start working on the fins. The fins are cut from the sheet of balsa
after being marked from the fin pattern guide. I would have favored cardstock
for this guide instead of the paper one that is supplied. The balsa is good
quality and there is plenty of it just in case you make a mistake. I had no
issues cutting the fins. You are instructed to apply a balsa sealer and sand
before gluing. I skipped the sealer and just sanded them. The fin leading edge
is supposed to be straight by the pattern but I sanded them with a slight
concave curve to give the Pumpkin Head some more character.
 After the fins are glued, the launch lug is trimmed with a 45 degree angle on
each end and glued to the body tube. Once dry, the instructions require you to
recoat all the joints with glue and let dry. As a side note, the entire rocket
was glued using the Thrustline Rocket Glue in the "awesome twist
applicator bottle that's self cleaning every time you close it" and I am
very satisfied with the glue and bottle.
After the fins are glued, the launch lug is trimmed with a 45 degree angle on
each end and glued to the body tube. Once dry, the instructions require you to
recoat all the joints with glue and let dry. As a side note, the entire rocket
was glued using the Thrustline Rocket Glue in the "awesome twist
applicator bottle that's self cleaning every time you close it" and I am
very satisfied with the glue and bottle.
Before you finish the rocket you are required to glue and screw the eyelet to the nose cone, then to attach the elastic shock cord to the Kevlar® cord and tie to the eyelet. The instructions do not detail this process very well. With other Thrustline instructions, it is explained to string the Kevlar® cord through the rear of the motor tube prior to it being glued. After the mount is glued, you then make a loop for a place to tie the elastic shock. When the cords are strung into the body tube, the Kevlar® loop is located below the front of the body tube to help prevent zippering during the flight. This was what I did for this rocket.
Lastly, I assembled the rip-stop nylon chute (90% done already) and attached it to the nose cone.
Finishing:
The instructions provide you with finishing techniques and suggestions for
colors and decal placement. My process is as follows:
- Apply water thinned coat of Elmer's Carpenters Wood Filler to fins, nose cone, and tube spiral.
- Sand and apply coat of gray auto primer
- Sand about 90% of primer off and apply two coats of white primer sanding in between coats
- Mask and apply two coats enamel paint (main body color: orange)
- Mask and apply two coats enamel paint (accent color: black)
- Apply decals
- Apply a coat of Future Floor wax with foam brush
Construction Rating: 4 out of 5
Flight:
Now comes the fun part: flying the newly built work of art. Recommended engines
for this bird are C11-5 and D12-5. For the first flight, it is recommended to
use the C11-5, which I did. The rocket burst off the launch pad to at least 700
feet. It was straight and true even with a slight wind. I had planned to launch
the second flight with a D12-5, but after seeing the height and recovery from
first flight, I will need to go to a bigger field. I had launched about 15
rockets during this launch and I can truly say that the Pumpkin Head was my
favorite for the day.
Recovery:
To flight prep the rocket I packed the body tube with a 4"x 4"
Nomex®
heat shield and the nylon chute. The 12' chute floats the rocket gently back to
earth. The bright orange chute dangling the rocket high in the air is an
awesome sight. The rocket landed about 150 yards from the launch pad due to
wind gusts.
Flight Rating: 5 out of 5
Summary:
If you are looking for a very affordable 3FNC, this kit is what you want. It is
a real winner. If you are looking something else, forget it and get this kit
because it is a real winner! I thoroughly enjoyed building the rocket and it is
a real treat to fly. Even though I received a wrong or missing part I would
follow the advice of the company's motto, "Make Mine.....A
Thrustline!" I suggest you do the same. You will not regret it when it
happens to be the Pumpkin Head. Did I mention the how cool the name is?
Overall Rating: 5 out of 5
 |
 |
Flights
|
|