True Modeler's Rocket Kits Juno 1/Jupiter C
True Modeler's Rocket Kits - Juno 1/Jupiter C
Contributed by Jonathan DuBose
| Manufacturer: | True Modeler's Rocket Kits  |

(Contributed - by Jonathan DuBose)
Brief:
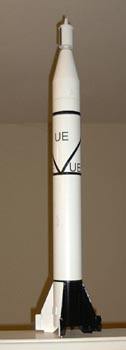 This a beautiful, exquisitely detailed 1/17.5 'Super
Sport Scale' model kit of the USA's first satellite launch vehicle.
This a beautiful, exquisitely detailed 1/17.5 'Super
Sport Scale' model kit of the USA's first satellite launch vehicle.
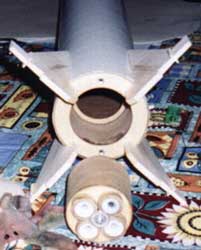
This rocket can be flown using either a 29mm motor canister (for F, G and H motors) or a (4) 24mm cluster canister. Both 'quick change' mounts are interchangeable and secured with a solid retention system. This is a fun to build, fun to fly rocket that will definitely get attention at any launch. Is this kit for everyone? I would hope so, but be forewarned this is not something that you will throw together the night before a launch. True Modeler's Mission Statement starts off with "Our desire is to bring the art of model rocketry back to the roots from whence it came. The True Modeler's Rocket Kits are designed to take you back to a time when model rocketry placed the emphasis on "modeling."
For more see True Modeler's website site (link on title).
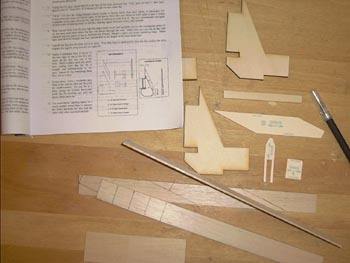 Construction:
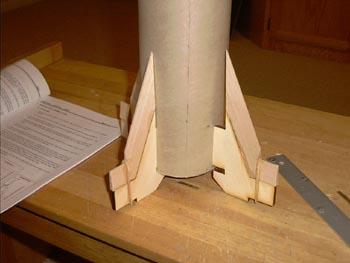
The main body is one very solid 32" long, 4.0" diameter tube. The
fins are impressively laser cut, 'through the wall' and assembled from 6 pieces
into the 4 solid fins. Centering rings and motor mounts are all made from
aircraft quality plywood and require only a fair amount of fitting. The top
assembly, with transition, satellite pod and extension 'tip' is recovered
through a 'cradled' 18" parachute while the main body is recovered by a
solidly anchored 36" parachute.
As impressive as the photos on TMRK's website were, opening the eagerly
awaited package (my girlfriend's Christmas gift to me!) only reinforced my
impression that this rocket would quickly become a favorite of mine. All of the
materials (with a few minor concerns, noted later) were of the highest quality
and appropriate for a solid, many times to fly, medium powered, highly detailed
model rocket.
 True Modeler clearly put as much effort and thought
into the assembly instructions as they did in the design and quality of
materials of this kit. A 12 page, clearly written and illustrated 'book' guides
you through the assembly process. Each major subassembly is 'kitted' in it's
own package and clearly explained making it almost impossible to make an error.
True Modeler clearly put as much effort and thought
into the assembly instructions as they did in the design and quality of
materials of this kit. A 12 page, clearly written and illustrated 'book' guides
you through the assembly process. Each major subassembly is 'kitted' in it's
own package and clearly explained making it almost impossible to make an error.
The order of assembly is 1) Booster Assembly, 2) Motor canisters, 3) nose
assembly, 4) Satellite and Tub, 5) Painting and decals, and finally, 6) Final
assembly and flight prep. As TMRK says "you will find this kit not too
difficult to build, but you must follow the instructions exactly as they are
written and in the order they are written. Upon completion, you will have a
master piece you'll be proud to display and fly." I couldn't agree
more!
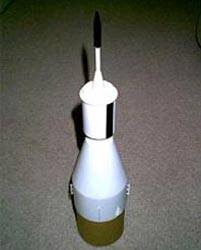
Finishing:
Finishing this rocket is pretty much a straightforward process for any
experienced rocket builder, but here I will note three concerns. First, was the
rather light weight 'fishing' snap hook swivel that attaches to an eyebolt on
the transition below the satellite tub and helps cradle the nose assembly (like
the Estes Saturn V and Mercury Redstone). Second were the decals. There are 4
large "UE" letters (it designates the 29th Redstone booster built,
the 2nd and 9th letters of the 'Huntsville' Redstone arsenal). While I have never been especially adept
at decals I did find these especially delicate and brittle. I managed to apply
only one of the 4 satisfactorily. Thirdly, were the 4 antennae on the nose
section. I found that these were very delicate and I managed to break 3 of the
4 (with an assist from my grandson!) during finishing. Finally, I dispensed
with them entirely. The painting scheme is relatively simple and very clearly
illustrated.
Construction Rating: 4 out of 5
 Flight:
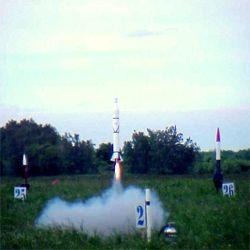
I was rather nervous about flying this model because it was my first launch at
my local club (Sacramento Area Rocketry Group - SARG) and because I had simply
liked how this one looked and didn't want to wreck it. I checked all my prep
several time and debated whether to use an F40-4W Aerotech reload or an
Aerotech G80-7T. After consultation with a couple of more experienced members I
decided on the G80. Basically, I wanted to make sure I had plenty of power and
didn't want to risk a cato due to faulty reload motor assembly on my part. As I
checked in I received more than a few inquiries about the model and a number of
compliments as well. My first attempt to load the rocket on the launch rod
revealed 'sticky' launch lugs - I had obviously gotten paint on the inside of
the lugs. A little light sanding solved this. I'll have to admit a small case
of butterflies as the countdown reached 'launch' and the Copperheads lit the
motor. The G80 lifted the "J1JC" quickly off the rod and STRAIGHT up!
It appeared that chute deployment, both of them thankfully, occurred exactly at
apogee - after a nice coast. In spite of slight mishap I was very happy with
the flight and again received several compliments on the flight.
 Recovery:
The only problem I experienced occurred during chute deployment. The
lightweight snap hook on the nose section which I noted earlier was pulled
apart and instead of coming down gently cradle at 45 degrees the nose section
came down straight on the satellite extension tube which broke. TMRK recommends
that you don't glue this delicate extension into the tub assembly so this will
be rather easy to replace and maybe not install on future flights! Other than
this detail the main shock cord is solidly attached to a Kevlar®
cord which is eyebolted solidly into the the upper plywood centering ring. Both
chutes are high quality rip stop nylon solidly shrouded and grommeted. Only a
little mud and the above noted damage (which TRMK is replacing at no charge)
marred the otherwise perfect maiden flight of my TMRK 'J1JC' and it WILL fly
again, often, and at my first opportunity.
Flight Rating: 4 out of 5
Summary:
Overall, I could hardly be happier with this kit. The detail of the rocket
requires that several parts be delicate and I am more than happy to manage
those details. Another plus is that Mark and Scott at True Modeler are very
helpful whenever needed. My experience with this kit would lead me to highly
recommend this TMRK kit and TMRK generally.
Overall Rating: 4 out of 5
 |
 |
Flights
|
|
J.E.T. (May 23, 2003)
K.S.W. (August 24, 2004)
|
|
C.D.B. (February 16, 2002)