| Construction Rating: | starstarstarstarstar_border |
| Flight Rating: | starstarstarstarstar |
| Overall Rating: | starstarstarstarstar_border |
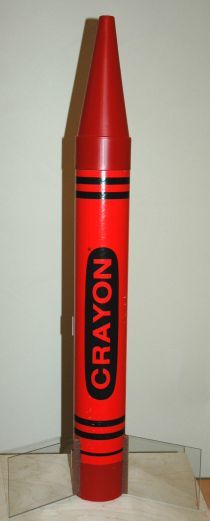
| Manufacturer: | Underdog Rocketry |
| Style: | Odd-Roc |
Brief:
A simple to build rocket that not only looks cool, but it also supports a TARC
team as well.
Construction:
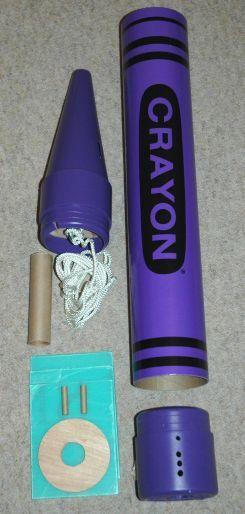
The kit includes:
- 1 3 foot Crayon bank with bulkhead already glue in place
- 1 motor tube
- 1 centering ring
- 2 launch lugs
- 1 30" Rockethead Rockets mylar parachute
- 3 clear Lexan fins
The provided instructions were easy to follow. You start out by epoxying the motor tube into the fin can. A hole was already drilled into the fin can for the motor tube. I used the provided centering ring to ensure that the tube was centered in the fin can while the glue was drying. Once dry, I poured in more epoxy to a depth of about 1/8" in the bottom of the fin can to provide more strength. I then used epoxy to mount the upper centering ring.
The nose cone already had a bulkhead mounted with what appeared to be Gorilla Glue (polyurethane glue). There was also a large screw eye mounted to the bulkhead and the shock cord was already attached. I mounted the free end of the shock cord to the inner wall of the body tube using tape and epoxy.
Now for the fins. The fin can already had holes drilled in it for mounting the fins. I believe the idea was to allow for epoxy rivets to form in the holes. I sanded the areas around the holes and applied epoxy to the root edge of the Lexan fins. I used an angle iron to hold the fin in place while drying.
 Once all the fins were mounted, I was getting ready to move the rocket and I
accidentally dropped it onto a carpeted floor. Two of the fins immediately came
off along with the dried epoxy. There was no glue residue on the fin can
whatsoever. This told me that the epoxy just was not sticking well enough to
the plastic fin can. I remounted the fins and then added fillets using West
systems 405 filleting blend. This detracted from the appearance somewhat, but
the rocket passed the drop test.
Once all the fins were mounted, I was getting ready to move the rocket and I
accidentally dropped it onto a carpeted floor. Two of the fins immediately came
off along with the dried epoxy. There was no glue residue on the fin can
whatsoever. This told me that the epoxy just was not sticking well enough to
the plastic fin can. I remounted the fins and then added fillets using West
systems 405 filleting blend. This detracted from the appearance somewhat, but
the rocket passed the drop test.
I sent an email to Underdog Rockets explaining my experiences and apparently they were also seeing that the epoxy rivets were just not holding up. On my second Crayon, I opted to cut fin slots for TTW fin mounting. Underdog is also doing the same thing on subsequent kits. It really is a better method and looks much better too!
I added some Kaplow clips to the fin can for positive motor retention. I did have to trim some plastic off the nose cone shoulder so the fit was not quite so tight. Last step was to mount the 30" parachute and she was ready for flying.
Finishing:
No finishing is required.
Construction Rating: 4 out of 5
Flight:
There were no motor recommendations other than to use a short delay with any F
engines. I added a Nomex®
chute protector due to the size of the body tube. My first flight was with an
Aerotech F50-4T single use motor. The Crayon took off at a respectable speed
and got to about 600 feet. The delay was just about perfect with ejection
occurring slightly after apogee. The second flight was on a G104T-S and had a
straight, fast boost to about 800 feet. Ejection again was a little after
apogee. Great flights!
Recovery:
The 30" parachute was just the right size to bring this rocket back down
to earth without damage. Both flights had perfect recoveries and the fins
stayed attached.
Flight Rating: 5 out of 5
Summary:
Crayon rockets are just fun and the kids really love them. Underdog Rockets
went through a lot of work to put this kit together. I would recommend that you
get one not only because they are fun to fly but also because it supports a
TARC team.
Overall Rating: 4 out of 5
 |
 |