U.S. Rockets El Lubbo
U.S. Rockets - El Lubbo {Kit} (1020, K-20) [1979-]
Contributed by Lance Alligood
| Construction Rating: | starstarstarstarstar_border |
| Flight Rating: | starstarstarstarstar |
| Overall Rating: | starstarstarstarstar_border |
| Manufacturer: | U.S. Rockets  |
Brief:
The U.S. Rockets (USR) El Lubbo is unlike any other kit available. In an age
where cones and transitions are made of plastic or balsa, an extremely
challenging yet rewarding build has come along where these items are made by
cutting and shaping body tubes. The end result is a large yet extremely
lightweight mid power rocket that can be flown on most 29mm and 24mm motors.
Construction:
I ordered this kit along with 2 others directly from USR. They were ordered and
received without payment first. When I received the bill via email, USR gave me
a discount on my order that resulted in a total amount (including shipping) for
less than the cost of the 3 kits separately. Both the ordering/payment
arrangement and multi-kit discount are standard USR practices. Add in the
impressively fast turnaround time on email communications (responses in less
than one hour is in fact quite common!), and you realize that you are dealing
with a very customer driven business! The kits all showed up on my door in 2
boxes just a few days after having my order confirmed.
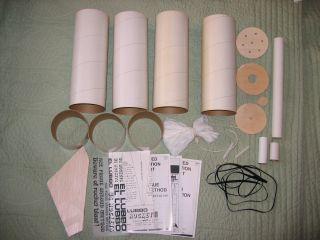
The El Lubbo kit comes with the parts loose in a box almost entirely dedicated to shipping (there was enough room to safely squeeze in a USR Miniroc 1.2 kit with it). After verifying all parts were present and intact, my first reaction would have been "Where's the nose cone? There's no balsa or plastic nose cone!" except I knew that the kit has you building the nose cone and tail cone--the definitive elements of this kit--from tubing. You read that right. The nose cone and tail cone are cut from tubing! Because of the unusual and unfamiliar design of this kit, I read through the instructions. And then I read them again. While there is enough material to create 2 nose cones, there is only enough for one tail cone. The room for error is small. I could tell that this was going to be a challenging build and one that would require a lot of patience. However, if I followed everything to the letter, I would be rewarded for my efforts!
 Also,
because of the lightweight nature of this kit, it is a good idea to go easy on
the glues and/or adhesives. USR recommends yellow wood glue (aliphatic resin)
for the build and I concur fully with that recommendation as it provides
greater strength than the materials being joined but without the weight penalty
of epoxy.
Also,
because of the lightweight nature of this kit, it is a good idea to go easy on
the glues and/or adhesives. USR recommends yellow wood glue (aliphatic resin)
for the build and I concur fully with that recommendation as it provides
greater strength than the materials being joined but without the weight penalty
of epoxy.
The kit includes:
- 4 11" long x 4" diameter thin wall body tubes
- 3 4" diameter coupler tubes
- 1 12" x 29mm motor mount tube
- 4 1/4" thick balsa fins
- 2 3.9" x 29mm plywood centering rings
- 1 3.9" plywood bulkhead plate
- 1 3.9" plywood baffle plate
- 1 screw eye
- 1 3-fold paper shock cord mount
- 1 7' x 1/4" elastic shock cord
- 2 1/4" launch lugs
- 1 24" surplus parachute
- 1 24mm motor adapter kit
- Decals
- Instruction manual
- Tail cone and nose cone pattern sheet
- Advanced Information Report (AIR) #1 -- Motor Installation
- Advanced Information Report (AIR) #4 -- ACE Fugue Shroud Method
Aside from reading the instructions possibly a third or even fourth time, the first thing that needs to be done is to clear out some "mental workspace" because you are going to need to forget a lot of what you might normally want to do when building a rocket. Take several deep breaths and count to 10. Ready? Let's go then...
 The first
couple steps are fairly conventional. The instructions have you round the
leading and trailing edges of the fins. My fins were all close but not quite
the same in shape though so I had to match sand them. That didn't take long
though since they are only (thick) balsa. Also seeing how this rocket is going
to be a "slow and low" performer, I chose to only round the leading
edge so the trailing edge fin tips would be better suited to handle any rough
landings. The motor mount tube was then marked for the fins and centering
rings. All 6 items were glued and filleted one at a time in their appropriate
locations on the tube and then allowed to dry.
The first
couple steps are fairly conventional. The instructions have you round the
leading and trailing edges of the fins. My fins were all close but not quite
the same in shape though so I had to match sand them. That didn't take long
though since they are only (thick) balsa. Also seeing how this rocket is going
to be a "slow and low" performer, I chose to only round the leading
edge so the trailing edge fin tips would be better suited to handle any rough
landings. The motor mount tube was then marked for the fins and centering
rings. All 6 items were glued and filleted one at a time in their appropriate
locations on the tube and then allowed to dry.
Next you are informed to read the AIR-4 document before continuing any
further with the build. This document explains the how and why of building
custom shrouds from tubing along
 with plenty
of diagrams of simple and complex shapes to further demonstrate its point and
simultaneously inspire the builder (at least it did for me) for future builds
as well. Shrouds can be formed as nose cones, tail cones, or transitions. I
will definitely be keeping this document in a safe place for future reference.
with plenty
of diagrams of simple and complex shapes to further demonstrate its point and
simultaneously inspire the builder (at least it did for me) for future builds
as well. Shrouds can be formed as nose cones, tail cones, or transitions. I
will definitely be keeping this document in a safe place for future reference.
With all of that information absorbed, it's time to return to the build. A "gotcha" makes its first appearance here. The instructions have you use the shroud marking guide to mark and cut the tail cone shroud. If you do that first, it will ruin the nose cone marking guide. Instead, refer to all the instructional guidance on the marking guide sheet instead and start with the nose cone.
 Now that
trouble has been averted, you find out that you are not only going to create
one nose cone, but two. Seeing how this was my first time using this technique,
I was more at ease seeing how I was going to have 2 chances to do it right. In
fact, if done right the first time, you get a spare nose cone out of the deal!
There is, however, only enough tubing for one tail cone shroud.
Now that
trouble has been averted, you find out that you are not only going to create
one nose cone, but two. Seeing how this was my first time using this technique,
I was more at ease seeing how I was going to have 2 chances to do it right. In
fact, if done right the first time, you get a spare nose cone out of the deal!
There is, however, only enough tubing for one tail cone shroud.
Although the instructions recommend cutting the tubes with a new, sharp X-Acto #11 blade, do yourself a huge favor: put down the X-Acto knife and go to your local home improvement store. Pick up a razor blade utility knife and a pack of replacement blades. (One of those "snap blade" box cutters work just was well too!) For less than $5 you will have a much stronger, sharper, and longer lasting tool because you are going to need it for this build. Otherwise, it's going to take several #11 blades...
 The
important things to remember when cutting the tubes is to be patient and always
make sure that your blade is sharp. "Measuring twice and cutting
once" also applies here, as well as be patient and take your time. I just
cannot stress that enough. Making several passes over each line, you are left
with 2 pointy "crowns" of tubing. Small relief cuts are made at the
base of the triangles to assist with the shaping of the tube.
The
important things to remember when cutting the tubes is to be patient and always
make sure that your blade is sharp. "Measuring twice and cutting
once" also applies here, as well as be patient and take your time. I just
cannot stress that enough. Making several passes over each line, you are left
with 2 pointy "crowns" of tubing. Small relief cuts are made at the
base of the triangles to assist with the shaping of the tube.
I used masking tape along the seams of the triangles to form the cone and hold the edges together evenly. Although not mentioned in the instructions, I would consider it a worthwhile endeavor to glue strips of 90# paper (I used four ~6" x 3/4" pieces) along the inside of the cone to provide increased strength and durability of the cone. I left the coupler dry fitted about 3/4" inside the base of the cone to ensure everything stayed in round while drying. I found that the tips were still a little ragged looking so I cut a small piece of 90# paper to form a cone-like pyramid and cover the first two inches of the tips on the outside to give it a little cleaner look and again, more support. Using the paper strips was similar to how Art Applewhite has you assemble the shrouds for his various saucers and the nose cone has similarities to what Art Applewhite has you do when building one of his 29mm Qubits. I also felt this was a more lightweight solution than pouring epoxy or 2-part foam to accomplish the same goal of increasing the cone's strength and durability.
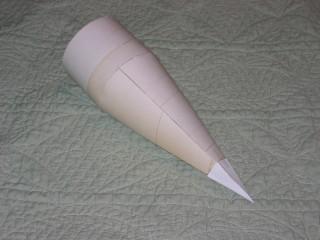 The last
steps in nose cone construction is to glue the bulkhead inside the coupler
about 1/2" from one end. A small bulkplate is also glued to the large
bulkhead so that the screw eye has a substantial amount of wood to grab onto.
With the bulkheads filleted into place, the coupler is glued into the nose
cone. It's also a good thing that there is material to build 2 nose cones
because I managed to mess up on the first one... I tried to rush everything
along (I didn't follow my own advice!) from having some ugly gaps and seams to
even gluing the cone onto the coupler crooked! Everything went much
better the second time around with the other piece of tubing.
The last
steps in nose cone construction is to glue the bulkhead inside the coupler
about 1/2" from one end. A small bulkplate is also glued to the large
bulkhead so that the screw eye has a substantial amount of wood to grab onto.
With the bulkheads filleted into place, the coupler is glued into the nose
cone. It's also a good thing that there is material to build 2 nose cones
because I managed to mess up on the first one... I tried to rush everything
along (I didn't follow my own advice!) from having some ugly gaps and seams to
even gluing the cone onto the coupler crooked! Everything went much
better the second time around with the other piece of tubing.
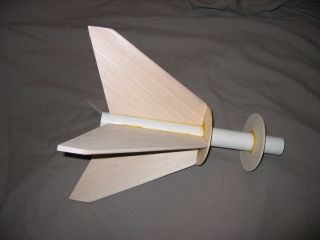
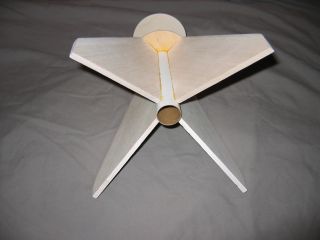
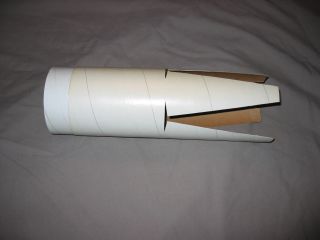
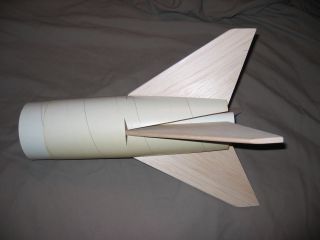
Cutting the tail cone transition was an easier task and is simply a matter of taping the pattern to the tube and following the cut lines. With a little sanding of the inside of the tube and forward centering ring, everything fit together smoothly. The motor mount/fin assembly was glued into place. The coupler joining the forward airframe section was also glued in at the same time because it mounts flush against the forward centering ring as well. It was set aside vertically and allowed to dry before attaching the tips of the tail cone to the fins and motor tube.
I moved on by assembling the forward section of the main airframe. First, a bulk plate with several holes to act as a baffle was sanded to size to fit inside another coupler tube. It was glued and filleted into place inside the coupler. That coupler was then glued halfway inside each of the 2 remaining uncut and unmodified airframe tubes. The baffle not only provides a "shelf" for the recovery hardware to rest on (not to mention keeps them comfortably away from the blast of the ejection charge), it also adds considerable stiffness to the design as the tubing is much thinner than your typical HPR airframe tubing--although still much thicker than standard Estes tubes.
With the forward airframe drying, I returned to the tail cone assembly. I started by taping the tips of the tail cone to the motor tube to hold it in place as the glue dried. Doing one flap at a time, I put a nice bead of yellow wood glue along both fins to form a nice fillet. Again, one at a time. I was still left with small holes in the tubes from the relief cuts but they will have to wait till finishing to be filled with some putty. Also, one of my fin slots turned out to be ~1/16" too wide. Instead of trying to fill the gap with a ton of glue, I folded a 6" x 3/4" strip of 90# paper in half lengthwise and attached onto the underside of the tubing so that it could attach to both the tubing and fin, effectively sealing the gap with minimal weight, glue, or trouble of disturbing the lines of the rocket while still providing ample support.
The only other deviation from the instructions was to use rail buttons in place of the 1/4" launch lugs. Personal preference here. One was mounted just forward of the tail cone shroud (into the aft centering ring) and the other was another 7" forward to have the extra support of the aft coupler to hold on to. The holes were drilled and glue was applied before screwing the rail buttons into place.
Finally, the shock cord is a long piece of 1/4" elastic glued to the inside of the airframe with a paper tri-fold. The other end is tied to the screw eye in the nose cone. I tied a small loop into the shock cord so that I could easily swap out whichever chute I wanted to use at the field. The kit does include a very lightweight surplus 24" nylon chute. While not appearing to be particularly rugged, it should be adequate for this rocket for at least a handful of flights to bring it in safely but quickly.
Finishing:
USR uses the smoothest glassine coated tubes I have found from any manufacturer
which means that there were no spirals to fill. Having only the large balsa
fins to fill, I started by glazing them with 20-minute finishing epoxy to add
strength and provide dent resistance. (Had they been smaller, I probably would
have used CA instead.) The fins were then sanded with 220 grit sandpaper. To
fill out any minor imperfections left, I smeared them with a coat of diluted
Elmer's Fill 'n' Finish and sanded again until I had a smooth surface.
The nose cone and tail cone required quite a bit of filling to get rid of the seams and minor gaps from cutting the tubes. I resorted to Bondo automotive body putty for this task because of its greater strength over Fill 'n' Finish while still being lightweight and retaining its ease of sandability. The nose cone was more difficult to get smooth (requiring a few rounds of applying filler and sanding) as it has more noticeable seams and the shape changes from being round at the base to rather pyramid-like near the tip because of the wide arcing diameter of the 4" tubing. The tail cone just needed some smoothing out around the fin fillets. I covered the seams where the body tubes butted together as well.
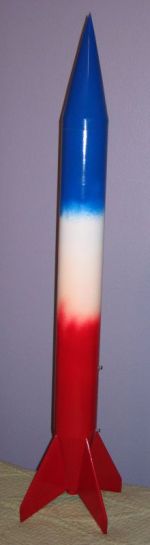
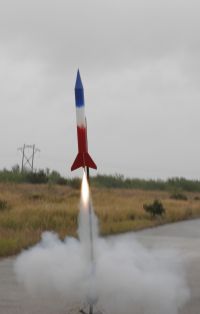
Bright colors aren't exactly necessary because of El Lubbo's large size and slow thrust requirements. The rocket will almost certainly remain easily visible during the entire flight because of this. It was first primed with Krylon gray primer and then sanded it smooth. Another coat of primer followed by more sanding then finally I put on a couple shiny coats of Krylon gloss red, white, and blue which I faded together.
The included decals were peel 'n' stick and were just black text on a matte finish clear adhesive. I felt the included peel 'n' stick decals were a little plain compared to my paint scheme so I left them off.
Construction Rating: 4 out of 5
Flight:
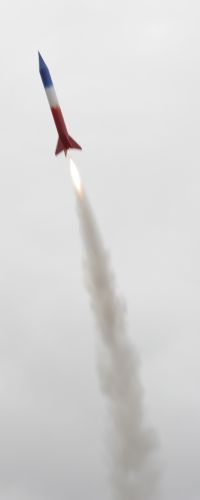
Despite the long 29mm motor mount tube, the instructions state early on that El
Lubbo is not designed to fly on motors with an average thrust greater than 20
pounds. In other words, it will fly on pretty much any D, E, F, or G impulse
24mm or 29mm motor up to a G80. I prepped a G64-7W reload, friction fit the
motor into place with some masking tape, dumped in some dog barf wadding,
attached the chute onto the shock cord, and placed the nose cone on. Finally, I
loaded the El Lubbo onto the rail and hooked up the Quickburst ignitor to the
clips.
The motor roared to life and El Lubbo wasted no time in getting off the pad! As a very welcome bonus, the rocket gave off a loud whistle--even louder than my BSD Thor on a high thrust I motor! Overall height was easily 1000 feet and would have been much higher if not for the 10+ mph winds on a bleary January day in Florida. There is no doubt that long burn motors with a slight punch at the beginning of the flight would be the ideal and most impressive flight for El Lubbo.
Recovery:
I do like how the baffle bulkhead in the middle of the airframe acts as a shelf
for the recovery devices to sit on at a comfortable distance from the motor
tube. It also benefits the CG of the rocket since the recovery devices can only
be in the forward third of the rocket as well! I don't trust its location to be
enough to not use any wadding at all but a minimal amount of cellulose wadding
to cover the baffle should be more than sufficient in safely protecting the
shock cord and chute.
 Ejection was
dead on at apogee. The chute came out and softly opened. The thin, somewhat
porous nylon material made for a gentle inflation of the chute. It also made
for a descent on the quicker side but that actually was desirable the day I
launched it because of the 10+ mph winds. Even with the rapid (but still quite
safe) recovery, I had ~1/4 mile walk through the soggy field. No damage upon
inspection. Excellent flight and recovery!
Ejection was
dead on at apogee. The chute came out and softly opened. The thin, somewhat
porous nylon material made for a gentle inflation of the chute. It also made
for a descent on the quicker side but that actually was desirable the day I
launched it because of the 10+ mph winds. Even with the rapid (but still quite
safe) recovery, I had ~1/4 mile walk through the soggy field. No damage upon
inspection. Excellent flight and recovery!
Flight Rating: 4 out of 5
Summary:
Simply put, this is not a beginner's kit. Advanced builders need only
apply. The USR El Lubbo is a huge mid power kit that provided me with a more
than challenging build. Not only did I enjoy building the nose cone and tail
cone shrouds, I will keep the documentation for this kit in a safe and easily
accessible location to refer to again for future scratchbuild designs! This is
a kit that will test your build techniques and patience. You can however, amaze
your fellow rocketeers by launching El Lubbo on a 24mm motor! So if you are
looking for a simple 3FNC kind of rocket, then this kit isn't for you. Or if
you find that you overbuild your rockets or often don't follow the
manufacturers build instructions, then this isn't a kit for you either. If you
are looking for a Level 1 certification kit, this probably isn't the one for
you (primarily because of the low thrust requirements). This rocket can be
finished with less effort than my perfectionist drive put me through but my
efforts were very much rewarded. Now I need to go feed El Lubbo a steady diet
of low thrust long burn motors!
Overall Rating: 4 out of 5
 |
 |
Flights
|
|