| Construction Rating: | starstarstarstar_borderstar_border |
| Flight Rating: | starstarstarstarstar_border |
| Overall Rating: | starstarstarstar_borderstar_border |
| Manufacturer: | U.S. Rockets  |
Brief:
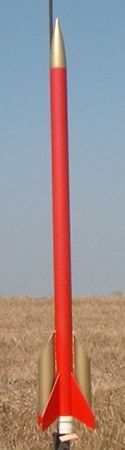
Think of this as a mid-power Gemini DC--two side pods with ducted ejection pop a couple long plastic streamers out the back. It can supposed hit 6000 feet on a G60-4 although that might be a bit optimistic. Still, this is built rugged to handle big thrust motors.
Construction:
My kit arrived via EMRR as a prize and everything was in good shape. The components are good quality, and I could tell just picking things up that this is a much tougher bird than the typical modroc. Parts include:
- 2 1.22" x 12" body tubes, heavy wall (29mm ID)
- 2 1.22" x 6" side pods
- Hard balsa nose cone
- 4 Pre-cut plywood fins
- balsa bulkhead, pod caps
- 2 streamers, elastic shock cord
- 1/4" launch lug
- 29/24 motor adapter kit
- waterslide decal**
**The website and instructions mention a decal, though my kit did not include one, and numerous emails to US Rockets went unanswered.
This is rated as a skill level 1 kit. That's probably a bit understated, as in my case I had to handle the tapered cuts on the pod tubes on my own. I'd give it a skill level 2 overall.
The instructions were fairly well written with basic illustrations where needed. The instructions even list a typical build time, about 2 hours. That's pretty accurate as long as you don't include finishing time.
Construction starts by sanding the fins. I went with basic rounding of leading and trailing edges, figuring a high performance airfoil on such a high drag design would be pointless. The fins are pre-cut from some very nice plywood.
Next, you're supposed to mark the body tube for fin lines. Considering how tight things would be with 4 fins and a pair of side pods, I held up to fill the spirals first. The tubes, while very good quality and certainly heavy duty, had nasty grooves as opposed to spirals. Think slathering in Bondo not a light smearing of Elmer's Fill 'n' Finish. I probably had 2-3 hours just filling the spirals on the body tubes and pods.
I attached fins with yellow glue rather than CA to get a stronger bond and followed up with generous wood glue fillets. Fins are supposed to be offset by 1/2" from the aft end, making it much easier to tape the motor in place. Since the pods are flush with the rear, this isn't really that much help so I went with the fins flush with the aft end for slightly better stability and what I think is a better look.
The payload/upper body tube is built from another 12" body tube, a nose cone, and a bulkhead made from a coupler with a balsa disk. Considering the ejection charges of some of the higher impulse motors this is rated for, I'd have preferred a solid bulkhead rather than a glued-in disk, but this will probably hold up OK with a good glue joint and fillets.
 The motor adapter is a basic 24mm tube with a couple of centering rings. The kit also included a brief write-up authored by US Rockets' Jerry Irvine on motor mounts and retention, which I found to be a nice and informative addition.
The pods are according to the instructions, pre-cut and simply get a balsa cover piece. In my kit, the tubes were squared not tapered and there was no pattern or information on how to cut the angle. I also noticed that the photo of the kit in the bag on the US Rockets' web site had squared pod tube also. I shot off a quick note to the "contact us" link on the web site but got no response. So 3 days later I went ahead and just made a 30-degree tapered cut using my miter box. I then cut the vents in the pod tubes and lower body tube.
Ducted ejection can be a very tricky proposition, another reason I think this is more of a skill 2 kit than a beginner's kit. This is especially true in this scale versus the Estes Gemini DC because with such large (3/8" x 1") vents on heavy wall 1.22 inch tubes, you've got a gap on each side of over 1/8". That's likely going to need something like epoxy, and there will be a tendency for the epoxy to ooze through the tube while it sets. My favorite trick is to grab a pinch of dog barf, mix in some white glue, and turn it into a paste. I then spread this paste into the gap and let it harden. Once it's hardened, I follow up with a thin epoxy fillet on top. Once you're sure you've got a tight seam on the ducts, you can glue on the end caps to the pods, which you cut from stock using a provided template.
I'd also note that for my payload section, I left the cone friction fit rather than glued on. The instructions initially tell you to glue on the cone, but at the very end suggest leaving it loose to have a working payload. An experienced builder is not going to make the mistake of gluing in the nose cone if they want to utilize the payload, but the newbie skill 1 crowd might not figure this out until it's too late.
Finishing:
As noted previously, tube spirals are a bunch of work if you want a nice finish.
With a blank canvas to start with--no stock colors, no color photos anywhere I could find--I started off with a couple coats of gray primer, the first of which was more of a dusting than a paint job. I painted the nose and pods a metallic flaked gold then masked them off and hit everything else with Rustoleum Candy Apple Red Metallic. The result is a nice finish.
As also mentioned, there is allegedly a decal for this kit although I did not get one. I do think it could benefit from even a basic "USR Rear Ejection" type of vinyl lettering or decal.
Construction Rating: 3 out of 5
Flight:
For the first flight, I loaded a Perfectflite altimeter for tracking and went with a E9-6 versus a recommended 7 second delay. Packing the large streamers in the side pods is a bit of a challenge. Not only is it a tight fit, but to keep the streamers from dropping out during boost, you have to use a small piece of masking tape to hold them in place.
The rocket flew perfectly straight in moderate 6-8 mph winds. The 5 second delay was perfect--it had just arced over and according to the altimeter, reached 940 feet. This is obviously a very high drag rocket to have only covered 940' on a E9.
Recovery:
Obviously, there's a Goldilocks principle to prepping the streamers, as I didn't quite figure out "just right". One of the two streamers deployed fine, but the other remained stuck in the pod. As it turned out, that's probably an ideal configuration--the one streamer held the rocket in a horizontal profile, very slowly descending, and avoiding a nose-first recovery on that pointy (and soft balsa) cone.
Flight Rating: 4 out of 5
Summary:
I liked the quality of components and generally liked the design.
Cons would include non-existent customer service and perhaps an inaccurate skill level 1 rating. I think it's also a bit overpriced at $27, no doubt pushed up by the heavy-duty components like thick wall tubing and plywood fins.
Overall Rating: 3 out of 5
 |
 |
Flights
|
|