| Construction Rating: | starstarstarstarstar_border |
| Flight Rating: | starstarstarstarstar |
| Overall Rating: | starstarstarstarstar_border |
| Manufacturer: | U.S. Rockets  |
Brief:
This is an up-scale of the old classic Starlight from the 1960's. It flies on
29 or 38mm motors with adaptors provided.
Construction:
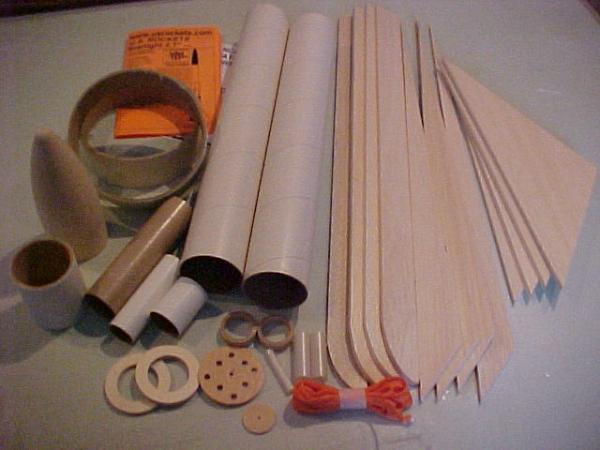
Picture seen is after cutting out all the fins and strakes. Kit includes:
- 4 Large ¼" thick balsa sheets for fins and strakes
- 2 Rings for fins
- 2 Body tubes
- Coupler
- Balsa nose cone
- 38mm motor tube
- 29mm adaptor assembly
- Ejection Baffle
- Other sundry components
- Instructions and templates
- A parachute is NOT included
There are lots of surfaces to sand and miles of fillets to do. This is not a weekend job but only requires moderate building skills. The first thing I did was to cut out all the fins. You need to take your time and use a sharp knife with a long straight edge because the wood is so thick. The key here is accuracy. Inaccurate cuts will make the build tough as the components will be difficult to fit together. A little patience and extra effort here will pay of later. Note: I left all the fin edges square. This made it easier to paint later and is how the original kit from the 60's was built.
I then very liberally sealed the edges of the tube fins with CA. The cardboard rings were on the rough side. Prepping the rings took some effort but nothing too difficult.
I deviated from the kit by installing small rail buttons on the rings. The kit contains two sets of different size large launch lugs. But because I have rails, I felt that it was a better way to go.
One minor thing I didn't like about the instructions was that in the body of the text it calls out part numbers. It says to “Glue a CR-16-11-1/2 to each end." What the hell is a CR-16-11-1/2? You can figure out what each part is during the build but it can become annoying.
Finishing:
The kit is even harder to paint that in appears. I don't use sanding sealer, so
several coats of primer was needed to seal all the wood. Because there is so
much surface area, two cans of primer were required.
The white paint coat was the most difficult. Getting a good coat of paint on the ID of the rings, and the area where the rings meet the strakes was difficult at best. Several coats and patience is mandatory here.
To paint all the edges red would have required endless hours of tedious masking. I cheated by painting the edges with a Uni-Paint paint pen. Because the edges were left square, the paint pen technique actually came out pretty good.
Construction Rating: 4 out of 5
Flight:
The motors are held in place using the masking tape friction fit method. I have
done this on countless rockets so there was nothing new here.
The kit comes with a nice elastic shock cord but no parachute. I chose a 30" nylon chute of the Aerotech variety.
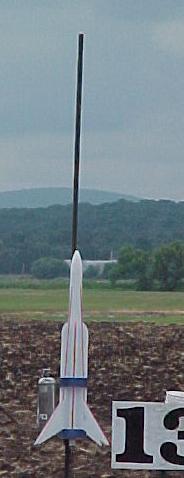
The first flight was on a G38 7. This was a bit weak for the rocket, but a good flight. This was also the last flight for me. A 12 year old kid thought that the rocket was the coolest thing he ever saw so I gave him the rocket. It was an excellent opportunity to spark a kid's imagination and pay forward.
Recovery:
The delay was a bit long, but the laundry came out and recovery was fine
Flight Rating: 5 out of 5
Summary:
This is a moderately difficult kit to build. If you like up-scale rockets but
are afraid to design your own, this is the kit for you. It's guaranteed to turn
heads at every launch.
Overall Rating: 4 out of 5
Other:
Read the directions! I got ahead of myself and missed a step. The kit is
designed to have the shock cord attach to the aft end of the rocket with a cord
running from the aft centering up to the nose cone/BT joint. This is to avoid
breaking the fins on landing. I got way ahead of the instructions and built it
the conventional way. Once I realized what I had done, it was too late. I
anticipate repairing lots of fins. Hind sight is 20/20. I should have put the
rings on after everything was painted. The instructions mentioned that as an
option. You may want to consider that when building yours.
 |
 |
Flights
|
|