| Construction Rating: | starstarstarstarstar_border |
| Flight Rating: | starstarstarstar_borderstar_border |
| Overall Rating: | starstarstarstarstar_border |
| Manufacturer: | Venus Model Rocketry |
Brief:
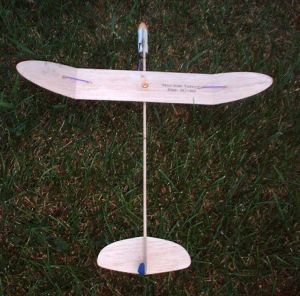
This is a very high performance design utilizing a complex swing and flop wing
mechanism, although thanks to Venus's excellent design and instructions, you do
not need to be an expert to pull this off. The boost-glide classification is
not a typo--this flies without a pod but spits the motor (attached to a safety
code compliant streamer), so you get much better boost performance than a
typical pod-riding glider.
Construction:
The kit is available in two forms--a regular version for $13 and an ARF
"minimal assembly" version for $16. I was lazy and went for the ARF
version and am sure I saved well more than $3 worth of my time. I managed to
assemble this along with 2 other Venus gliders and a helicopter kit basically
in one afternoon, so I would estimate the total construction time for this to
be about 1-2 hours depending on your experience level.
I would generally rate this about a skill level 3 on the 1-5 scale--while it is ARF, there are some tricky concepts involved that will take some time and effort to figure out.
 My kit arrived a bit
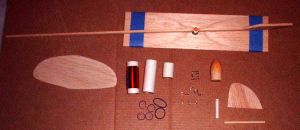
mangled by USPS with parts of excellent quality. The parts lists includes:
My kit arrived a bit
mangled by USPS with parts of excellent quality. The parts lists includes:
- Wing assembly (pre-airfoiled, and hinged for proper dihedral)
- Nose cone (balsa, resin coated)
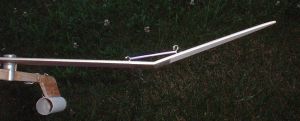
- Spruce boom (wing and pivot already mounted at slight angle)
- balsa tail, stabilizer
- motor tube and pod (pod is TT-5, motor tube is 13mm)
- Assorted hooks and rubber bands
The instructions are printed in color with excellent computer generated illustrations. They were generally easy to follow, but I did find myself a bit confused at times in part because the materials are the latest version of the design and the illustrations and notes for some of the clips didn't exactly match the parts I had to work with. I was able to resolve my questions through a combination of email and a phone call to Mark plus browsing through the support section of the Venus website where they have construction photos. Other than a very simple Estes swing wing glider, I had virtually no previous experience with swing/flop wings, so some of my confusion was undoubtedly stemming from this.
The construction begins at the nose: you glue a BT-5 to a step portion of the shoulder of the nose cone. This BT-5 acts as a motor tube/holder. You then slide a TT-5 tube over this, bonding to the nose cone shoulder. The result is a stubby tube on the inside that the front of the motor slips into with a longer TT-5 section that has enough wiggle room to hold the motor plus a small streamer wrapped around it. This completed assembly is then bonded to the front of the boom.
Next comes gluing the rudder to the boom followed by the stabilizer. Look carefully at the illustrations as it is the rudder that goes to the sloped side of the boom, not the stabilizer (most other gliders I've built have a slight incidence on the stabilizer).
 Once you've got the
basic parts in place, it is time to work on the doodads that support the swing
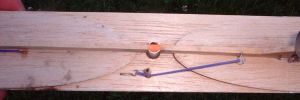
and flop system. First, you need to drill a small hole in the wing through
which a wood dowel/post is inserted. This dowel acts as a stop against the boom
and holds the opened wing at a 90-degree angle to the boom. Next, a series of
J-hooks go on the wing and wing tips. These mainly serve to make the tips flop
out into the dihedral position, though one of these is an S-hook used to hold
the burn string. A last set of hooks goes between the wing and the boom to
cover the rubber band that causes the swing.
Once you've got the
basic parts in place, it is time to work on the doodads that support the swing
and flop system. First, you need to drill a small hole in the wing through
which a wood dowel/post is inserted. This dowel acts as a stop against the boom
and holds the opened wing at a 90-degree angle to the boom. Next, a series of
J-hooks go on the wing and wing tips. These mainly serve to make the tips flop
out into the dihedral position, though one of these is an S-hook used to hold
the burn string. A last set of hooks goes between the wing and the boom to
cover the rubber band that causes the swing.
There is a launch lug provided if you wish to go that route, as a piston launcher is recommended. I taped on a lug, hoping eventually to figure out how to construct a reliable piston for this (my only piston experience is a fixed design that relies on guide rods extended up from the chamber, which would not work on this shape rocket).
That's really all there is to this construction. No sanding, no airfoiling, all the hard work is already done. It really feels like this is cheating...
Finishing:
While you could use a light/thinned dope on this or a magic marker for
coloring, the kit is designed to fly unfinished. You might want to at least
write your name and phone number with a Sharpie as this could very easily sail
away from you.
Construction Rating: 4 out of 5
Flight:
I hand tossed my finished glider to test the trim and found it did not require
any significant adjustments. It glided very well although it did lose altitude
quickly in the backyard.
 Flight prep is a
little tricky but not too bad once you get used to it. You attach a burn string
to the S-hook on the wing, slide it across the boom and back down the other
side then across the open end of the motor tube. You then shove the motor in
(with streamer wrapped around it), pushing the burn string in across the front
of the motor. This wedges the burn string in place and at ejection when the
motor spits out, releases the string to enable the rubber bands to swing/flop
into action.
Flight prep is a
little tricky but not too bad once you get used to it. You attach a burn string
to the S-hook on the wing, slide it across the boom and back down the other
side then across the open end of the motor tube. You then shove the motor in
(with streamer wrapped around it), pushing the burn string in across the front
of the motor. This wedges the burn string in place and at ejection when the
motor spits out, releases the string to enable the rubber bands to swing/flop
into action.
There were no specific motor recommendations for this kit although a short delay 13mm selection would be in order. Our club has a couple of contest this year that cover 1/2A-B/G and 1/4A-RG, so I tested this out using 1/2A3-2Ts. Winds were fairly light but steady at 6-8 mph.
First flight got a great boost and was very stable. Unfortunately, the burn string included in the kit was a bit heavy and got stuck, which prevented transition into glide configuration. It flopped harmlessly into the tall grass undamaged.
I tried again but used a thinner cotton thread I normally use for helicopters and other burn string requirements. The boost was not quite as good but still impressive. This time the string broke free just fine, but one of the flop wing rubber bands broke and I couldn't get a glide.
For flight #3 I replaced the rubber band (the kit comes with two sets), fired it up again, but this time the burn string either broke or somehow slipped out during boost and it kicked into glide configuration during boost. At that point it went a bit unstable, spit the motor, then settled into a decent glide. However, by that point it was only about 20 feet up so I got around 20 seconds of duration.
I'm going to continue tinkering with this to see if I can get better results and will also start flying on A10-3Ts. For now, I'll give Mark and Venus the benefit of the doubt and attribute most of my performance to bum luck and material problems.
Recovery:
The swing/flop mechanism is a very clever design. While it provides for very
efficient boost and glide performance, it is definitely higher risk than
conventional pod-based gliders. When everything works well, this is surely an
outstanding flyer, but you will find yourself crossing your fingers with every
flight.
Flight Rating: 3 out of 5
Summary:
There are a number of very solid pros to this kit, starting with the terrific
value and ease of assembly in the ARF version. It is also one of the few
commercially available swing/flop wing kits (although the design has been
floating around in the competition world for ages). The fact that the wing is
pre-airfoiled and the dihedral already set makes this almost idiot proof.
The only con I would offer is the poor flight performances I had, but I do not expect those would be the norm. This does go a little farther out on the risk/reward spectrum, so there will occasionally be disappointing flights.
Overall Rating: 4 out of 5
 |
 |
Flights
|
|