Aerospace Speciality Products FOTL
Aerospace Specialty Products - FOTL {Kit} (KFOT-18)
Contributed by Chan Stevens
| Construction Rating: | starstarstarstarstar |
| Flight Rating: | starstarstarstarstar_border |
| Overall Rating: | starstarstarstarstar_border |
| Diameter: | 1.33 inches |
| Manufacturer: | Aerospace Specialty Products  |
| Skill Level: | 2 |
Brief:
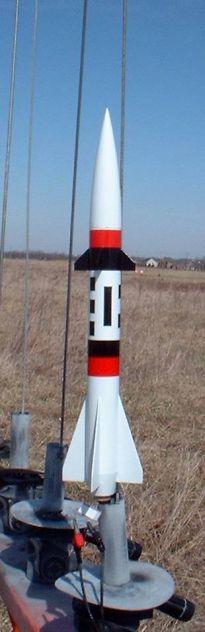
A very nice beginner's scale kit with top quality components and decals that
make finishing a breeze. FOTL, which stands for Follow On To Lance is a
prototype battlefield weapon designed to replace the ground-based Lance,
offering double the range.
Construction:
The kit arrived complete, neatly packaged in a plastic bag. Components were all
very good quality and included a basic 18mm motor mount assembly, a BT-50
"stuffer" tube (similar to a booster), body tube, basswood fin stock,
template sheet, decals, 15" heavy-duty Mylar chute, and a balsa nose cone
(pre-weighted for stability).
Construction of the motor mount assembly was fairly straightforward. I like that ASP kits use a Kevlar® line mounted around the motor tube for recovery, coupled with elastic to the nose cone. The instructions also show how to tie a fixed loop at the end, and walk you through a knot I'd never seen before (sort of an overhand combined with a half hitch). While a standard bowline would have worked, it's always neat to learn something that can be used when working with Cub Scouts...
Once the motor mount is completed, it's glued into a BT-50 stuffer tube. This is because the FOTL has a boattail, which needs the support of the BT-50 and centering rings. The boattail is formed by rolling the shroud pattern provided. Because the overlap section on the pattern would leave a seam, I elected to cut off the overlap piece, and use it as an inner tab to bond the ends of the pattern together. The result is a nearly flawless joint, which can then be sanded flush. The boattail/motor mount is then glued into the body tube.
Fins are then hand cut from basswood stock using the templates provided. There are four lower fins and 4 very small upper fins. The basswood was great to work with, eliminating the time-consuming grain-filling of balsa. The lower fins are a little tricky to cut and mount, as they are contoured to fit along the boattail so they need a little trimming followed by minor filling of the seams.
Once the fins are attached and properly filleted, it's time to cut and mount the launch lugs. This needs to be done very carefully as the upper lug rests very nicely in the middle of a painted stripe area. Failure to mount it correctly could make the finishing much more difficult, masking around the lug.
The nose cone is then attached to the very generously long elastic shock cord. I did wind up spending some time sanding and sealing the cone, as I wanted this one to have a flawless finish for potential backup in a sport scale competition.
Construction wraps up with the parachute assembly. ASP provides very good Mylar chutes, swivels, and plenty of shroud line.
Overall, I found this a very quick and easy build. The most challenging aspect was probably the boattail and this was ready to paint after about 3 hours work.
Finishing:
I prepped the tube by filling the spirals with Elmer's Fill 'n' Finish then
applied two coats of primer. Finish paint involved two light coats of gloss
white, followed by a 7/8" black band painted around the upper fin section
(and the upper launch lug).
Most of the color and finish is achieved through decals--there's a black vinyl adhesive strip, 2 red vinyl strips and a very clever roll pattern that wraps around the body tube. The roll pattern fills in the black rectangular sections that would have been practically impossible to paint. If only they made patterns this easy for the Saturns!
Construction Rating: 5 out of 5
Flight:
With the weighted nose cone, this rocket felt extremely heavy for a basic 18mm
motor, so for the first flight I elected to go to the biggest recommended
motor: a C6-7. With winds ranging from 6-8 mph, I also elected to fly off a
4-foot steel rod.
The rocket wobbled slightly on the way up and weathercocked a bit into the wind, but had a pretty good flight up. The C was barely enough motor though, and it only reached a couple hundred feet. I new as it slowly climbed that the 7 second delay was going to be way too much.
About 3/4 of the way back down, the ejection kicked and the chute came out just in time to provide a soft landing in tall grass. No damage, but I'll never fly this again on anything but C6-3's (until Aerotech starts making 18mm reloads again).
Recovery:
While the mylar chute provided was fine, I substituted a heavy-duty rip-stop
nylon chute for the first flight. I'm glad I did, as the mylar would have
shredded on such a late deployment. Still, the materials provided are very good
for such a reasonably priced scale kit.
Flight Rating: 4 out of 5
Summary:
If you're considering going down the scale rocketry route, this should be one
of your first kits. It's easy to build, can be done well enough to compete at a
local or sectional level, and is a nice looking rocket to boot. The only
drawback is the lack of easily obtained reference materials. I was able to find
an old copy of Rockets & Missiles of World War III by Berman &
Gunston, which included a color photo but nothing like the documentation
provided in Alway's Rockets of the World (the scale modeler's bible).
Overall Rating: 4 out of 5
 |
 |
Flights
|
|