| Manufacturer: | Das Modell  |

(Contributed - by Colin Rowe - 04/22/03)
 Brief:
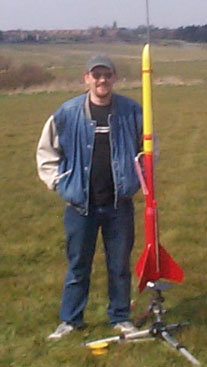
A single stage cluster rocket consisting of 4 x 24mm motor mounts. Transition
from 80mm to 60mm. Splits at Centre.
Construction:
The Kit includes:
- Instruction Sheet (in German not translated)
- 1-80mm tube.
- 2-60mm tubes.
- 1-60mm tube with fibreglass nosecone attached.
- 3-plywood fins
- 4-motor mounts (1.05" dia)
- Centering rings (card)
- Motor hooks
- Wadding (cotton wool????)
- Elastic shock cord
- A brass keyring (to attach chute)
- Launch lugs
- Several pieces of balsa
- Various stickers
The instructions were in German, so I went on the net to translate them, this gave me some idea where most of the pieces went. But as I translated more, it became clear that the instructions were very general in nature and printed to be included in most of the kits!
A quick look over the parts was all I needed to see that most were of poor quality and of a bad finish. The balsa had been "snapped" to length, the alumimium launch lugs (3/8") had been sawn by hand at a strange angle and the burrs left on. The grain on the fins of the rocket were all at different angles, making 2 fins stiff and the third able to flex quite a lot. The fibreglass nosecone has a very bad mismatch that had to be to be sanded out leaving it very very thin in some places. The body tubes were very thin and had deep spiral grooves in them. The motor mounts were brown card of very poor quality and much too big in diameter for 24mm motors ( I have since found out that they fit the German D7 motors that are larger)
On starting to build the rocket, I wanted to use 4 x 24mm Rowes Retainers
coned retainers to give a cool finish to the end of the rocket. But the motor
mount tubessupplied with the kit were too big and the quality was poor and
would not fit in the centering rings suplied without kinking. I made some new
centering rings from Tufnol and used motor mount tubesfrom Apollo with the
tubes canted at an angle to meet at the rockets CP.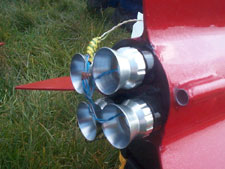
With the motors now sorted, I moved on to the 80mm tube. This tube has to be handled with care as it peels, creases or bends with the slightest touch. The front of the tube has 2 rings glued into it to reduce the 80mm to 60mm so the front tubes can fit into it. With the rings glued in, I tried to fit the card transition, hard as I tried I could not get it to look anything like neat. In the end I made one out of foam and used that instead.
I wanted to put an electronics bay in, but the tube being "none standard size" I had to cut up one of the tubes and a coupler to make it. The tube was very hard to work with as it kept peeling, In the end I managed it.
The rest of the rocket was a little easier to do. With the fins on I looked for places to put the triangular balsa that was left, I could only assume that they went at the base of the fins to create a fillet of sorts and add some support to the fins. With all this done, the launch lugs were filed square and de-burred and fixed to the body, the top lug having to be stood off the body. I felt they were a little weak so I glassed them on locally. The fit of the tubes were poor and the couplers were a little too short making the rocket have a crooked look to it.
The recovery was a big problem also. The chute (if you could call it that" was a sheet of silver plastic with a big blue circle marked on it. I cut this out and try as I might, I could not get the lines to fix to it without ripping it in some way! So that went in the bin along with the elastic shock cord and the other various fittings, and in went an Aerocon Chute and some Kevlar® line and swivels.
Finishing:
The tube is a pig to finish!!!!!!!
The first sight of paint and it all fluffs up. Let it dry and rub it down. Keep this up for about 5 coats then fill the grooves. Be prepared for a long haul as it takes an age to rub down. Alittle to hard and the card tube just fluffs up again or bends and creases.
When you have primed, filled again and again for several days you start to wonder what you are doing this for!!!!.
In the end if you have the time, you can get a average finish on the kit, but nothing special.
Construction Rating: 1 out of 5
 Flight:
The motors recomended are D7-3 but these are German motors and not available in
the UK so D12-5's were used.
The motors were loaded into the mounts and secured by Rowes Retainers 24mm cones. The finished effect was just what I was looking for.
Wadding was placed in the rocket just above the ejection charge of the MAD( Magnetic Apogee Detector). As this was the first time I has used it I also had motor backup from the D12's.
I made a set of igniters using the magnalite system and prepped ready to go.
The rocket looked good on the pad and I waited to launch.
5 4 3 2 1 LAUNCH................
All 4 motors lit and the rocket flew straight and true, slow and majestic, you could see all 4 motors burning. At apogee the motors ejected and the chute came out fine, the decent rate looked fine too.
On recovering the rocket quite a few things were wrong:
- The fins had split and come away from the body just ripped the tube.
- The tube above the motors had scorched with the ejection causing the paint to blister
- the upper part of the rocket havd kinked.
- The MAD did not fire (my fault!)
The damage was caused by the tube being much too thin, so the fins just pulled it apart on landing. The same for the scorching, if it was thicker there would not be a problem.
Recovery:
Recovery was at a slow to medium rate and should not have caused any damage. If
a larger chute was used then the rocket would drift much too far. The problem
is with the strength of the kit.
Flight Rating: 1 out of 5
Summary:
The rocket looks impresive when done.
- The cons are:
- The kit is just too poor a quality to be an asset to your collection.
- The price is way too much for what you get. If I had known this before I started, I could have got all the parts and built it myself for about the same price with much better parts and built a much better rocket.
Binned parts:
- All motor parts, centering rings, all recovery parts, decals, reducing templates
Parts made or bought:
- Chute, centering rings, recovery parts. Motor tubes. tranition cone, retainers.
Overall Rating: 1 out of 5
 |
 |