| Construction Rating: | starstarstarstarstar_border |
| Flight Rating: | starstarstarstarstar_border |
| Overall Rating: | starstarstarstarstar_border |
| Diameter: | 0.98 inches |
| Manufacturer: | Estes  |
| Skill Level: | 2 |
| Style: | Glider |
 Brief:
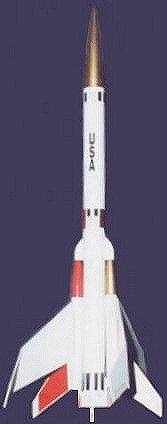
The Estes Condor is a very slick kit which incorporates a sustainer with two gliders attached to the sides. The glider's airfoils act as fins for the model during boost and detach at ejection, then each glider spirals in for a landing while the main sustainer lands with the aid of a streamer. USAF insignia helps dress up this little beauty and makes it a esthetically pleasing kit to launch or show.
Construction:
The kit comes in a box and includes a main 7/8" body tube, two ½" glider tubes, stamped balsa fin/wings, motor mount and centering rings, tubular elastic shock cord, one booster nosecone, two glider nose cones, streamer and detailed assembly instructions. Component Rating: 4 of 5
The motor mount and shock cord follow the normal assembly procedures. A nice touch from Estes though is the fact that this model uses a tubular shock cord, rather than the frail flat elastic band that is typical for so many of their kits. This cord is much more rugged and has survived many launches to date.
What becomes more difficult is the construction of the "wings" for the gliders and include some complex angles that need to be set just right. Included in the instructions are templates that you cut out to aid with the angled wing assembly. CA glue is recommended for the balsa construction, but before even starting, take all the similar wing panels and stack them, then sand them evenly so you have two matching sets. Also, even though it is not listed in the instructions, bevel the root and outer edges of each wing joint so they fit flush when the pieces are glued together at the specified angle. This will result in a much stronger wing. I also used thin CA glue to stiffen each panel and sanded them until they felt plastic-like, prior to assembly.
Once the wings are assembled, CA a wing to each body tube, making sure they are straight on the ½" body tubes. Also, glue the vertical stab fin "perpendicular" to each wing, otherwise poor flight could occur. I recommend painting the gliders once assembled, PRIOR to gluing on their nose cones, so you can get a true balance point on them with the weight of the paint included; you can add additional weight inside if needed before you glue the nose cones. Also, test fly each glider and see how they do; the instructions have some tips on adjusting the flight pattern for them.
The gliders are held in position at the top by a plastic, cupped shoulder that slips over each glider nosecone, then pulls away when the booster separates at ejection. Two wooden dowels glued to the lower part of each glider's body tube hook into plastic retainers at the bottom of the booster stage. This really works well as long as you glue the dowels on per the instructions. Moreover, once the entire model is assembled there will be some rocking of the gliders back and forth inside their mounts, but do not let this bother you; I have had many launches and the gliders always stay put until released at apogee. I'd rather have the slots a bit loose to facilitate launch then have them tight and not release. The streamer cannot handle that type of weight and a stuck glider would probably result in a damaged rocket. Construction Rating: 4 of 5
Finishing:
Since the fins were stiffened with CyA and sanded, I simply primed and painted the model. Note that the gliders were painted ahead of the final assembly to check CG. Testors Glossy white was used on the gliders and model, while I deviated from the orange/yellow the kit uses and painted one glider in red trim and the other in gold. In addition, the nosecone was painted gold and the entire model really looks good once finished. Some wood grain still shows but does not detract from it's appearance on the pad.
Decals were applied next and the process went well. I did add some 1/16" gold tape for trim to really help set off the model. Once everything was painted and decals placed, the entire model was sprayed with Testors Dullcoat for that flat military look and it turned out really nice. Finally, the shock cord was tied to the nosecone and I opted to add a swivel link system for the streamer. Finish: 4 of 5
Construction Rating: 4 out of 5
Flight:
My rocket weighed in at about 2.5 oz and I was anxious to get it on the pad. An Estes A8-3 would power the first launch as a test for glider flight. Prior to launch time, I did purchase some small Pratt Heatshields and tied one to the shock cord so I didn't have to worry about wadding. The model was placed on the pad and it was time to launch. It was a great flight; the Condor took to the air slow and steady and reached an altitude of around 200'.
Recovery:
When it separated the gliders began their spiral back to earth. Everyone was amazed at the gliders and it caught a lot of people's attention at separation. Gliders and booster landed within 20 feet of each other and only about 30' from the pad. The A8-3 was a good choice for a first flight and I recommend it to everyone who builds this kit.
Good deployment on an A8-3; right at apogee. Since then, I have had many flights on this rocket and it's still one of my favorites. It is a perfect match for a B6-4 and achieves a hefty altitude that still produces a manageable recovery for the gliders. I did try the maximum for the model, A C6-7, and this was a BAD choice. Instead of heading straight up, the stress pushed the model up about 300 feet, then out over the fields in a nasty horizontal twisting flight. It started heading for the ground once power was gone and the ejection charge fired about 75 feet before touchdown. Unbelievably, the gliders separated and landed along with the booster with no damage. Needless to say, I got lucky and have never used a "C" motor again on this bird. Flight/Recovery: 5 of 5
Flight Rating: 4 out of 5
Summary:
The Estes Condor is a REALLY cool kit!!! The gliders and booster work well when assembled correctly and it is a real "eye catcher" at the field. The model does require some advanced building skill, due to the nature of wing construction, but can be done easily if you take your time. Look for a lot of attention when you launch this bird; The Condor is a true work of beauty and advanced design that I highly recommend to all! Overall Rating: 4 of 5
Overall Rating: 4 out of 5
Other Reviews
- Estes A.R.V. Condor By Chris Taylor Jr. (January 1, 2008)
Parts and Supplies Hobby Knife, Sand Paper (220 grit), Glue (I used Thick CA), Ruler, Pen or Pencil, Desired paint etc.. Assembly Compare the parts in the box with the parts list in the instructions. Separate all balsa parts from balsa stock and sand trim as needed. Assemble wings, there are two and make sure you make a left and right for each wing set. You will use the included ...
- Estes A.R.V. Condor By Hank Helmen
Single stage piggy back boost launch glider design with two gliders. The glider's wings act as rocket fins during boost then separate using the ejection charge to deploy the gliders. The rocket booster body recovers with a streamer. The kit includes 4 body tubes. Two larger ones are for the booster and two smaller tubes for the glider fuselages. Also supplied are 3 plastic nose cones and ...
- Estes A.R.V. Condor By Andy Sola
The A.R.V Condor is a single staged rocket that is about 19 inches long. . At apogee, two drones detach for a gliding return to Earth. Booster returns on a streamer! Recommended motors are B4-2 (First Flight), B6-2, and C6-3. The construction on this rocket wasn't as hard as I had thought it would be. After reading all the reviews I thought it would be impossible to make especially because ...
- Estes A.R.V. Condor By Eric Miller
I recently received an A. R. V. Condor as a gift from my wife. The A. R. V. Condor is an Estes Explorer series rocket (Intermediate level). This kit was packaged in plastic and came in a box and was probably around $15. 99. All the parts were included and none were damaged. The instructions were typical Estes and were excellent. The special feature of this rocket is at apogee ...
 |
 |
Flights
|
|