Modification Big Dipper Daddy Modification
Estes - Big Dipper Daddy {Kit}
Contributed by Dick Stafford
| Manufacturer: | Estes  |
 Brief:
I bought this Big Daddy (on sale, of course) as a test-bed for a Micro-Hybrid motor. This required an extension of the motor mount, and the capability to house electronics in the nose cone. Before flying it on a Micro-Hybrid, I'll probably try it on a conventional motor with motor ejection (1st flight) and with electronics (2nd flight).
Modifications:
Since there are already several articles on the Big Daddy, I will describe only the modifications that I made. Because the Micro-Hybrid is just over 6 inches long, and I wanted the full motor enclosed by the motor tube to protect it from ejection gasses, the 24mm motor mount tube is 7" long. I used the stock cardboard centering rings and made small notches in them to allow a Kevlar shock cord to extend to the rear of the rocket. I also added a single T-nut for positive motor retention. This is mounted on the inside of the rear centering ring to make sure it doesn't pull out (the ring is fairly thin cardboard, after all). The retention bracket itself is a metal picture frame hanger.
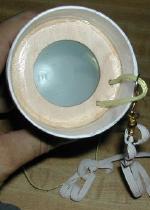 To allow the mounting of electronics in the nose cone and to provide more room for the recovery components, I cut the off the nose cone shoulder in front of the stock parachute hook. When looking for a method of attaching the recovery system and electronics in the modified nose cone, I borrowed a tip from The Rocketry Forum (TRF). I sanded a spare 38mm-to-3" centering ring so that it fits in the nose cone just ahead of the shoulder. It rests against the shoulder, which provides a mechanical lock. I added a loop of tubular Kevlar® for chute attachment, and glued the ring in with Liquid Nails. I used this concept on my Standard Cray-ARM , but never had thought of it for a standard nose cone (vs. the tip of my Crayon rocket). My thanks to John Coker on this one!
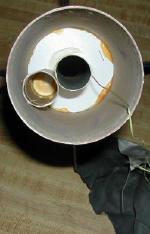 To control where the ejection charge gasses go, I built an ejection cannon from a piece of 24mm tubing and the motor spacer provided with the kit. This assembly is glued to the forward centering ring and fits nicely between the extended motor tube and the airframe.
The final two mods were an addition of 3' of 250lb Kevlar twine (I also used the elastic that was provided with the kit) and a pair of rail buttons from railbuttons.com.
After building this rocket, I weighed it along with my G-Wiz altimeter, mounting assembly, and a standard 9v battery. The results are not encouraging. The Micro-Hybrid's reported thrust ranges are between a D12 and an E24. If my Micro-Hybrid comes in on the high end, all will be well; if on the low end, I will need lighter electronics. I am currently thinking of buying a Perfectflite mini timer. Another concern is that the G-Wiz requires a certain level of acceleration to begin operation. They have been known to fail on flights that are too slow off the pad.
Finishing:
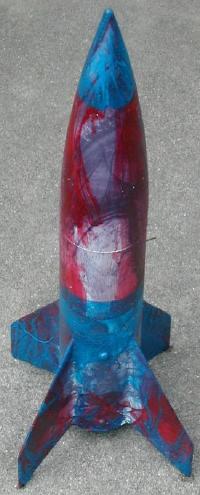
I had been wanting to try an Easter egg paint scheme and this rocket provided the opportunity. I will refer you to The Rocketry Forum for the details, but this method basically just involves spraying paint into a plastic trash can filled with water and dipping the rocket - just like coloring Easter eggs. This time I have to thank Lee Reep, the inventor and undisputed master of this technique! The painting technique also inspired the 'Dipper' in the Big Dipper Daddy's name.
One caution: don't dip in direct sunlight, the paint dries too fast.
Flight:
I chose an E9-6 to see how the rocket would fly on a motor with a low average impulse. I wrapped the end of the motor with tape for retention going up, and used the retaining bracket for retention going down. The speed and altitude were respectable, which makes me think this rocket will be fine with the Micro-Hybrid and a light timer.
Recovery:
I used a 12" Mylar chute and, in the place of wadding, a chute protector that I made from a discharged car air bag. The airbag material seems to work great after several tests with both BP and composite motors. I'll be sure to nab more of these if I get a chance!
Summary:
This rocket was easily modified for longer motors and electronic deployment. Despite the added weight, it should fly well on the Micro-Hybrid using light electronics. I also got the chance to try out an Easter Egg paint scheme as discussed on The Rocketry Forum. This didn't come out quite as well as expected, but was a good first try.
#Related Reviews
- Modification Bad Dad By Larry Brand
Brief: I modified the Big Daddy kit to replace the stock nose cone with a fixed nose cone made from a PET soft drink bottle; parachute deployment is from an open "mortar" mounted on the bottle opening. Rationale? I swiped the nose cone from a family member's Big Daddy kit to use in a building ...
- Modification Big Bad V-2 Daddy By Michael Bade
How to Make a V-2 out of an Estes Big Daddy Frustrated with the lack of availability of an affordable V-2 kit, I started thinking of ways to come up with a cheap and easy kit-bash from an existing in production kit that wouldn’t involve a lot of money or time. I also wanted to make a ...
- Modification Big Daddy (29mm) By Stephen Morrow
Brief: Modified Estes Big Daddy to fly on 29mm motors. Modifications: I started this project with a regular Estes Big Daddy. When I bought the kit I knew I wanted to mod it to a 29mm so I bought a motor tube and cut it to a length that would allow it to come up and touch the base of the nose ...
- Modification Big Daddy (29mm) By Sascha Grant
I've always liked the Estes Big Daddy, but even flying on an E just wasn't good enough. So I went about building this to fly on a H - the H128 specifically. Components Out of the box, the kit includes: Nose Cone Centering Rings Pre-Slotted Body Tube Motor Mount ...
- Modification Big Daddy (3) By Mike Goss
A modification to the Estes Big Daddy to use much less wadding. Modifications: The Estes Big Daddy is a short, fat rocket. With this being the case, there is a large volume in the interior of the rocket that needs to be filled with wadding to protect the parachute. I am always looking for ...
- Modification Big Wild Daddy By Tony Turley
The Estes Big Daddy first caught my eye hanging on the rack at WV Hobbies in the fall of 1998. It looked to me to be a good candidate for conversion to 29mm power, so I put it on my Christmas list. My request was granted, and away I went. My first decision was to evaluate the kit parts to see ...
- Modification Dig Baddy By Yitah Wu
What is it about the Fat Boy, Onyx, Minie Magg, etc, that makes grown men's knees weak? I don't know, but the Big Daddy has it - and lots of it. I swung by Commonwealth Displays a couple of times, but they were out of the kit. The second time I was beat out by a telephone order by an hour or ...
- Modification The 'Big Daddy' Educator By Joy Sills
The Educator is a modified Big Daddy. The modifications include adding a 12" payload section and using basswood for fins and centering rings. Modifications: The first modifications were adding basswood fins and centering rings. The second modification was adding a payload section. This was ...
- Scratch 3D Mega Daddy (3D MD) By Steve Lindeman
I was playing around with my Estes 'Big Daddy' one day when I discovered that its NC would fit the tube that my Aerotech Initiator came packed in. The decision was then made to acquire another Big Daddy and build the 3D Mega Daddy (3D MD). Components Only 3 components ...
Related Products
 |
 |
Flights
|
|