Estes Jetliner (3230)
By Steve Lindeman
2012-09-19

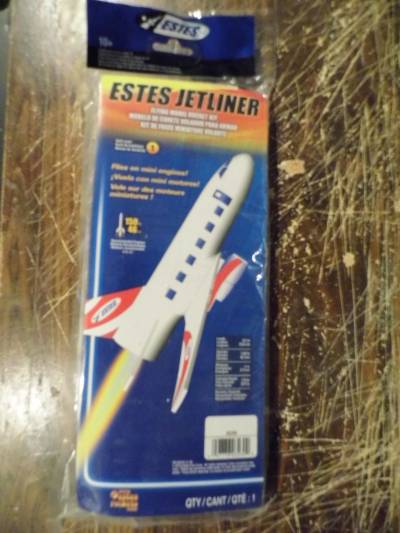 I ordered this kit on ebay on Sunday 9/16/12 and just received in the mail today (9/19/12). Fast service. This is the newest kit from Estes and is not yet listed in there 2012 catolog but available on ebay. It looks to me to be designed on Boing's 737 line of jetliners. More to follow as I build.
Quandary
2012-09-20
I can't make up my mind on power for this build. I was going to go with a stock build but after putting the MM together and looking at it and having built sixteen Goonybirds so far, (check out My Goonybirds under photo albums on this site to see the rest), this kit is screaming for an 18mm mount as well. After all, it is the same size as my Zoom Broom or Cloud Hopper. What to do, what to do.
Assemble Engine Mount
2012-09-21
I did these seven steps already but I'm re-doing them for an 18mm mount upgrade. On a side note: I'm sitting here looking at the 13mm mount and thinking how good would this fly as a Spool Rocket??
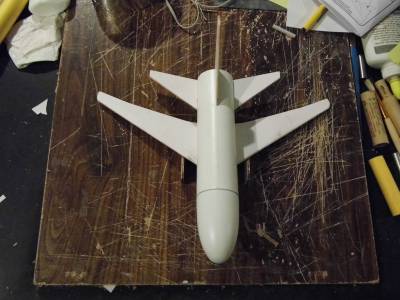
Fin Prep, Tube Marking, Wing Assembly
2012-09-21
Followed the next three steps of the build as per instructions. At this point I will be adding one step as I am papering all balsa pieces for a stronger better looking finish.
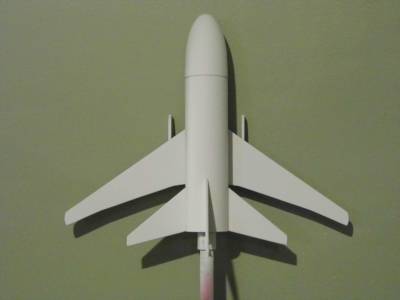
Attaching Wing, Tail Fin, & Stabilizers
2012-09-21
Time for wing attachment. For this step I'm going to be using wood glue for added strength. Drew a fresh line down the center of wing top after papering it so that I can line it up with BT. After applying a bead of glue on wing I set it on the BT making sure all lines matched. After holding in for a couple of minuets I carefully turned it over and set it on the table to dry. While that set up I went ahead and glued the tail fin on being careful not to move the BT around. After they set for half an hour I finished gluing the stabilizers on and again gave it some drying time. After that I glued on the wing attachments and the launch lug. Setting all aside to dry over night.
Engine Mount Instalation
2012-09-22
I was a bit surprised that this step was done this late in the build as I'm used to doing it in the first couple of steps. Needless to say the measurement Estes gives for the glue circle inside the BT for the MM had to be moved further in due to 18mm mount being installed. That being done the next setp in the instructions calls for the paint job.

Side note: Discovered that I glued MM in upside down. Not sure how that happened as I test fitted it with the clip down and then some how it ended being glued in up. Oh well.
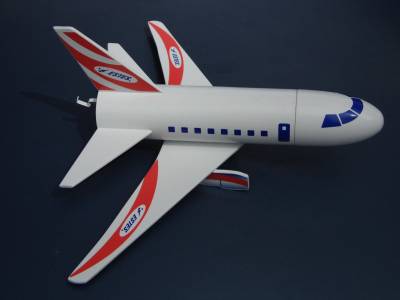
Painting
2012-09-22
Painting of this rocket will be easy. First I sprayed a coat of Rust-Olium 2x white primer over entire rocket and gave it a couple of hours to dry while I ran a couple of errands for the wife. Next grabbed the 400 grit sandpaper and gave rocket a light sanding, then followed that with a final coat of primer. After allowing rocket to air dry about half an hour I applied the first coat of Krylon Gloss White followed shortly there after by a second coat. Rocket will now be allowed to dry overnight.
Rocket Finishing
2012-09-23
Wet sanded entire rocket with 1000 grit paper for smooth finish and then applied a final coat of Krylon Gloss White paint then took it outside to air dry in the sunlight. After allowing most of the day to dry I applied the decals and sat it on the table outside to air dry again. Starting to get cold so will be moving indoors for rest. OK, so now the rocket will get clear coated. From here all I have to do is finish installing the shock cord and recovery system steps of the instructions and that will complete this build.
 |
 |