| Construction Rating: | starstarstarstarstar_border |
| Flight Rating: | starstarstarstar_borderstar_border |
| Overall Rating: | starstarstarstarstar_border |
| Manufacturer: | First Flight Hobbies  |
Brief:
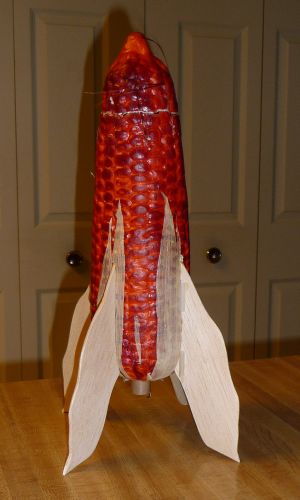
This is a seasonal oddroc based on a Styrofoam ear of corn. It is a cool-looking, sturdy rocket and looks better in
person than in photos. My beta test version flies on 18mm motors but 13mm and 24mm versions were also offered.
Unfortunately, all had limited runs and more will not be available until next year. I normally don't submit reviews
until I've flown a rocket but, since people are getting the kits now, I thought I'd provide my experience building it
sooner rather than later.
Construction:
The parts list:
- Styrofoam ear of corn, pre-drilled with the tip removed
- 4 fins cut from 2 pieces of 1/8" balsa stock
- balsa nose block and screw eye
- BT-50 tube, 9.75" long
- 18mm motor tube, engine block, engine hook, and centering rings
- thick 12" plastic chute, shroud lines, tape discs, and snap swivel
- 150lb Kevlar® and ¼" elastic shock cords
- one 1/8" launch lug
- BBs
- corn husk scraps
The instructions are printed on 7 sheets and include a fin template. They are witty and well illustrated. Although not professionally printed, they are more than adequate for this fun build. Because the body is Styrofoam, you must use foam friendly glues. This is highlighted well in the instructions so there is no excuse to get it wrong. I used wood glue for the motor mount and for attaching the fins and fast Gorilla Glue to main tube and balsa nose block.
The motor mount construction is typical--cut slit for motor hook, tape down, attach the 2 centering rings, insert motor block. Before gluing it into the BT-50 body, you tie the Kevlar® around the mount in between the rings. Remember to put a drop of CA or epoxy on the knot and notch the top ring so it will fit through.
The body tube was quite loose in the husk and I'm not sure how well some of the glues identified in the instructions would work. I used fast Gorilla Glue, which expands as it cures. This worked well. I also plugged the gap on the top using tissue soaked in wood glue. Scrap corn husk material was provided to fill/cover the bottom of the motor tube, but I left it off.
The method of aligning the cone/block/body tube was good. I've faced this issue many times and have responded with varied degrees of success. The answer is simple. Add some glue to the pre-drilled pocket in the nose section, insert the block, slide over the body tube, align the parts, and then turn it on its nose so the glue stays in the nose. I taped the nose to the body while the glue dried. When the assembly was dry, I pulled the nose part way off and used a Sharpie to make a mark on the block and the tube to help with alignment during flight prep.
You cut the fins from the balsa stock using the provided template. The balsa was good quality and the style of the rocket means you don't have to be terribly precise keeping to the lines. I rounded the leading and trailing edges slightly.
Positioning the fins is slightly inexact due to the odd contour of the corn ear. However, it isn't too hard given the pre-marked lines. Use a new #11 blade and go slowly when slotting the corn. As long as the fins are all even, you should OK if you balance the kit as directed.
Although I prefer nylon chutes in general, I am really liking the type plastic provided in this kit. I think it may be a Hartle Engineering Chute Skinz. It seems sturdier than the typical "Questes" plastic.
Since I didn't know if my fins are positioned exactly as expected I couldn't tell if the balancing instructions will guarantee a stable model. I used all the provided BBs and had to add ~0.2oz of lead shot to get it to balance at the fin leading edge with a C6-5 installed (as specified). I think more BB's may be provided in the production kits. Mine weighed in at 3.5oz without motor. I did a quick and dirty RockSim and it shows stability is marginal, but this might be GIGO given the odd contours. Sky Ranger says mine will fly great!
Finishing:
The body comes pre-finished and all you are asked to do to the fins is seal them with your favorite clear coat. Make
sure you cover them before installation in case your clear coat eats Styrofoam.
Construction Rating: 4 out of 5
Flight:
I'll ask Nick to add a flight report after I have data to report. With temps <40 degrees and 10-20 mph winds, I'm
not hitting the field this month.
Flight Rating: 3 out of 5
Summary:
This is a cool looking rocket and as I said it looks better in the flesh...or in the corn. It really is a
straightforward build but the Styrofoam body made it interesting. Two thumbs up for the build!
Overall Rating: 4 out of 5
Other Reviews
- First Flight Hobbies Corn Roc By John Lee (December 28, 2008)
The Corn-Roc is a fall themed oddroc I was asked to beta test. It is basically a conversion of a Styrofoam ear of Indian Corn from a craft store into a rocket. Construction began with the building of the motor mount. A slit was made for the engine hook and the hook was secured in place with several wraps of masking tape. The mount was then marked at each end and the centering rings were ...
- First Flight Hobbies Corn Roc By Charlaine Cadence Nordin (December 25, 2008)
Brief: The main stay of the Corn on the cob shaped oddroc collections by First Flight Hobby. This 18mm rocket once complete is interesting and fun. It promises to be a head turner and also a great flier. Construction: The parts include: One styrene foam corncob One body tube MMT 18mm tube One engine block 2 centering rings Small bag of bb's ...
 |
 |
Flights
|
|
|
|
J.A.L. (February 14, 2009)