| Construction Rating: | starstarstarstarstar |
| Flight Rating: | starstarstarstarstar_border |
| Overall Rating: | starstarstarstarstar_border |
| Diameter: | 1.64 inches |
| Length: | 27.48 inches |
| Manufacturer: | FlisKits  |
| Skill Level: | 2 |
| Style: | Futuristic/Exotic |
 Brief:
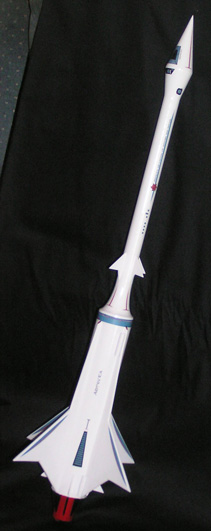
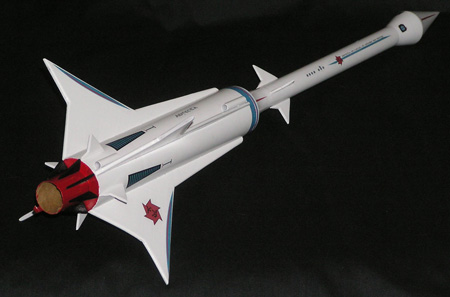
This is another fine addition to the futuristic-themed line of Flis kits. A far cry from your 3FNC style rocket (try
20 fins!), which features an unusual nose cone and really sweet inverse parabolic transition.
Construction:
For all you collectors out there, I did the market price a favor by tearing into kit #24. I had thought about hanging
onto it, but this design and in particular the transition and nose cone were just screaming to avoid the long,
drawn-out aging process that is my build queue. I started working on it almost immediately after it arrived.
Parts are all excellent quality, though I should note that the balsa is very soft, and prone to minor dings. My transition had a very slight dent, easily touched up, and I nicked a couple of fins trying to cut very fine points. The parts list includes:
- BT-60 x 8.5 lower body
- BT-50 x 4 motor tube
- BT-20 x 8.625 upper body tube
- Balsa nose cone
- Balsa transition
- Balsa fin stock (mostly 1/8, some 1/16)
- Fiber centering rings
- Motor block, metal hook
- Kevlar® + elastic shock cord (48")
- Plastic parachute
- Waterslide decals
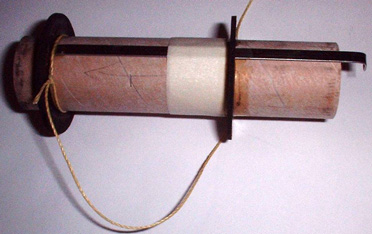 Construction begins with a reasonably straightforward motor mount
assembly consisting of a BT-50, motor block and a pair of centering rings. The only wrinkle is that you need to choose
between E-sized motors and C11/D12-sized motors. If using the longer motor (why not, since you can always add a spacer
and use D's), the supplied D-size hook will not work, leaving you to friction fit or swap out the hook for your own
E-sized as I did. Pay attention to the dimensions used for motor block recess and slot for hook, as these vary
depending on D/E motor choice. Also, be careful to mount the aft ring as close to 1.25" from rear as possible, as
it fits flush to the BT-60 leaving an exposed motor mount.
Construction begins with a reasonably straightforward motor mount
assembly consisting of a BT-50, motor block and a pair of centering rings. The only wrinkle is that you need to choose
between E-sized motors and C11/D12-sized motors. If using the longer motor (why not, since you can always add a spacer
and use D's), the supplied D-size hook will not work, leaving you to friction fit or swap out the hook for your own
E-sized as I did. Pay attention to the dimensions used for motor block recess and slot for hook, as these vary
depending on D/E motor choice. Also, be careful to mount the aft ring as close to 1.25" from rear as possible, as
it fits flush to the BT-60 leaving an exposed motor mount.
This might also be a good time to point out that if you intend to fill tube spirals, definitely do it now (including the aft 1.5" of the BT-50) since you're about to mount 20 different fins which leaves very little room for filler and sanding.
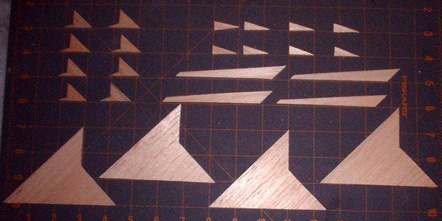 Next comes fin cutting, the old-fashioned way using templates and
raw balsa sheet. Use a good fresh blade, as most fins have at least one sharp point, which tends to break as you drag a
dull blade across the balsa grain. There are a total of 24 pieces to cut including the (4) 2-piece main fin sets. Oddly
enough, the main fins consist of a main fin and strake section but are not bonded in advance. Instead, the instructions
call for mounting them one at a time on the BT-60. I cheated and bonded the fin and strake together on a flat surface
first, then tacked the assembly onto the BT-60 with CA. The fin lines are marked via wrap-around guides for the BT-60
and BT-20. Being an obsessive-compulsive, I printed out a wrap-around marking guide on my own for the BT-50 aft tube
(0.976 OD x 8 fins). But found it was at least as big a pain to coordinate the lines on the BT-50 and BT-60 when
sliding in the motor mount than if I'd simply marked the aft BT-50 lines by eyeball.
Next comes fin cutting, the old-fashioned way using templates and
raw balsa sheet. Use a good fresh blade, as most fins have at least one sharp point, which tends to break as you drag a
dull blade across the balsa grain. There are a total of 24 pieces to cut including the (4) 2-piece main fin sets. Oddly
enough, the main fins consist of a main fin and strake section but are not bonded in advance. Instead, the instructions
call for mounting them one at a time on the BT-60. I cheated and bonded the fin and strake together on a flat surface
first, then tacked the assembly onto the BT-60 with CA. The fin lines are marked via wrap-around guides for the BT-60
and BT-20. Being an obsessive-compulsive, I printed out a wrap-around marking guide on my own for the BT-50 aft tube
(0.976 OD x 8 fins). But found it was at least as big a pain to coordinate the lines on the BT-50 and BT-60 when
sliding in the motor mount than if I'd simply marked the aft BT-50 lines by eyeball.
There are 4 tiny secondary fins mounted on the BT-60 between the main fins and an identical set of fins. Don't let the inclusion of a second pattern fool ya. They are the same fin, down to the grain direction.
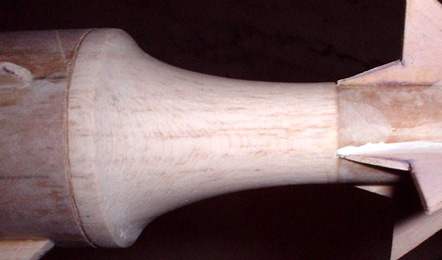 The upper body is built like a standard payload bay, though using a very cool
transition. The picture doesn't do it justice. Imagine turning a cone on a lathe using a parabolic nose cone as the
cutout pattern. The end result is a sweet transition that is not just a plain, straight line.
The upper body is built like a standard payload bay, though using a very cool
transition. The picture doesn't do it justice. Imagine turning a cone on a lathe using a parabolic nose cone as the
cutout pattern. The end result is a sweet transition that is not just a plain, straight line.
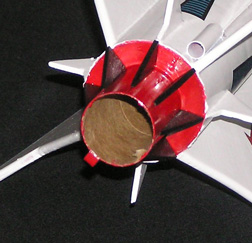
Tacking on 8 lower/aft fins to the BT-50 and making/packing the chute wraps up construction. Note: if following the standard paint scheme of white body, red aft motor tube, and black aft fins, then you'll definitely want to tape off a very thin (< 1/16") portion of the BT-50 along the fin lines to act as a bonding surface AFTER the BT-50 and fins have been separately painted.
The finished motor mount serves as the anchor point for the Kevlar® shock cord.
Finishing:
Well, the good news on finishing is that it's basically a monochrome finish, so there is very little masking. The bad
news is that there is a LOT of balsa grain to deal with and a fair length of tubes for spiral filling. I'm a big fan of
pre-prepping most surfaces before construction, so took care of spirals and grains in advance using Elmer's Fill N
Finish®.
The transition was very tricky to work with. I knew hand sanding could be problematic and potentially mess up the
gentle curves and sharp edge lines, so I went with a very thin/highly dilluted Fill N Finish mix and very lightly
touched with 400 grit. I wound up repeating this process 3 times before satisfied.
 As noted, I also masked off tiny strips on the exposed aft end of
the motor tube so that I could paint the trim fins offline (black) and then tack on with a little CA.
As noted, I also masked off tiny strips on the exposed aft end of
the motor tube so that I could paint the trim fins offline (black) and then tack on with a little CA.
I made one minor goof in masking, I didn't catch that the aft trim fins do not run the full length of the exposed tube. So I over-masked. This caused a little hand touch-up to what was otherwise a pretty darned nice paint job.
I first primered everything with a coat of gray which is best for exposing flaws in surface prep. Satisfied, I moved on to a couple light white primer coats then hit the motor tube and aft centering ring with gloss red. Allowing a couple days to cure, I then masked that area off and shot three coats of gloss white over the rest of the rocket. I then tacked on the black trim fins, touched up my little goof area and moved on to decals.
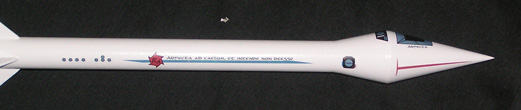
There are a bunch of decals for this. Decals in general are a rarity for Fliskits but when they are included they are usually fantastic. This kit is no exception. The decals are incredibly detailed and really give it the finished space transport vehicle look. After spending a good 90 minutes applying everything (excellent placement notes are included, by the way), I touched everything up with a little Micro Scale decal solvent.
Construction Rating: 5 out of 5
 Flight:
I had rushed the construction a bit on this one to haul up to NARCON 2008 and while there I managed to talk myself
into trading it back to Jim Flis to use as a display model. So the flight report will be delayed a bit as I now have to
build another one in the next month or two.
As a general impression, I would not anticipate any stability problems whatsoever. Using 24mm motors though, I think at about 2 ounces empty weight I would hold off on pushing the envelope up to E's unless flying on a very large field. My guess is a D12-5 would be a perfect motor for this.
Flight Rating: 4 out of 5
Summary:
While Fliskits tends to offer a variety of unusual/innovative designs, I think this one is going to stand out as a
real gem. Very sleek futuristic styling, unusual nose and a sweet looking transition.
Cons are minor and probably overly picky, while the transition is gorgeous, it is a bit difficult to sand/treat, though there's nothing I would offer up from a production or design perspective to improve this. Also, I found that there is as slight dimensional mismatch related to decals and the placement near the main body tube/transition joint. The trim band is suppoed to fit flush to the forward end of the body tube but the space between that and the forward tip of the fins is about a half inch to short to accomodate. I split my decal and mounted it spanning the transition/tube joint. I also had to relocated a couple other trim decals that are supposed to go forward of the fins/aft of the transition.
Overall Rating: 4 out of 5
 |
 |
Flights
|
|