| Construction Rating: | starstarstarstarstar_border |
| Flight Rating: | starstarstarstarstar |
| Overall Rating: | starstarstarstarstar |
| Diameter: | 0.98 inches |
| Length: | 39.00 inches |
| Manufacturer: | FlisKits  |
| Skill Level: | 2 |
| Style: | Futuristic/Exotic |
Brief:
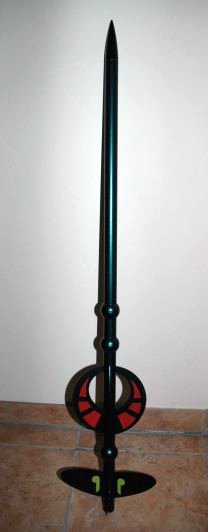
A totally unique looking skill level 3 rocket designed by Shrox and sold by
FlisKits. It even includes ping pong balls as a design feature! It's a great
flyer and a rocket that people will take notice of at any launch.
Construction:
The kit includes:
- 2 NCB-50AB nose cone, balsa
- 2 BT-50-18 body tube, 18"
- 1 BT-50-04 body tube, 4"
- 1 BT-20-0275 body tube, 2.75"
- 1 CPL-50-01 stage coupler
- 2 FSB-3-4-9 fin stock, 3/32" balsa
- 2 FSW-SHX01 laser cut fins, 3/32" balsa
- 1 PCP-16 16" parachute
- 3 PPB-01 ping pong ball
- 1 SE-M screw eye, medium
- 1 SLK-90-36 Kevlar® shock line
- 1 SC-2-24 elastic shock cord
- 1 SLCA-96 shroud line
- 1 TD-1-6 tape disk
- 1 LL-1-2 2" launch lug
- 1 LL-1-1 1" launch lug
- 1 EH-0275 engine hook
- 2 CRP-20-50 centering ring
- 1 EB-20 engine block
- 1 DCW-SHX01 decal sheet
- 1 FPS-SHX01 fin pattern sheet
- 1 INS-SHX01 instruction sheet
Typically fantastic instructions from FlisKits makes this Level 3 rocket and interesting build. Although FlisKits has taken the unusual step of providing laser cut fins for the curved upper fins, they still leave the builder with plenty to do.
You first assemble the 18mm motor mount and there are no surprises here. Next, you are told to cut holes in the 3 ping pong balls. The instructions have you use the 4" BT-50 body tube to trace the outline of the first cut. You then cut out the circle very carefully with a sharp hobby knife. After a light sanding of the hole to deburr it, you then push the BT all the way into the ball which will give you a faint outline with which to make the second cut. You have the option to keep the 6 cut pieces to use in the design, I chose to discard mine.
The 2 long body tubes are then joined together with the coupler. The Kevlar® shock cord is mounted with the coupler for a strong connection. You then cut out 9 fins and a jig brace from the balsa stock.
FlisKits has included a fin alignment jig that you must assemble yourself from included parts. The jig ensures that both of the large fins are at a 15 degree angle. I found the jig very useful and it worked perfectly. I even saved it since I have three other Alien8s to build.
At step 17, there is a typo that you need to be aware of. The instructions tell you put glue on root edge #1 and glue that to the 4" warp pod tube. However, the template clearly shows that root edge #1 should be attached to the body tube instead. The template is actually correct, if you only follow the instructions, the warp pod assembly will be swept back instead of forward. I informed Jim Flis about the typo and I am sure that future kits will have this corrected.
The rest of the assembly is quite straightforward. You mount the fins and the ping pong balls according to the directions. I added fillets to all the fins and even around the ping pong balls to give a smoother finish. I am really glad that FlisKits decided to include the laser cut fins for the large, curved fins. They are what appears to be birch plywood and that would have been very difficult to do with my little hobby knife.
Finishing:
I used two coats of Krylon dark gray primer with a 320 grit sanding in between.
There are lots of little nooks and crannies on this rocket, so sanding took
longer than normal. I then applied 2 coats of Audi Dragon Green Metallic spray
paint. I really like the auto spray paints, they go on smooth, do not run, and
dry so fast that you can put a second coat on 15 minutes after the first and
then top coat it in one hour! The face card shows a two tone paint job using
black and green, but my aliens prefer all green to match their skin.
There are decals included, 4 of which that are somewhat large - they are for the curved fins. The instructions mention that you may want to cut the large decals in half, but I had no problems applying them whole. Just take your time as they are very thin and can easily break. After the decals dried, I applied one coat of clear coat to seal everything up.
Construction Rating: 4 out of 5
Flight:
First flight was with a B4-2, the smallest motor recommended. Thank goodness
for the short delay, because she did not fly very high. Parachute popped open
just after apogee and she came down in the grass with no damage. For the second
flight, I used a C6-5. Much better! Perfect flight with some weathercocking but
nothing serious. Parachute arrived just after apogee again and I had another
perfect landing. I had other rockets to launch so I did not get in more
flights, but I am impressed with how she flies and she will definitely be
spending more time in the air.
Recovery:
The 16" parachute was a perfect size for this rocket. Although I was
flying on a fairly calm day, the rocket came down with not too much drift and
neither too fast nor too slow. I like the Kevlar®/elastic
combination, it always seems to hold up well.
Flight Rating: 5 out of 5
Summary:
Aside from the little typo, this is a great kit. Take your time, build it
right, and you will have yet another FlisKit that will be the center of
attention. I hope that this is not the last collaboration between FlisKits and
Shrox. If this first kit is any indication as to what we can expect in the
future, I have my credit card ready and waiting!
Overall Rating: 5 out of 5
Other Reviews
- FlisKits Alien8 By Andy Miller
Brief: This is an over three feet long single staged rocket with a 16 inch plastic parachute. Construction: This kit comes with two body tubes, one coupler, 5 balsa fins and three ping pong balls to cut out. And that's just for starters! There are also two large wing like fins. All of these parts have to be glued on precisely. The shock cord attachment is a step above the ...
 |
 |
Flights
|
|