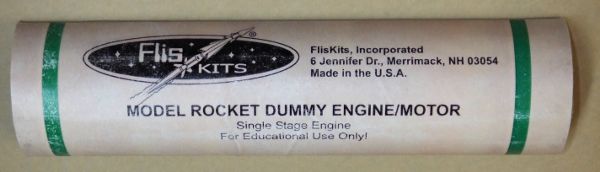
FlisKits Cut-Away Motor Rocket Motor
FlisKits - Cut-Away Motor Rocket Motor {Kit}
Contributed by Chan Stevens
| Manufacturer: | FlisKits  |
Brief:
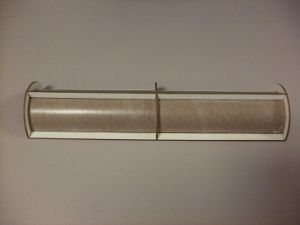
This is a neat display of the interior of a model rocket motor, and at 3:1 upscale, it's large enough to use in a
typical classroom presentation.
Construction:
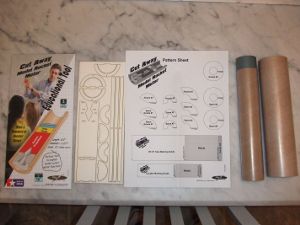
This kit comes packed in a typical rocket baggie with color header card and contains the following parts:
- BT-70 tube
- Laser-cut cardboard detail sheet
This is described as a skill level 2 kit, and I'd say that's accurate. It might not look that tough, but this is actually a pretty detailed and highly engineered kit and requires careful construction skills. The instructions feature excellent illustrations and detailed steps. You will definitely want to pay close attention to them, as this is not at all an obvious/intuitive construction project.
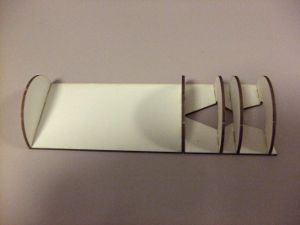
Construction starts out with the assembly of the interior ribs and spine. At first glance, this looks like overkill--this really doesn't need the structural support--but it's intended to reflect the motor casing thickness. Everything was pre-notched and fit very well, and it was quickly tacked together using white glue.
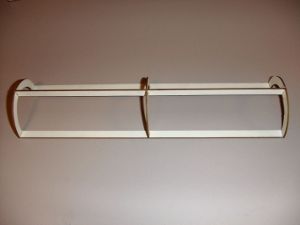
With the guts done, the next phase is tube cutting. The outer section of the model is a BT-70, which needs to be split open almost in half, then trimmed to length. With such laser cut precision details, I'm not sure why the tube wouldn't already be cut to length, but that's minor extra work so not a big deal. This half BT-70 holds the rib/spine assembly, which in turn holds a split open BT-60 section. The propellant section goes into the split open BT-60.
Depending on whether you want to model a booster motor or one with a delay charge, you can choose to build an upper section for the delay. This module is much like the propellant module--a flat piece mounted to a couple semicircles, though in this case it sits inside a TC-60 coupler section to strengthen it a bit.

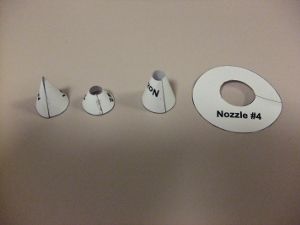 The real fin (or pain) comes next: forming 4 different shrouds to model the various tapered
sections of the nozzle. Each are made from rolled paper. Don't worry about the seams--once you set them into the cutout
areas in the propellant assembly, you cut away the half that sticks out above the flat piece of the propellant
assembly. Getting all the shroud angle correct to fit together is a little tricky, and you might still need a little
filler putty anyway.
The real fin (or pain) comes next: forming 4 different shrouds to model the various tapered
sections of the nozzle. Each are made from rolled paper. Don't worry about the seams--once you set them into the cutout
areas in the propellant assembly, you cut away the half that sticks out above the flat piece of the propellant
assembly. Getting all the shroud angle correct to fit together is a little tricky, and you might still need a little
filler putty anyway.All told, this can be built in about 2 hours.
Finishing:
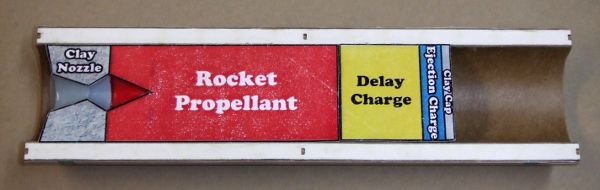
Right out of the bag, it looks motor shaped but does not include anything for finishing. You are left to either
paint/decorate it on your own, or better yet download the free patterns to print out on white label stock. The
patterns cover an outer wrap to make it look like a B6-4 or B6-0 motor plus interior labels to go over the flat pieces
identifying the propellant, delay, ejection charge, etc.
I printed off a set of labels, and they looked pretty good, though the outer wrap can be a little tricky to apply and keep perfectly aligned. In my case, I have a very slight wrinkle where I tried to peel it back up to reposition.
I then circled back and hand painted in some of the interior sections, such as the half-cones and the ends.
I coated everything when done with two light applications of Krylon clear acrylic fixative.
Construction Rating: 4 out of 5
Summary:
I think this is a good instructional aid. At $9, it's not too expensive and it's rugged enough to survive being
handed around for a show and tell session.
PROs: Very realistic looking.
CONs: Slightly over-engineered. The BT-60 could be supported by just a pair of half rings, no need for the spine assembly.
Overall Rating: 4 out of 5
Other Reviews
- FlisKits Cut-Away Motor Rocket Motor By Jim Bassham (March 8, 2009)
( Contributed - by Jim Bassham - 03/08/09) Brief: This is FlisKits' new model of a cut-away rocket motor. It is designed to be used as a classroom or science-fair demonstration model. Construction: The kit consists of a laser-cut sheet of fiberboard parts, two body tubes, a coupler tube and a sheet of paper parts. OK, I really wanted to like this kit, but it was frustrating ...
- FlisKits Cut-Away Motor Rocket Motor By Hans "Chris" Michielssen (February 1, 2009)
( Contributed - by Hans "Chris" Michielssen - 02/01/09) Brief: I "won" this kit on a rocketry forum. A build thread hosted by Powderburner followed the steps of the assembly. After the last assembly post, the host asked the readers to find the mistake in his build. If you found the error you would receive a Cutaway Engine Kit as a prize. I read through the ...
- FlisKits Cut-Away Motor Rocket Motor By David Landgraf (January 2, 2009)
( Contributed - by David Landgraf - 01/02/09) Brief: If you have ever been at a loss for a giant version of a model rocket motor to use as a teaching aid to hold up in front of a class, this is your ticket. This little kit provides a good illustration of the internal parts, gives you a model in a good, usable size, and is easy to assemble in a couple hours of total work time. It ...
 |
 |
J.F. (March 21, 2009)
* This model is not aimed at young modelers and is certainly not what we would call a beginner kit. You are correct that there are challenges in building it.
* The cost point we were aiming for (less than $10) precludes us from including a label with the kit. A free download label is easy to provide and is only an available option. the builder is free to finish it as they choose.
* I would be most interested in working with you offline as your comments about difficulty in removing laser cut parts and a flimsy end product indicate that you may have gotten some defective parts as you shouldn't be having such problems. Feel free to contact me if you would like some resolution in this regard. Thank you for your review. As you know we value all feedback and negative feedback helps us identify things that need attention!
Sponsored Ads


|
|
R.A.M. (January 22, 2009)