FlisKits Cut-Away Motor Rocket Motor
FlisKits - Cut-Away Motor Rocket Motor {Kit}
Contributed by Hans "Chris" Michielssen
| Manufacturer: | FlisKits  |
Brief:
I "won" this kit on a rocketry forum. A build thread hosted by Powderburner followed the steps of the
assembly.
After the last assembly post, the host asked the readers to find the mistake in his build. If you found the error you would receive a Cutaway Engine Kit as a prize. I read through the storyline trying to find the error. I guessed wrong twice and another post got the correct answer.
I was disappointed, as I could see afterwards where the mistake was made. The host said all the participants would receive a prize from FlisKits! I forwarded my name and address to Jim Flis.
Five days later a box came in the mail. It was a Cutaway Kit Model! Jim Flis gave all five participants a Cutaway Engine Kit. A congratulatory letter from Jim Flis accompanied the kit.
The old OOP Estes cutaway engine was the standard engine size, 3/4" x 2 3/4". This is a 3.1 upscale enlargement. If you have ever tried explain how an engine works to a classroom of sixth graders, you will certainly appreciate this model.
In the pictorial review I noticed the nozzle wasn't an accurate depiction of a B6-4. The throat widens where the clay meets the black powder. I know in the next "run" of kits this will probably be corrected. I thought I would build a nozzle closer to the actual contours of the intended engine.
Construction:
The parts list:
- 8.5" length of BT-60
- 8.625" length of BT-70
- 1.75" length of 60 size black coupler
- Laser cut sheet of Ribs, Spines and "Plates" (Thick)
- Nozzle Shroud pattern sheet (Thin)
- Instructions
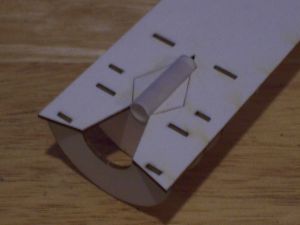
The modification was actually pretty simple. I substituted a 3/16" launch lug in place of nozzles #1 and #2.
I did have to build up the #3 nozzle to support the lug. The half circle cut of nozzle Ring #2 was widened slightly. And, I added back the triangular sides (nozzle contour) to the propellant plate. I cut them from the original laser cut sheet. Since they were cut from the same piece, they fit perfectly.
While leaving out nozzles #1 and #2, this actually makes for an easier to build kit. I've never been a fan of paper shrouds. But, FlisKits included two extras of each shroud. If you messed one up, simply cut out another and try again.
The top of the lug was plugged with a piece of half-round cardstock. I formed the half-round plug (end) into a round shape by rolling it around the end of a paint brush handle.
Finishing:
After construction you can download the "Cutaway Wrap Set" from the FlisKits website. Because I modified
the nozzle, the downloads wouldn't fit my "engine" anymore.
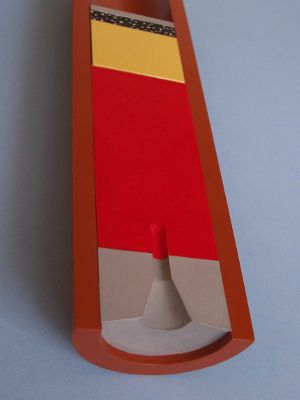
I decided to use painted cut-out cardstock pieces to define the propellant, delay, and ejection sections. I made half-round ends to roll over backs of the propellant and delay/ejection pieces. The three main sections were solid colors.
The ejection charge was a little different. A base coat of gray was followed by a mist coat of black. I used a black Sharpie pen to simulate the loose charge granules. I then added a few white dots from a white out pen.
The engine casing was shot with a Rustoleum Cinnamon color. While I could have gone with a color closer to an actual engine's paper wrap, I wanted a good contrast.
I gave the kit a 4 1/2 point rating as the nozzle isn't an accurate depiction of a real model rocket. This is really a moot point. The kit was a great build, but I would imagine FlisKits would work in this change on the next batch of kits.
Construction Rating: 4 out of 5
Summary:
Some ("well thought" by FlisKits) observations:
- The fiberboard was very thick and strong, more like matte board for picture framing.
- The pattern sheet has four nozzles to cut out and form. You are also given two extra nozzles (each) in case you aren't happy with the first attempt.
- Well illustrated instructions, more of a 3-D rendering than the standard 2-D look.
- The finished model is plenty big and strong.
This is a well engineered model. A nice change and a good challenge. This is not a 3 fin/nose cone build. No manufacturer has produced something like this before.
Congrats Fliskits! You have provided a valuable tool that has been needed for a long time.
Overall Rating: 4 out of 5
Other Reviews
- FlisKits Cut-Away Motor Rocket Motor By Jim Bassham (March 8, 2009)
( Contributed - by Jim Bassham - 03/08/09) Brief: This is FlisKits' new model of a cut-away rocket motor. It is designed to be used as a classroom or science-fair demonstration model. Construction: The kit consists of a laser-cut sheet of fiberboard parts, two body tubes, a coupler tube and a sheet of paper parts. OK, I really wanted to like this kit, but it was frustrating ...
- FlisKits Cut-Away Motor Rocket Motor By Chan Stevens (February 7, 2009)
( Contributed - by Chan Stevens - 02/07/09) Brief: This is a neat display of the interior of a model rocket motor, and at 3:1 upscale, it's large enough to use in a typical classroom presentation. Construction: This kit comes packed in a typical rocket baggie with color header card and contains the following parts: BT-70 tube Laser-cut cardboard detail sheet ...
- FlisKits Cut-Away Motor Rocket Motor By David Landgraf (January 2, 2009)
( Contributed - by David Landgraf - 01/02/09) Brief: If you have ever been at a loss for a giant version of a model rocket motor to use as a teaching aid to hold up in front of a class, this is your ticket. This little kit provides a good illustration of the internal parts, gives you a model in a good, usable size, and is easy to assemble in a couple hours of total work time. It ...
 |
 |
J.F. (March 21, 2009)
* This model is not aimed at young modelers and is certainly not what we would call a beginner kit. You are correct that there are challenges in building it.
* The cost point we were aiming for (less than $10) precludes us from including a label with the kit. A free download label is easy to provide and is only an available option. the builder is free to finish it as they choose.
* I would be most interested in working with you offline as your comments about difficulty in removing laser cut parts and a flimsy end product indicate that you may have gotten some defective parts as you shouldn't be having such problems. Feel free to contact me if you would like some resolution in this regard. Thank you for your review. As you know we value all feedback and negative feedback helps us identify things that need attention!
|
|
R.A.M. (January 22, 2009)