| Construction Rating: | starstarstarstarstar_border |
| Flight Rating: | starstarstarstarstar |
| Overall Rating: | starstarstarstarstar |
| Diameter: | 1.64 inches |
| Length: | 23.90 inches |
| Manufacturer: | FlisKits  |
| Skill Level: | 2 |
| Style: | MicroMaxx |
 Brief:
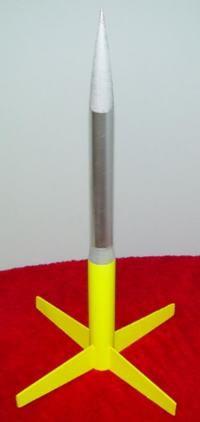
The new Fliskits Praetor is a single stage, dual diameter "Sport" design, with a very unique and bizarre looking set of four fins. The kit says that this was first introduced at the "Pearl River Model Rocket Convention (MODROC)".
This comes in the same type of package as my previous rockets from FlisKits. Estes type retail package, which is a plastic bag with hole punched hang tab. Package insert is full color and looks very nice. I ordered this kit directly from FlisKits online during a holiday week with one day of no mail delivery (Thanksgiving) and I still had it in the mail in just (4) days.
Modifications:
Recovery system as described below.
Construction:
This kit comes with two different diameter body tubes, balsa nose cone, balsa bulkhead/airframe adapter, engine tube, engine clip, thrust ring, stiff black cardboard engine tube centering rings, good quality stiff Balsa fin sheets with templates, Estes type triple fold paper to the body type shock cord mount, 12" x 1/4 elastic shock cord, full detailed illustrated instructions, pre-flight check list and a multi-sized Estes type Official Fliskits Red, White and Black plastic parachute. Parachute includes line, adhesive tabs and instructions. A screw eye is also included to mount recovery to the bulkhead, as this rocket separates in the center. One thing I really like about the FlisKits is that they each have a production number which is filled in on the main package header/display card with a black sharpie. My Praetor is numbered #7!
The instructions are top notch. Very simple with just the right illustrations.
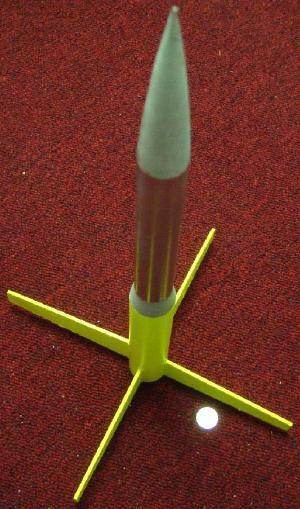 Now, this rocket has the widest fin array I have ever seen. The fins measure 13.5" from tip to tip! This is one of those rockets that looks interesting in pictures, but the real appreciation comes in hand and in person. It looks awesome!
I used just CA for minor and quick assembly, and DAP yellow Wood-Weld glue for fillets on the large fins, fillets engine mount to airframe, as well as to secure the nose cone and balsa bulkhead/airframe adapter to the upper body section.
Finishing:
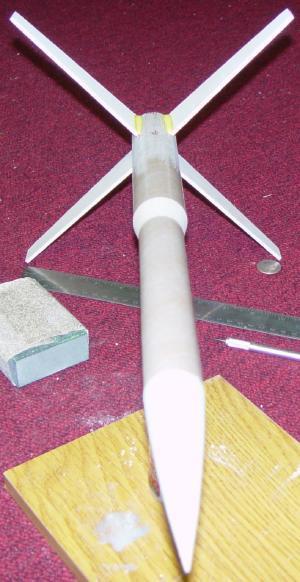
Considering that this rocket is just less than (2) feet tall, and the fin span is over a foot, I made for strong fin mounting. After sanding the glassine layer off of the body tube, I outlined the (4) fin locations. Then using a very sharp exacto knife pin (you can also use a sharp thumb tack), I made (7) holes in the body tube for each fin location. Then, using medium CA, with a generous bead on each fin root, I mounted the fins and made sure that they were perfect by using an Estes fin alignment guide and clips.
You can see my Exacto Knife pin in picture below (laying to the right of the rocket).
The tiny holes method is something I recently learned on EMRR. The idea is that the holes will absorb the CA, creating small CA rivets. I really don't know how much strength that will add, but the theory looks right.
Considering the wide base of these fins, or perhaps they should be called "wings", they will encounter far greater than average stress each upon ground contact when landing.
The Balsa fin stock included would have had enough to cut the fins to have a through the body connection tab to the motor mount.
While this is only a skill level (2) kit, I see that it can be improved upon, even if only by the addition of an "optional" and/or slightly advanced construction step for through the wall. Certainly not required for skill level two, but showing how to do it optionally would be a major plus for this kit.
There are no decals, but it doesn't need them. The bizarre shape speaks for itself, and with it's dual sized body with adapter, there are multiple ways of finishing it paintwise.
I decided to go ahead and show off the huge fins and painted the lower half and fins with flourescent day-glo yellow over a single layer of white primer. The top section which also saw a single layer of white primer, received it's own coat of metallic silver. I think it looks awesome. After watching how it acts when leaving the launch pad, I don't think I will lose this one as long as I stick with a max of a C6. But this was so much fun to build and looks so cool that if I do lose it, it will hurt.
While this kit is what I consider to be one of the best there is, due to what I have described regarding an optional step which could improve the kit, I am going to give this one a 4.5/5 here.
Construction Rating: 4 out of 5
 Flight:
This kit recommends A8-3, B6-4 or C6-5. It requires wadding to protect it's stock plastic chute.
I did something a little crazy and not only did I fly it before paint, I flew it before fin fillets, with the fins attached only with CA. I picked an Estes B6-4 just to see if it would fly or die.
I now see what is happening here. These fins, or let me call them "wings" have a ton of drag. This rocket lifted very slow, and with drama in fact. I seem to be on a streak when it comes to stable and straight up flights I guess. This bizarre looking Praetor burned a B6 slowly, got up about 400 feet and just seemed to levitate there as the chute came out.
It came down soft, but I cheated and caught it. So I don't know if the fins would have held up with no fillets, but I think they would have. Next flight will be with paint, fillets on a Quest C6-5.
I would have loved to see a small fabric chute, which I will add myself, but it would not be reasonable to expect that as this is not an expensive kit. I only paid $14.95.
Recovery:
The shock cord that came with it was only 12". However, there was an upgrade notation and a new length 18" shock cord included as well.
Just by personal preference, I opted out of the suggested shock cord method. I added a 10" piece of 100# test Kevlar® cord, making a double knot in both ends. I then cut tiny 1/16" V notches in two sides of the top motor mount ring and secured the two ends of the cord. Making certain that this would not extend from the main body, I then tied a knot about an inch from the top, creating another loop so that if one side of the cord mount should fail, the other will still work. I then added a snap swivel to be able to change chutes out quickly.
On flight and recovery, this rocket most certainly deserves a 5/5.
Flight Rating: 5 out of 5
Summary:
Feel free to take a look at my picture #1. This is the unpainted rocket after it's first flight with no fin fillets. You can see the yellow wood glue fillets I was starting then.
Now, take a very close look at that picture, and you will see that I have placed a quarter at the base of the fin on the right. That should show how huge these fins are. I call them wings.
I think this is one of those rockets that you have to see in person to fully appreciate. It's not expensive at all, it is definately fun to build as it's not just a few fins and a nose cone. This rocket is quite unique and it looks really cool!
No doubt about it, this one is a 5/5!
Overall Rating: 5 out of 5
Other Reviews
- FlisKits Praetor By Nick Esselman
Why does Summer, and even Fall, always run out of time? I guess so we'll have the opportunity to sled, build snowmen and throw snowballs! But, here in Vermont it simply halts all rocket finishing activity! Still, I was interested in getting my 2nd kit built from the the newest kit manufacturer, FlisKits (opened in September 2002). As with my FlisKits Tumble Weed I was impressed with the ...
 |
 |
Flights
|
|
Z.C. (July 19, 2008)
|
|
J.B. (February 11, 2008)