Giant Leap Rocketry Vertical Assault 3.0
Giant Leap Rocketry - Vertical Assault 3.0
Contributed by Philip Levanda
| Construction Rating: | starstarstarstar_borderstar_border |
| Flight Rating: | starstarstarstarstar |
| Overall Rating: | starstarstarstarstar_border |
| Manufacturer: | Giant Leap Rocketry  |
Brief:
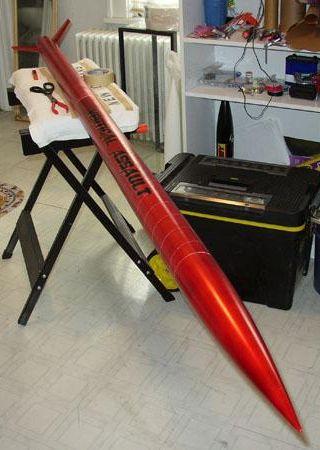
When I was standing in line at the RSO getting ready to put this baby up on a J528, a bystander said to me "You ready to lose that hypodermic needle?". This is a high altitude kit that was made for J motors. At 89in long and 3in diameter, it is long and sleek with short fins. It can easily reach mach on a big J.
Construction:
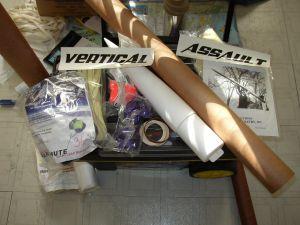
This lit includes:
- 2 very strong 3" phenolic body tubes
- 1 coupler
- 1 nose cone
- 1 54mm MMT
- 1 Slimline motor retainer.
- 1 nylon shock cord
- 1 Kevlar shock cord
- 1 Fireball anti-zipper ball
- 2 bulkheads
- 1 piece 1/4" threaded rod
- 1 54mm 3 fin fincan
- 2 centering rings
- 1 18" drogue
- 1 36" Tac 1 main parachute
- 2 Acme conformal rail guides
- 1 Decal
- Eyebolts, nuts, and washers
- Board and lug for the electronics were talked about in the instructions but not included with my kit.
This is an almost ready to fly kit. It comes with just about everything you need to build the rocket short of epoxy. The fin can is a big time saver as there is no need to align the fins.
Most high power rocket kits I have seen either come with sparse instructions, if any at all. This kit, on the other hand, came with very detailed instructions including helpful pictures and tips on how to assemble. It even had tips in the back for packing and getting the Vertical Assault ready for launch.
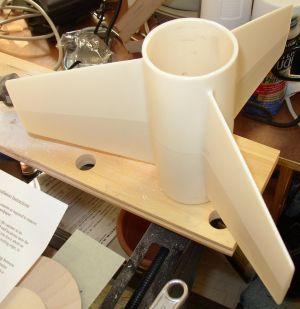 I started first thing with the fincan and motor mount. They recommend JB Weld because of its ability to handle high temperatures. I agree with this recommendation, so I used it. The only problem with JB Weld is that it takes hours to set, so I put the Slimline on and said goodnight. The next day I mixed another batch of JB Weld and slid the fincan and centering mini coupler on applying a decent amount to keep it in place. Then I said goodnight to the rocket again as I waited for the JB Weld to dry. I usually like to eyebolt my shock cord in but with a 54mm MMT in a 3 inch rocket there just isn't room for it. Instead I measured off the Fireball to meet the end of the tube and epoxied the cord to the MMT. Once the fincan and MMT was assembled, I mixed up a big batch of 5 minute epoxy and slid it into the slotted tube. In my opinion, the thin coupler put at the back to help keep the slotted tubing in round and give you an extra bit of area to glue to may be too thin. It didn't stay well and barely worked. If it was a bit more substantial, I think it would have been easier to use. Filleting the fincan is a bit messy. The slots have some play in them so the epoxy oozed through. The directions almost recommend just pouring it in and to use a large amount. I did it about half way, applying a generous amount and making some small fillets. A foam filler might be a good idea to fill those gaps between the fins.
Next I installed the eyebolt in the nose cone. The instructions tell you to cut a big hole in the side of the cone shoulder so you can put the nut on the back of the eyebolt. I wasn't thrilled with that idea but after looking at it, that seems the only way to get it on there. Doing this also leaves a nice hole in case you need to add nose weight.
 Last thing to assemble is the avionics bay. I was not thrilled with the included setup at all. Giant Leap makes some great avionics bays so I was a little disappointed by the one included with this kit. It consisted of two bulk heads and a 1/4" threaded rod. The instructions talked about a piece of wood and a tube to attach the electronics to but they were no where to be found. One threaded rod in an avionics bay to me just isn't a good idea. For one you are putting all your recovery stress on that one rod from the chutes and you've also got an altimeter in there that can spin and jostle around. I happened to have some 1/4" rod lying around so I simply just added a second one. I used some old fin material for the mounting board and installed my Missile Works RRC2X altimeter and switch. I used two 1/2" PVC caps to hold my black powder charges.
Finishing:
I used some nice metallic red paint which gives it a slight automotive finish to it. I think it went on good and looks great. The provided decal went on smooth and has survived a few flights without any clear coat. I did not fill the grooves which are in my opinion some of the nastiest I've ever seen on a tube. They are close together and deep, but the tubes are so strong, I can't complain about that. These tubes feel stronger than some glassed tubes I've seen.
Construction Rating: 3 out of 5
Flight:
Giant Leap recommends any motor from high thrust Hs through medium Ks which makes this a very versatile rocket if you have the waiver to go that high. I went conservative on its first flight and used an I285 with a medium delay. I mocked up the Vertical Assault in RockSim 8.0 and it said 1900 or so feet. When I went to balance this rocket with the I285 in it I was a little disturbed to see it almost 5 calibers overstable. This might be due to the fact that I used a less epoxy than they recommend in the fincan. It could also be the fact that it has tiny fins and is very long. Not having an easy solution to this I did some research on long rockets that are overstable. I read a few things and it looked as long as it wasn't launched in 15+ mph winds I should be fine with some weathercocking.
I took this rocket out to NERRF 2005 for its maiden flight. I flew it twice over those 3 days. Since this was the first flight and the fact that I did not ground test the ejection charges, I used the motor delay and put in a 30" drogue just in case my electronics failed or I didn't put in enough black powder. I loaded it on an extreme rail which the conformal launch lugs glided on nicely. Turned on the electronics and moved behind the LCO. 5...4...3...2...1...ignition. She went up pretty straight there was a slight kick into the wind once off the rail but I attribute that to the light motor. Other than that, it was a nice, straight flight. Both chutes deployed--one at apogee and the other at 500 feet, right where I set the altimeter. With the large drogue it almost made it into some trees. Thankfully it landed about 15 feet short of them. I recovered it easily with zero damage--not even a scratch in the paint. The altimeter beeped out 1900 something feet which was right on with RockSim. On the second launch, I took it up a notch and loaded a Loki J528 in there. This time I used the 18" drogue that came with the kit and I left the 17 second full delay in the Loki motor. After a few false starts, which we figured out was a blown fuse in the switch box on the setup, the LCO made the count and that thing disappeared. Zero hesitation. No weathercocking. Nothing. It left the rail quick, fast, and in a hurry. The altimeter beeped out 5964 feet. Again, the dual deploy went perfectly and I didn't need the Loki delay redundancy.
I used the 54-38mm Slimline motor mount adapter for both motors. The Loki motors are not compatible with Slimline motor retainers. The Loki rep at the NERRF launch suggested I just tape the back of the motor to the retainer for positive retention. That worked out great. Not sure what I can do if I want to put a 54mm Loki in there, as it's hard to tape the back when I can't get my hand in there.
One thing I can say about the main shock cord is that I badly burned two of them. I will use less BP next time and I put a Kevlar® cord protector on the base of the nylon shock cord.
Recovery:
PROs:
- Dual deploy went off without a hitch
- Zero damage after 2 flights not even a scratch in the paint.
CONs:
- Protect that forward shock cord
- TAC-1 chute is a tight squeeze in that 3" body tube
Flight Rating: 5 out of 5
Summary:
This is a great kit. They label it almost ready to fly but it took me about the same amount of build time any other kit would. The fin can makes it easy but waiting for the JB Weld to dry negates any time saved. Next to the fiberglass rockets I have built, this is the strongest kit out there. You're not gonna zipper it and you not gonna hurt it. This would make an excellent L2 kit. The main CON I think is the altimeter bay. Toss in an extra 1/4" threaded rod and include all the parts next time.
Overall Rating: 4 out of 5
 |
 |
Flights
|
|
Roger Smith (May 25, 2011)
I managed to create a substantial zipper in the upper tube of my Vertical Assault. The drogue failed to deploy, so it was going very fast when the main 'chute deployed.
I'm blaming the Fireball. I think there are times when the Fireball gets stuck and stops the ejection charge from being able to pressurize the interior of the rocket. I'm not sure, but I think the same thing happened with a four-inch rocket of mine a few years ago.
Replacing the upper body tube of the rcoket is the main thing I need to do to repair it. I also have to rebuild the electronics bay. At the same time, I'm going to remove the Fireball.
|
|
B.C. (April 4, 2010)