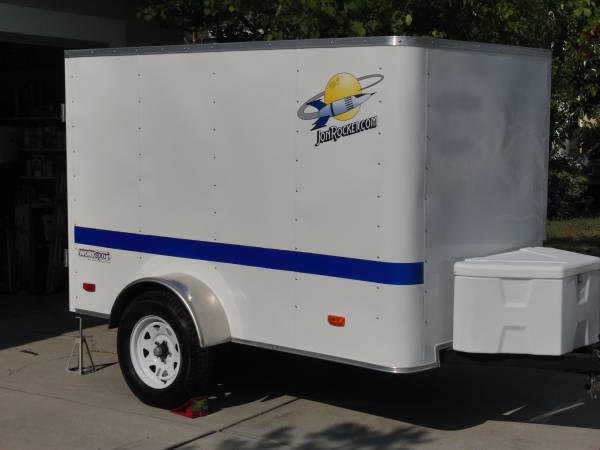
JonRocket.com Trailer
By Roger Smith
2012-05-06
This build is a little different. For more than ten years, two or three Saturdays each month, my wife, Bracha, and I packed our mini-van with rockets, motors, supplies, a tent, chairs, cooler, and everything else we thought we would need at that day's launch.
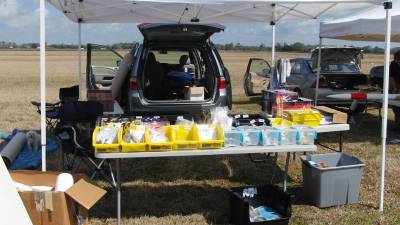
Arriving at the launch site, we'd unload everything to get to the tent, tables, and chairs. At the end of the launch, we would re-load the van then, after getting home, we would unload everything. Of course, we were always tired after spending all day outside at a launch. So, unloading the van after getting home was always a painful chore.
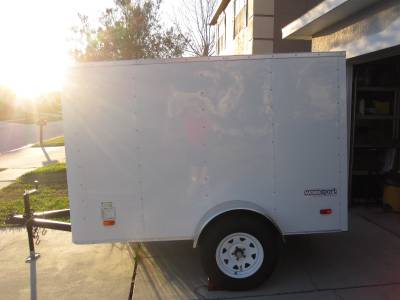
So, for the past few years, we've been looking for a small trailer we could use to store and transport our rocketry stuff. One of the challenges is that the trailer had to be small enough to fit into our garage, but large enough to be useful. We considered a 4x8 enclosed cargo trailer. A small trailer like that would fit easily in the garage, but we were concerned that it would be difficult to organize things in it. We wanted to be able to put things like tents, tables, and chairs in the back of the trailer so they could be unloaded first and loaded last. A larger 5x8 trailer seemed better suited to our needs. In addition to being a foot longer, a 5x8 trailer is a foot taller. In addition to giving us much more space inside the trailer, the extra height would make it easier to get into the trailer. I did some research and found that most 5x8 enclosed trailers are 71" tall. I measured the opening to our garage at 73" - a close fit.
We visited a couple of local dealers and looked at some online sources for trailers. But, the prices quoted were a bit more than we wanted to spend. Then, one day at lunch I drove by the local Home Depot and saw a Pace American trailer sitting out front. I parked and went to take a look. The price on the trailer looked good, so when I got back to work I searched the internet to see if it was really a good deal. I found out that used trailers were selling for about the price Home Depot was asking for this new trailer.
After work, and after calling Bracha, I went back to Home Depot and purchased the trailer. Someone met me by the trailer to help me hook it up to our minivan. But, no one at the store could find the key to unlock it! No big deal. I offered to come back to pick it up the next day after work.
The next day was overcast. During lunch I went to the county tax office and purchased a license plate for the trailer. After work, it was getting dark because of the cloudy skies when I went to pick up the trailer. The people at Home Depot had found the keys and unlocked the trailer. I hooked it up to the van and tested the lights. The brakes and turn signal lights worked. But, the running lights on the trailer wouldn't light up. I directly hooked the trailer's connector to a "jump pack" that I had in the van and the lights glowed. So, the problem was with the van, not the trailer. I didn't want to take the risk of towing the trailer without the proper lights, so, once again, I told the people at Home Depot that I'd be back later to pick up the trailer.
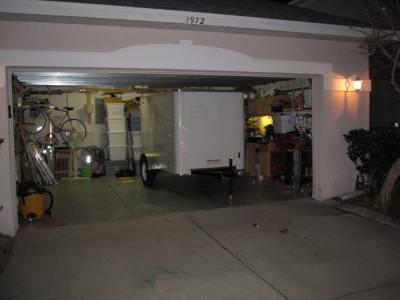
I finally picked up the trailer the next day at lunch time. When I got home, I backed the trailer up to the garage and received an unpleasant surprise. The trailer was too tall to fit in the garage! But I had measured the trailer. And I had measured the garage opening. Why wouldn't it fit?
The problem was partially that our garage doors in Florida have slats attached on the inside to prevent the doors from flying away during a hurricane. When the door is open, the slats hang down a couple of inches. After scratching my head for longer than should have been necessary, I realized that the real problem was that the door wasn't opening far enough.
I did some research on the 'net and found out that our garage door opener requires an extension to the screw drive to allow it to raise the door an extra six inches. The kit with the parts wasn't expensive. Adding the extension to the garage door opener took a couple of hours. I had to take apart the existing screw-drive and add the extension. Then I had to raise the opener itself up a few inches.
And then … ta da!
I was able to back the trailer into the garage.

Inside the Trailer
2012-05-07
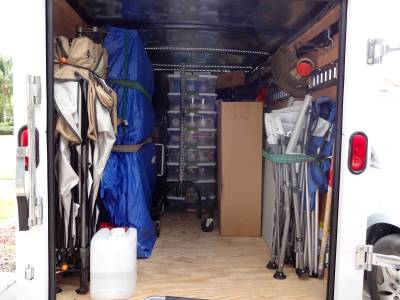
Once we could park it in the garage, our attention turned to the inside of the trailer. How would we organize things in the trailer so that we can find what we need and ensure that things don't get damaged in transit?
Oh, wait ... first I took care of some minor rust spots on the tongue. I sanded the spots down then painted the tongue using a rust inhibitor.
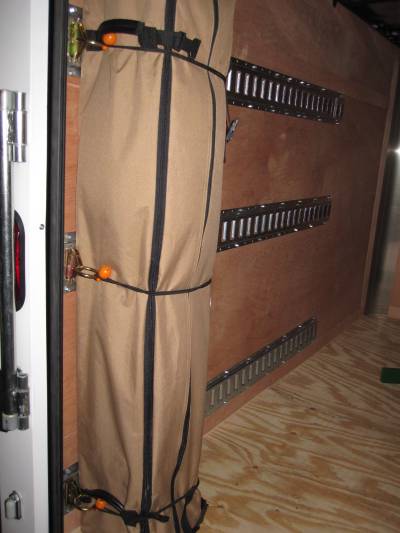
Having completed that challenging task, I turned to the Internet to research what others had done with similar trailers. I discovered a common thing to do is to install an "e-track" system. An e-track system consists of metal load bars that attach to the sides or bottom of the trailer along with straps and connectors that attatch to the rails. It's a really neat system that gives you a lot of flexibility in how you load the trailer.
I bought several of the e-track rails from etrailer.com because their free shipping offer made the total price a little lower than from others online. I bought rings and straps that attach to the rails from several vendors on eBay. I used self-tapping screws bought locally to attach the e-track bars to each side of the trailer.
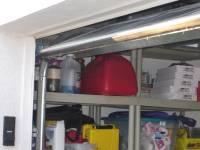
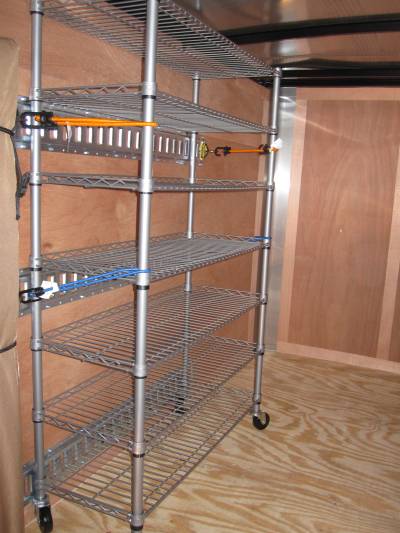
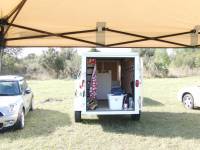
For our store items, we bought a shelving unit which includes bins from Sams Club. The shelves just fit through the trailer door. We used bungee cords to the e-track hooks to hold the shelving unit to the wall of the trailer. A tarp over the front of the unit holds the bins in place during travel. A couple of wide bungee straps keeps the tarp tight. On site at the launches, we just pop off the bungee cords and pull down the tarp to get to the things we sell.
For lighting, I installed a few battery-operated motion-sensor LED lights. They aren't very bright, but provide enough light to work in the trailer even when it is dark outside. Since they are motion-sensitive, I didn't have to worry about wiring and switches.
Fixing the Lights
2012-05-07
I had installed the trailer hitch and trailer light connection in our mini-van. So, I knew where to start to debug why the running lights weren't working when the trailer was connected to the van. The first thing I did was to hook the trailer up to the van and ... now none of the lights worked! Ugh!
I checked was the fuse which was added to the van's fuse compartment. It was fine. Next, I hooked my multimeter up to the trailer light connector and, as expected, there was no power at any of the pins of the connector. So, I pulled off the panel covering the wiring in the back of the van. I found the box I'd added for controlling the trailer lights. I tested the power going into it and got frustrated when it seemed that there was no power going to the box.
Upset that the problem now appeared to be somewhere deep in the van, I started to put the car back together. Just then, a neighbor walked up, armed with his own multimeter. His multimeter was bigger than mine, so I recognized him as an expert. He quickly diagnosed that the problem was in the trailer light controller box, not the van's wiring. Whew. I later discovered that my multimeter is broken which is what led me astray.
Knowing that the problem was with the controller box, I went online to order a replacement. Looking at the reviews for the old controller, I saw a few comments to the effect that "first the running lights quit working, then all the lights quit." So, my situation wasn't unique. I ordered a different brand of controller. It arrived a couple of days later and was easily installed. And, it worked!
At The Launch
2012-05-07
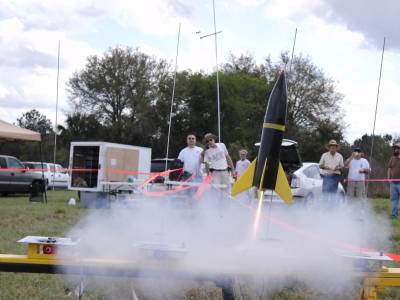
Our first experience using the trailer was at the March, 2012, ROCK launch. We arrived a little early because I wasn't sure how the trailer was going to handle being pulled through the ditch onto our field. There was no problem driving on the grass, but arriving early did allow me to pull in forwards rather than having to back up with the trailer.

We had the tent, chairs, and table unloaded and set up in just a few minutes. We carried a printed list of the sale merchandise inside the trailer so we didn't have to take any of it out unless someone wished to see it or make a purchase.
At the end of the launch, putting everything back was as quick and easy as set up. And, when we got home, all I did was back the trailer into the garage. Other than taking in the cooler and my cameras, we didn't have to unload anything.

Powering Up!
2012-05-07
Having more room to carry stuff to a launch, I naturally began to think of more things to carry.
One item that came to mind was a small generator for those times when it would be nice to have a source of electricity on site. I went online and read reviews of generators. And I talked with a neighbor who owns several small ones. What I found out is that there are some very nice, small, quiet generators. And there are some inexpensive generators. But, there are no inexpensive quiet generators.
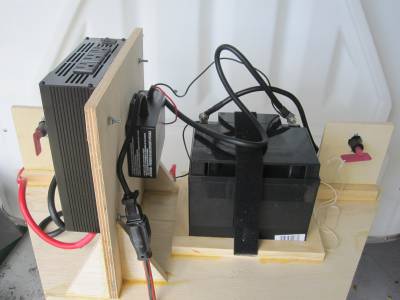
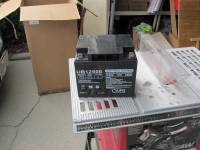 So, I decided to build a battery-powered system. I started by purchasing the parts – a tongue box, battery, inverter, charger, and stuff to connect it all together. I bought a white plastic tongue box. It was less expensive than the metal boxes. For the battery, I chose a Universal Power Group UB12500 sealed lead acid battery. It is rated at 50 AH. To keep it charged, I purchased a BatteryMINDer "Battery Charger/Maintainer, Desulfator, Conditioner." The charger is designed to keep batteries like the UB12500 charged and functioning. The inverter is from Roadpro. It's rated at 1500 Watts which means I can add a second battery to the system if I later find that it is needed. To connect it all together I bought a giant fuse to put between the battery and inverter; a couple of switches to allow me to connect and disconnect the charger and inverter; a couple of fused 12V jacks; and wires.
I found a couple places on eBay selling wiring kits for specific golf carts. Ordering one of them turned out to be an inexpensive way to get several short heavy wires with terminal lugs already attached.
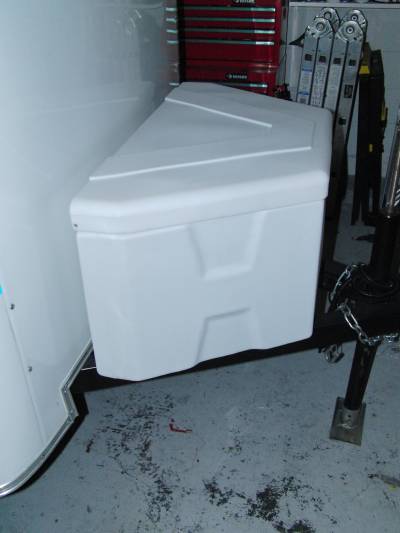
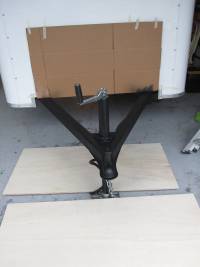
Test-fitting the box on the tongue, I discovered a problem. The handle on trailer's jack hit the box when you turned it. To solve the problem, I extended the rod where the handle attaches. It turned out to be a challenge. I couldn't find a heavy, strong pipe with the right inside diameter. So, I bought a pipe with too small an inside diameter. I put it in a vise and used a drill to ream it out. I discovered that a drill stuck in a metal pipe can generate a very large amount of torque. I switched to a much slower, but safer, method of using a round file attached to the drill to gradually enlarge the opening until it was the right size. I drilled holes in the pipe and cut a short length of 1/2" diameter rod to complete the handle extension.
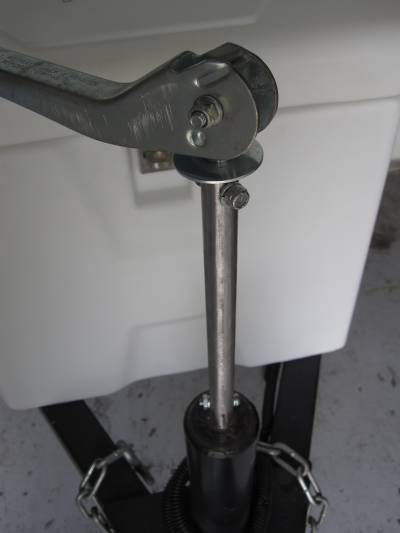
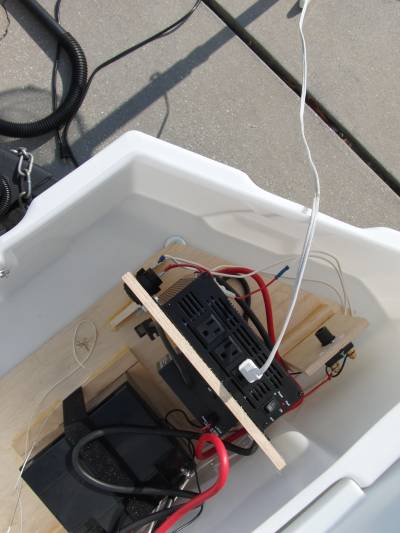
I built a wooden frame to hold everything in the tongue box. The box is bolted to the tongue and the wooden frame is bolted to the box. While I was attaching the box to the trailer and the frame to the box, I plugged an electric fan into the inverter and used it to keep cool. It ran for several hours while I worked on the trailer.

Wrapping It All Up
2012-05-07
Our friend, Carolyn Klages of Klages Kreations, provided decals and stripes for the trailer. She even applied them for us.
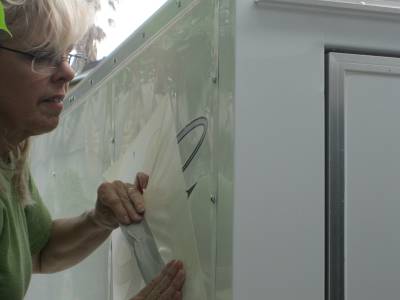
The logo decals are printed vinyl with a clear laminate. The blue stripes are highly-reflective.

Another Picture
2012-05-09


More Power!
2012-06-25
I added a second battery to the box on the front of the trailer to extend the running time of the fan. It lasted a few hours, but not quite all day at the ROCK launch a few weeks ago. Adding the battery was fairly easy. I attached a small board to the from of the wooden tray. I ran the Velcro battery strap under the new board and made it longer so it would hold both batteries. I charged the new battery for a couple of days then hooked it in parallel with the existing battery.
Trailer Upgrades
2013-03-21
This is my second try at entering this build entry. I spent about an hour on it earlier this evening before I pressed the back space key and lost all my work. If you accidently leave a text entry field then press the back space key when using Internet Explorer, IE will treat it as if you have pressed the “Back” button and you will lose all of your work. This bug has existed in IE for many years and Microsoft refuses to fix it. So, I’m finally doing what I should have done long ago. I’m switching to Firefox.
By default, FireFox also has the back space key do the same thing as the “Back” button, but you, unlike in IE, there is an option to disable it. Enter “about:config” in Firefox’s address bar then press the Enter key. Click the button to bypass the warning. In the search box, type “browser.backspace_action”. In the search results, double-click “browser.backspace_action” and set its value to 2.
Sorry … I just had to vent.
So … getting back on topic … we worked on the JonRocket.com trailer this weekend.
We mounted our first aid kit on the inside of the door so it can be found quickly if it’s needed. I added a Rubbermaid FastTrack rail on one side of the trailer and added a couple of hooks to it. We hang our weed trimmer from it. The trimmer should come in handy if the grass is too tall at the ROCK launch site.
Trying to get things more organized, we put two upright tool chests into the trailer. We were able to take most of the stuff we had in six storage boxes and four small toolboxes and put it in the two new tool chests.
With the new tool chests in the front of the trailer, we needed a little more light. We had been using small, motion-activated, battery-powered lights. We decided to take advantage of the 12V batteries in the tongue box and add better lights.
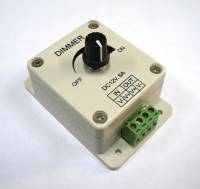
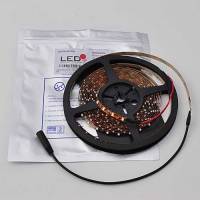
I ordered two reels of LED strip lights along with a dimmer switch from Amazon.com. The 12V LED strips are about 16-feet long and consist of 300 LEDs and resistors mounted on a flexible, conductive tape. The strips may be cut into shorter segments.

We cut the strips into several shorter segments about four-and-a-half feet long. I soldered speaker wire to each segment (being careful to keep the polarity right). We had a few short lengths of the LED strips left over. Since they work well when powered by a 9V battery, we’ll save them to use later on a rocket for the night launch at Bunnell Blast in November!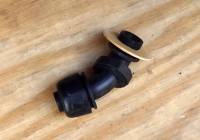
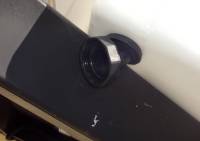
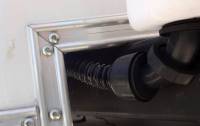
From McMaster-Carr, I bought a short length of PVC conduit and a couple of conduit connectors to use to connect the tongue box to the inside of the trailer. The floor of the trailer is pretty thick, so the connector would fit, so I used a piece of wood that looks, suspiciously, like a centering ring. I coated the wood with epoxy to weather proof it. Then I drilled a hole in the floor of the trailer. I glued the connector into the hole then added a few screws for good measure.

I mounted the other connector in a hole drilled in the tongue box. I ran some wire from the batteries, through the connectors and conduit, and into the trailer. I hooked up the connectors to the conduit and I’m happy with the result. It’ll definitely protect the wiring and the trailer from the elements and it looks good.
Inside the trailer, we attached the LED strips to the crossbars in the ceiling. The strips include a tape backing. After attaching the strips with the tape included with the strips, I used a little clear duct tape to ensure that the strips remain in place.
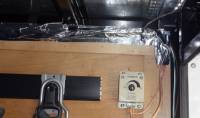
We ran the wires from the strips to a terminal block and hooked up the dimmer switch. We used aluminum tape to cover up and secure the wires.
Then I turned on the connection to the batteries. And Bracha turned the knob on the dimmer switch. And, we had light!
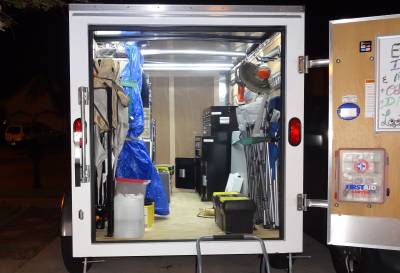
I used lag bolts to attach the tool boxes to the floor of the trailer. Then I added some anchors to the floor in front of each chest and above each chest. These will allow us to use bungee cords as a quick and easy way to keep the drawers and doors closed while travelling.
Finally, we replaced our remaining storage boxes with “underbed” storage boxes. These new boxes are not as tall as the ones we used before, bit are much longer. They are better suited for the kinds of things we need to carry such as motor casings.
Also, they fit pretty well between the tool boxes when we have the trailer loaded for travel. When the trailer is parked in our garage, the boxes will be stored under the trailer. This will allow us to be able to get into the trailer to use the stuff in the tool chests while the trailer is at home.
 |
 |