| Construction Rating: | starstarstarstar_borderstar_border |
| Flight Rating: | starstarstarstar_borderstar_border |
| Overall Rating: | starstarstarstar_borderstar_border |
| Manufacturer: | The Launch Pad  |
Brief:
Easy to build mid-power rocket kit, 18" mylar parachute
Construction:
Two body tubes of nice quality spiral cardboard tubing. 8 fins made of balsa must be marked and cut. 3 centering
rings (two for the engine mount and one for the parachute compartment) The forward centering ring provides a
compartment for parachute which keeps it up top for improved CG Plastic nose cone with paper tip. Cardboard fillet for
rear fins. Elastic shock cord (estes style) with swivel for an 18" mylar parachute.
I purchased my kit through Red Arrow Hobbies and it arrived quickly, nicely packaged, all there, and in good condition. The directions were pretty straight ahead and I found the kit easy to build. There were templates for the fin fillets and fins as well as the nose cone "attachment." The kit also has some neat little parts to build and add to the rocket body. This makes the rocket more interesting. I substituted the nose cone with a BT-80 size nose cone from Apogee. Instead of the Estes style shock cord attachment, I used Kevlar® cord around the motor mount. The large fins of balsa seem to be a little flimsy, so I strengthened them as per the kit instructions. I also left off the paper fillets and made epoxy fillets instead. This makes the kit a little less "authentic," but I thought it would make it stronger. I'm a little concerned with the depth of the motor mount. I used some heat resistant tape to prevent the tube from getting burned. As of this review I have not yet launched it, but look forward to doing so soon.
Finishing:
I sealed all the balsa and body tube grooves with Elmer's fill 'n finish prior to assembly, primed the entire rocket,
sanded, primed again, sanded again, then painted the body light gray instead of the suggested white. I've seen examples
of this rocket in gray and like it better. The nose cone was painted white. Since the kit comes without decals, I used
some adhesive lettering (the kit gives good directions) and vinyl tape for the stripes.
Construction Rating: 3 out of 5
Flight:
One flight D12-5. Chute was a little late, but the rocket flew well and was recovered without damage. I had no signs
of "burn" on the rocket, so I guess problem solved. Not sure the extra protection was needed.
Summary:
Pro: Easy to build, nice quality.
Con: Big balsa fins make break. Didn't like the kit nose cone with a paper wrap.
Other Reviews
- The Launch Pad Phoenix (2.6") By Ben Bentley
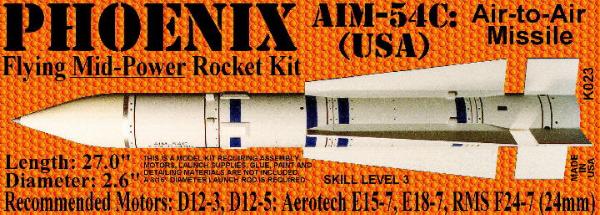
( Contributed - by Ben Bentley) Brief The Launch Pad Phoenix is a nice scale model of the AIM-54c long range Air-to-air missile. The model is meant for D and E engines, and it's claimed that it's ready for F's too. At 2.6 in around and 28 in tall, it's a nice size model. Construction I sent away the order and it came back in six days via Priority Mail! It was all in one bag ...
 |
 |
Flights
|
|
|
|
S.A.M. (February 1, 2000)