| Construction Rating: | starstarstarstarstar_border |
| Flight Rating: | starstarstarstarstar |
| Overall Rating: | starstarstarstarstar_border |
| Diameter: | 4.00 inches |
| Manufacturer: | LOC/Precision  |
| Style: | Sport |
 Brief:
This rocket is a high power flight capable, being large it is supposed to make
a low and slow flight. I am writing this review because John Cocker's review
does not seem detailed enough and his article is for Level 2 capable EZI-65 but
that would be overkill if one only wants to use this rocket for his Level 1.
Construction:
The kit came in a plastic bag, one long tube with slots for airframe, and one
shorter tube as a payload section. The nose cone is quite large. It came with
only 2 plywood centering rings, and I recommend getting an additional centering
ring of the same size. The motor mount tube is a little short, it is better to
get something a little longer, but the stock should be okay. The fins are
regular plywood. Unlike the LOC IV which has through-the-wall fins but not to
the motor mount, this kit's fins goes to the motor mount which is one of the
reasons why I chose it over the LOC IV. The shock cord is standard nylon
elastic which is the same kind as in your underpants, only that it should stay
where it belongs, in your underpants. Get at least 20 ft of tubular nylon or
Kevlar®, if you use nylon somehow protect the first 3 ft of the nylon from
ejection charge, or else after a few flights the nylon will burn and break. I
don't recommend using the LOC shock cord mount either, instead get an eye bolt
and some washers. Drill a hole in one of the centering rings and bolt the eye
bolt and put washer between the eye and the centering ring and another between
the centering ring and the nut. Make sure the eye is parallel to the airframe
as you will not have much space for the eyebolt. Attach a quick link to the
eyebolt, and ALWAYS put some epoxy on the thread of the eyebolt (but NOT the
quick link!) because you won't have access to the other side of the centering
ring in case the eyebolt/nuts loosens. One thing I like about quick links is
that it allows you to basically disassemble the rocket and remove all the
recovery harness to make it easier to paint.
If one has good experience with building LPR kits, one should not need the instructions. I never read the instructions while putting together the kit, so I can't comment on that, but I do know the instructions comes on the back of the card of the packaging. The rocket is very large when put together, if one has not built rockets weighting over a pound, this rocket will surprise you! I haven't built many rocket weighting over a pound except the NCR Lance Beta and this rocket makes the Lance Beta look like a dwarf!
One thing about the fin attachments, do use internal fillets after gluing the fins in place. I recommend 3 CR's because one centering ring would go on top of the MMT (that's the one with the eyebolt and quick links, make sure the eye faces up!) and a second CR goes on top of the fin tab. (Before doing any of this please try to peel off the glassine layer of the MMT, it allows the glue to soak in making a stronger bond.) After the glue cures glue the whole assembly (MMT) into the tube, making sure the second CR lines up with the top of the slots. Then glue each fin and fillet the inside. After all the joints inside has been filleted and the glue has cured, go ahead and glue in the last CR. I know it's a bit of an overkill to do internal fillets, but it's better safe than sorry (this rocket will be my L1 cert flight so I want to make sure nothing goes wrong...)
Finishing:
Always take the nose cone, wash it with soap and water to remove the release
agents. Even after doing this the paint still doesn't like to stick to the nose
cone... I used Polyfiber UV fill prime, at 38 dollars a quart it is a bit too
expensive but it sands like a dream and it might be a good idea to use anyway
since UV lights will damage epoxy and your rocket is held together with epoxy
so its better to keep them out. A few coats on the rocket and wait a few hours
making sure the primer dried, then sand, sand, sand! This stuff sands as good
 as Elmer's wood filler. I then took the rocket apart since this is such a large
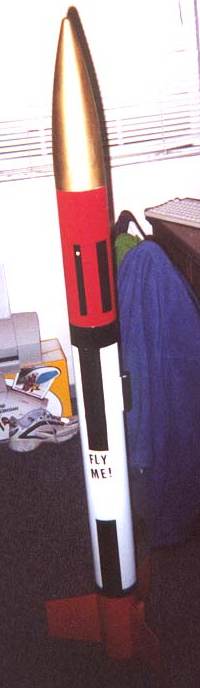
rocket, I painted the nose cone and the payload and the body section
separately. I painted the nose cone gold and the payload is painted red with
black roll patterns, and the body is white with a red fin can. I used krylon
and after everything dried I went over with clear coat then Lacquer and it
makes a very shiny and glossy finish.
as Elmer's wood filler. I then took the rocket apart since this is such a large
rocket, I painted the nose cone and the payload and the body section
separately. I painted the nose cone gold and the payload is painted red with
black roll patterns, and the body is white with a red fin can. I used krylon
and after everything dried I went over with clear coat then Lacquer and it
makes a very shiny and glossy finish.
Construction Rating: 4 out of 5
Flight:
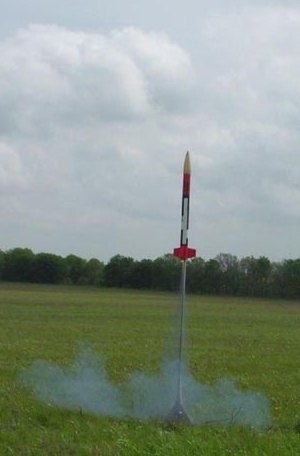
My first flight on a G80 is very good, perfect boost and recovery despite the
strong wind. I was going to certify on this rocket so I had to make sure
everything works the way it is supposed to work. The parachute came out at
apogee and it drifted quite a bit (because of the wind). I had to walk a bit to
get the rocket back, it landed without damage.
Flight Rating: 5 out of 5
Summary:
I feel this rocket is good and it is easy to put together. Anyone who puts
together a LPR should be able to put this kit together, however the shock cord
isn't that good, and they could use a longer motor mount.
Overall Rating: 4 out of 5
Other Reviews
- LOC/Precision EZI-65 By John Coker
( Contributed - by John Coker) Note: For more EZI pictures, visit John's site. The Loc/Precision EZI-65 kit is the rocket which is supposed to get me my Tripoli level 2 certification. This is a high-performance rocket which is reasonably stable and should give outstanding flights on I and J motors. (Of course, as is typical for me, I've done things backwards and have already ...
 |
 |
Flights
|
|
JT (May 13, 2002)
|
|
Y.L. (December 24, 2001)