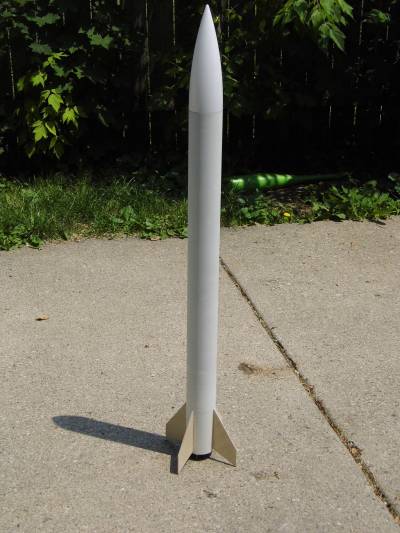
3D Mega Daddy
By Steve Lindeman
2012-02-28

The truth is I started this project over a year ago and I haven't gone any futher than to make the motor mounts, centering rings and coupler so the main purpose here is to give myself the motivation to finish it. This will not be a conventional build as the name implies. In place of the stock centering rings for the single MM I'm using 3/16" plywood drilled for 3, 24mm mounts, hence part of name of rocket as the maiden flight is planed for 3 D12-3's. Future flights will include 3 E9-4's. The mega part comes from the fact that I will be adding a 25 1/4" x 3" body tube that my Aerotech Initiator came packed in. This will make the finished rocket approx. 45" in length. At this point I'm still debating weather or not this is the direction I want to go or if I want to drop the original Big Daddy body tube and just use the long 3" tube and slot it for 3 fins instead of 4. Three fins would simplify things with 3 engines as far as TTW construction goes but I like the extra length so have to decide which way I'm going. Most likely will go with the extra length and 4 fins. Just have to modify fin tabs for the triple MM.
Choices Made
2012-05-19
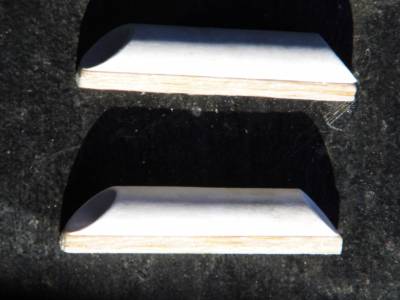
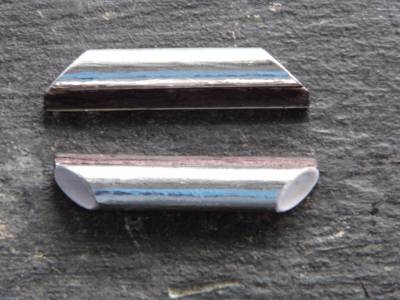
I think I have it all laid out now in my mind how this build is going to go and I believe I now have all the parts. I will be going with the extra length and I will still be using four fins. On a note here, I've bought a sheet of 1/8" plywood and have cut new fins to replace the balsa ones for this build and I also cut four 3" diameter discs. Two for a baffle system and two for MM centering rings. I also re-did the MM tubes and made them 6" instead of 4". My reasoning for that being that I wanted to reduce the chance of hot gases lighting the 3rd motor in the event one does not light at initial launch.
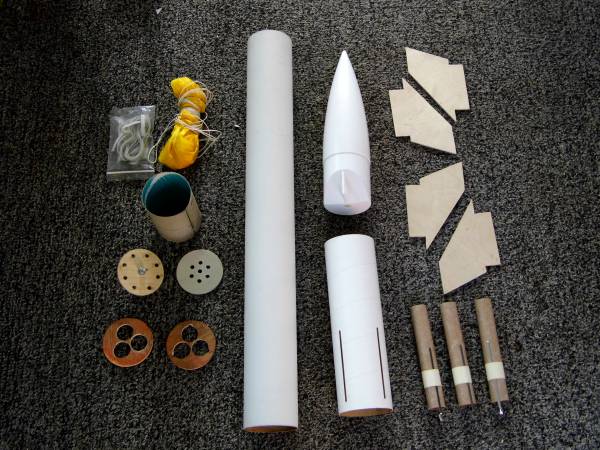
All components for the build
Motor Mount & Baffle Assembly
2012-05-21
Started assembly of motor mount by gluing in engine stop rings into each of the three 6" long BT-50 tubes and then adding the three retention clips. These were then glue into the bottom centering ring first and gauged for fit and set aside to dry. While that sets, I started assembly of baffle/jointer. I guess at this point I'm a little behind in my documentation. That's because two days ago I cut the plywood for the fins and for the baffle. After cutting the two discs for the baffle they were sanded for correct fit in connector ring and then marked for holes. Next I used a 3/16" drill bit and drilled out all holes in baffle plates, 7 in a close cluster for the bottom plate and 8 in a circle near the edge for the top plate. I then switched to a 1/8" bit and drilled one hole in the middle of the top plate for the screw-eye assembly to attach the shock cord to. I then installed the screw-eye and nut with a drop of super glue to lock the nut in place. I also cut and glued together the connector ring for the baffle (this was made from the bottom cardboard of a shoe box). While it dried I took the bottom disc and covered one side with aluminum duct tape (see 4th photo down). This is part of an experiment on my part. In theory, the metal tape should help protect the wood surface of the baffle from the hot gases. Anyway, I then glued this plate into bottom of connector ring and set it up to dry. Break time!!
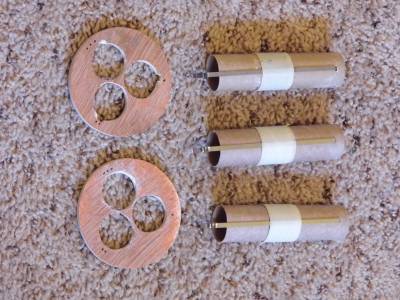
Components for triple engine mount all custom made by me
(Note: MT were extended 2" for build)
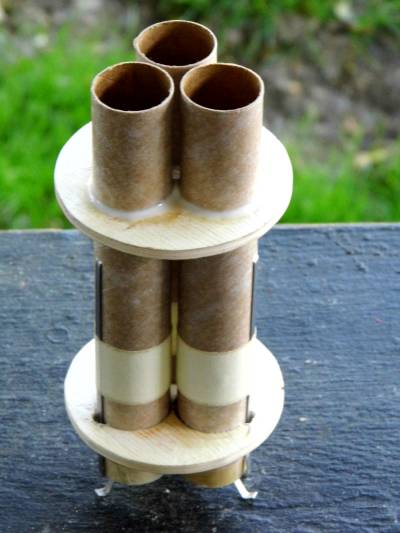
Top centering ring glued on
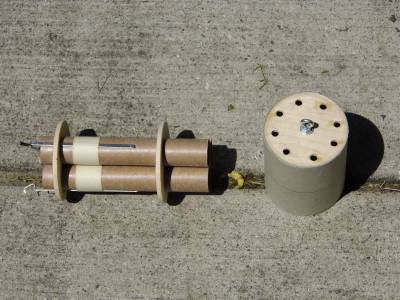
Completed MM & Baffle showing top with recovery anchor

Completed MM & bottom of baffle with aluminum duct tape covering
Final MM assembly, BT and fin prep.
2012-05-24
I finished gluing the top centering ring onto the MM today and set it aside to dry. In the mean time I cut 10' of 1/8" Kevlar and tied it to the screw-eye on the baffle and added a drop of super glue to the knot to secure it. I next started work on the upper BT. First I went over all the spirals and filled them with HobbieLite. After allowing HobbieLite to dry for a couple of hours I did a quick sanding of the spirals and then applied the first coat of Rust-Oleum Ultra Cover 2X White Primer to it. After allowing about an hour to dry, sanded down tube and shot it with another coat of primer which was followed by more drying time and more sanding. Once satisfied with finish I then glued the baffle into the BT. OK, so now its back to the MM and fins. These will be glued in once I finish trimming all the fins so that they fit properly. Time to grab a saw and file. Two of the fins will require at least half of the TTW tab to be cut off. The other two need about 1/4" or so trimmed off so that all will seat against the tubes in the MM. Also need to bevel the root edges of the fins to aline with the MM tubes. With the MM now dry I glued it into the BT with white glue. After allowing to set for about two hours I went about fitting each of the fins in place (sure glad I had the foresight to number them along with the BT). Each fin is attached with a heavy bead of white glue on the tab root edge and super glue on smaller root edges to tack fins in place against the BT. Once satisfied with alinement of fins I ran another bead of super glue around them to lock them in place. After that went back and used white glue to lay fillets on all fins. Time to let everything dry overnight.

Upper BT with Baffle glued in
Final Assembly & Recovery System
2012-05-25
Today I glued the top and bottom sections of the BT together. I also installed the parachute. I swapped out the yellow one that was in the first pic for a round 12 shroud 36" pink nylon one that was originally in one of my other rockets (Ram Jam). I set it on my diet scale today and the current weight is 1lb.-7.3oz. with 3 E9-4's loaded in. My original goal was to keep it under 1lb. but as long as I can keep it under 1 1/2 pounds I'm good. The descent rate calculator on this site says that I need a 33" one so should be OK. One thing I discovered today was that I didn't have all the parts for assembly. I forgot one very important piece, the launch lugs. Not the first time I've done this. I've painted a few rockets in the past only to discover that I forgot to glue on the launch lug. This usually happens on my scratch build projects. Anyway, will have to make a 45 minute trip to Flint next week down to Riders Hobby Shop and buy some, that or order them on-line. Sure wish they hadn't closed the two stores here in Lansing. The only other thing left to do is to finish filling the seam between the upper and lower BT sections and giving the whole rocket a final coat of primer.
Last Minute Details
2012-05-25
After filling in the seam between the two BT sections I went back over all fins with one final glue fillet to make sure all is secure. After some more drying time, more sanding and primeing was in order. I still need to glue on a couple of launch lugs but otherwise the rocket is ready for the main paint job. I'm still toying with a couple of ideas on how I want to paint it as I may have a secondary use for this rocket, but more on that thought later. For now I'm finished with this build.
Ready for primmer
Launch Lugs
2012-05-27
Oops...Ok, so I wasn't quite finished with this build. I decided to make my own launch lugs rather than wait and buy some. This was a slow tedious process but worth it in the end. I started with a 1/4" dia. plastic straw and split it down one side and cut it to 6" in length. I then grabbed my 1/4" launch rod and slipped the plastic straw over it. Next I cut two strips of white printer paper 2" x 8" and coated them on one side with white glue. I then rolled them onto the plactic wrap while applying pressure to the roll and rolling it on a flat metal surface. I then set them aside to dry over night. The next day I pulled the plastic off the launch rod and then pulled the launch lugs free of the plastic straw. The next step was to soak the lugs in super glue. After allowing them to dry I super glued an 1/8" x 2" balsa strip to each one to serve as the anchor point for the lugs then sanded both ends of the lugs to a 45 degree angle. After trimming up the ends I re-coated them in super glue. Man are these babies rock hard. After a final sanding to insure smoothness and checking that they slid freely up and down the launch rod I grabbed the roll of 2" aluminum duct tape and cut two strips and covered the launch lugs with them (see photos). I then glued them onto the rocket, again using super glue. After that I ran a final bead of white glue around the lugs and that finishes the main build. Now its just down to painting. Still undecided about that though...
Before and after photos of launch lugs with aluminum duct tape
Painting
2012-06-29
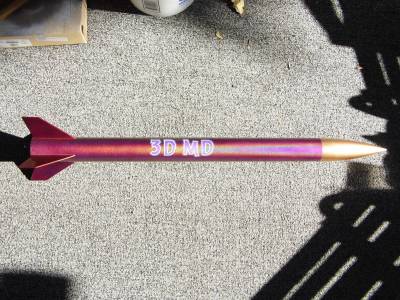
Yesterday I finally got around to starting the painting of this rocket. I started by painting the entire rocket with a base coat of Krylon Metallic Brilliant Silver. After allowing an hour of drying time I sprayed the fins with Krylon Red Xmetals paint and set it aside to dry. While that was drying I took the NC and treated it to a coat of Krylon Metallic Brilliant Gold paint (this was done because I changed my mind as to the color I wanted the NC to be). I followed that after some drying time by a coat of Dupli-Color Clear Effex paint. The NC was then set aside to dry for the night along with the main body. Today I masked off the fins and sprayed the BT with Krylon Metallic Brilliant Gold paint (again because I changed my mind on final body color). After allowing rocket to set in the sun for a while I started the first of three coats of Krylon Purple Xmetals paint. After applying the third coat of paint I set the rocket up to dry for an hour and then removed all masking tape and put rocket up to dry overnight. Tomarrow will apply final coat of Dupli-Color Clear Effex paint to main body assembly, finish attaching NC and parachute and hopefully do a photo shoot.
Final Work
2012-07-01
Yesterday I applied two coats of Dupli-Color Clear Effex paint to the rocket and then set it up to dry over night. Today I finished up this build by attaching the NC and parachute to shock cord and shooting a couple of pictures. Final weight without motors: 1lb. 3.5oz - 553 grams. 692 grams with 3 D's loaded. 741 with 3 E's loaded which is just over the maximum pound and a half that I wanted the finished rocket to weigh.
On a side note: I am hoping to launch this rocket on its maiden flight on July 28 at NARAM-54 in Muskegon. Will post pics if we make it to the Nats.
Well didn't make Nats. as something came up. If we make it past Dec. 22, 2012 (the day the world is supposed to end), will try to launch next year.
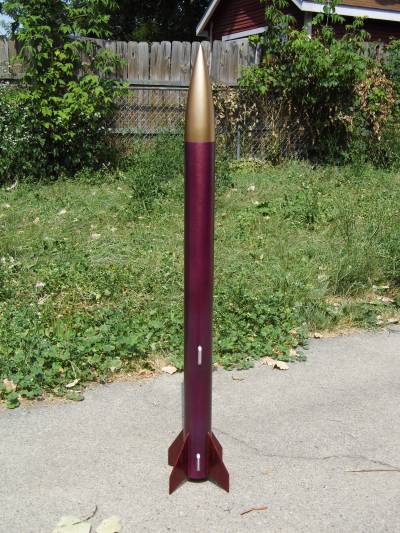
Red fins, Purple body, & Gold NC
Additional Painting
2013-04-19
Well, here I am nine months later and the world is still here. I still haven't flown this rocket yet but I finally got around to finishing the paint job that I wanted to do last winter. Took a run to Hobby Lobby and bought a pack of six sheets of Grafix Prepared Frisket Film for $10.99 plus tax and used only one sheet for the stencil pattern. I first took a standard size sheet of white paper and wraped it around the rocket to get the correct size for the design. I then drew up the flame pattern the way I wanted and then copied it to the Frisket Film with my scanner. I then wrapped the film around the rocket and using an Exacto knife I cut out the pattern. After that I masked off the bottom section of the rocket and then applied two light coats of the same gold paint that I used on the nose cone. All that's left now is to go over new paint with the Clear Effex paint and take a couple new photos.
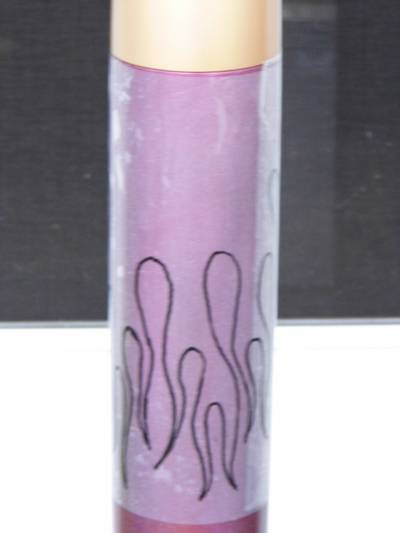
Friskit Film Applied
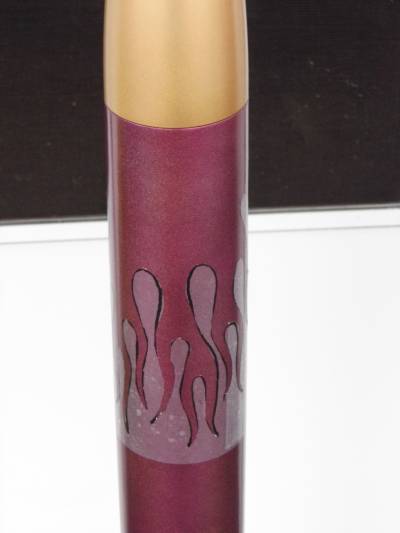
Film cut & ready for masking & Gold paint
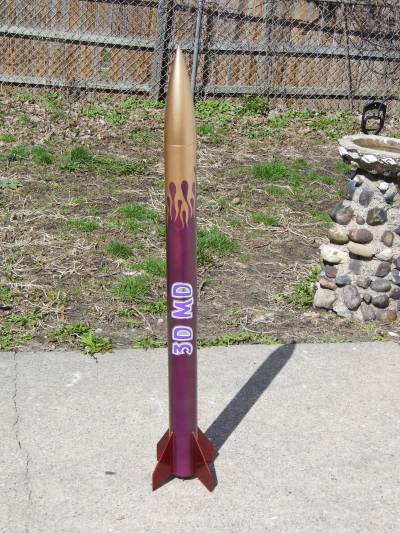
Glamour Shots

Should put some flames on fins as well
Maiden Flights
2014-07-09
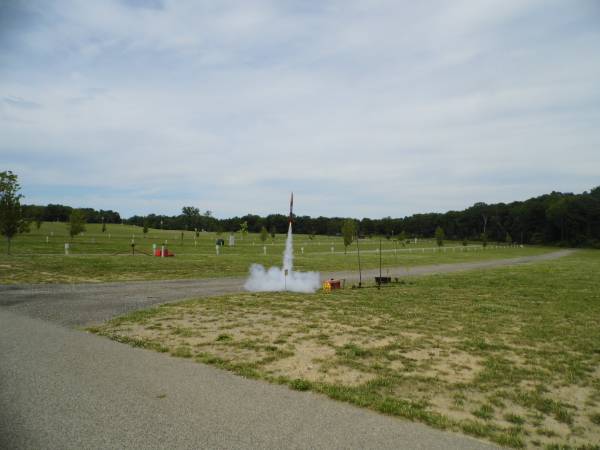
After almost 3 years I finally got this project off the ground. I ran the design through OpenRocket 14.06 and it simmed out at 564' on 3 D12-3's, 610' on 3 D12-5's, 1036' on 3E-4's, and 1079' on 3 E9-6's. On July 5, 2014 I was able to make it to Michigan International Speedway in Brooklyn, MI for a launch with the J.M.R.C. club. Maiden flight was on 3 D12-5's, hence its name sake. Rocket roared off the pad on a column of smoke and climbed straight up into the air to about 550' or so by everyone's guess. Parachute was deployed at apogee and rocket started a nice slow descent with the wind pushing it down range for a nice long walk for recovery. When the range opened I went out to retrieve the rocket to find that the wind had dragged the parachute and nose cone onto one of the service roads. The only damage I noticed right away was a small nick on one of the fin tips. Decent rate calculator says I need a 30" chute slo I'm going to have to buy one or only fly on really calm days as this rocket drifts to much under the 36" round chute.
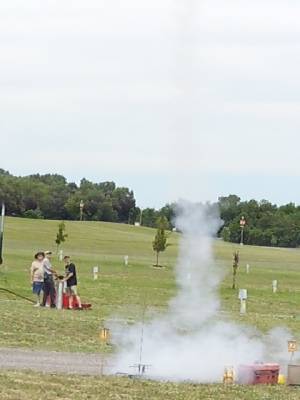
Damn, I missed the shot but good smoke trail
3D MD is the one on the right in the grass
I took the rocket back to my table and prepped her for her second flight. This time I loaded her up with 3 E9-4's. Again when the range opened I took her out to my assigned pad and hooked up my newly made whip clip to all three motors and went back behind the lines and awaited for my flight to come up. When the flight was announced and the countdown given, the LCO hit the fire button and again all three motors lit and she soared off the pad much faster and a whole lot higher. Altitude looked to be at least 1000' or so with parachute again at apogee. Recovery walk was twice as far as first flight and a good 1/2 - 3/4 mile down range (had to jump a fence as well which wife found amusing as I'm now 66). Once again after range opened I went out and recovered my rocket the only damage was some smoke discoloration near the bottom end and some blistering of the paint inside the end around the motor mount.
3D MD on 3 E9-4's
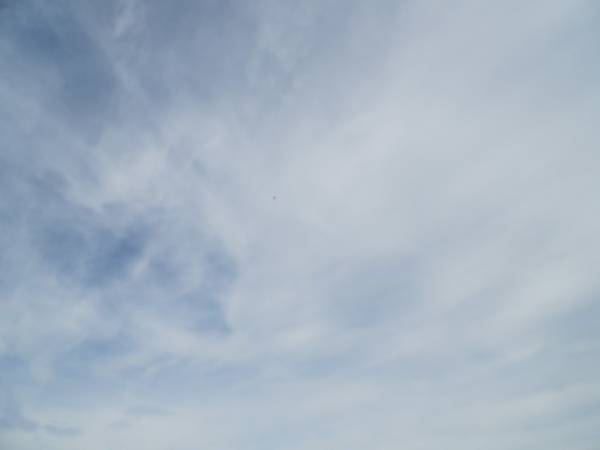
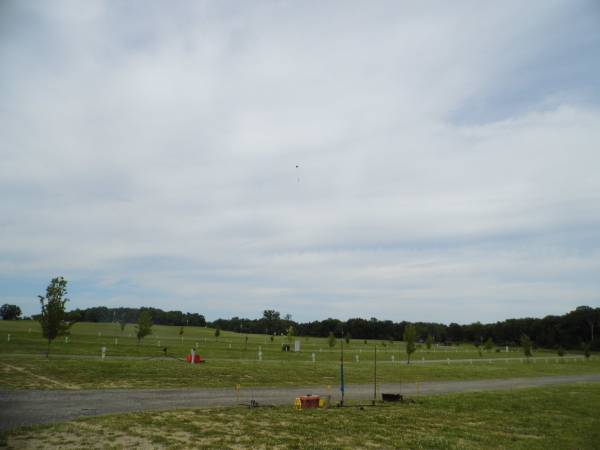
Parachute at apogee. Just a dot in the middle of the picture
3D MD still coming down. Recovered around 1/2 - 3/4 mile down range

 |
 |