Public Missiles Mini Black Brant X (BBX)
Public Missiles - Mini Black Brant X (BBX) {Kit}
Contributed by Brian Sutton courtesy of WildRocketry.Com
| Diameter: | 2.10 inches |
| Manufacturer: | Public Missiles  |
| Style: | Scale |
I must admit, I am becoming a real fan of PML kits. Normally I like to scratch build, but when I feel the need to put something together in a hurry, PML is definitely the way to go for high quality, durable kits.
The Mini BBX is a new released by PML. What caught my attention was the news that the Mini BBX is going to have a Terrier Booster to be released in the Fall. The combination of a good looking scale kit combined the challenge of two stages was irresistible to me. What a great way to get started in High power staging!
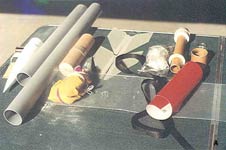 |
Construction of the Mini BBX is a straight forward PML kit. No
surprises! I opened the bag as soon as I got home from Hobbytown USA and inventoried the parts as usual, they were all there and in good shape. |
| I assembled the parts dry to make sure all would fit, and of
course, they did. I decided to prepare all plastic and fiberglass surfaces before starting to epoxy any parts. I started by sanding all the G10 fins, rounding the edges and roughing up the areas to be glued. I gave the Quantum Tubes and nose cone a bath in soapy water to remove any oily residue (Make sure you rinse well too!). |

|
Then I used 400 grit wet/dry to sand the entire Quantum Tube then 100 grit
to prepare then fin and fillet areas. I taped a piece of 100 grit to a dowel to
rough up the fin slot areas and where the centering rings would be epoxied.
Finally, I lightly sanded the nose cone so it would hold the paint too.
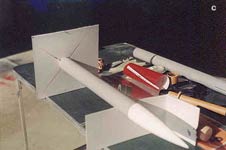 |
I used a piece of card board to make a fin jig. On the Mini BBX, this is a very important step because the "Canard" fins up front must be aligned perfectly and they are not "though the wall" mounted. They just fit into fit into shallow grooves in the tube. Without the fin jig, they could very easily lay over when the epoxy is setting up. |
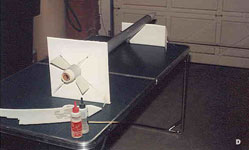 |
Of course I also used it to hold the main fins in place while
they set up too! I built the motor mount/ shock cord assembly according to the directions, this is the standard PML mount. The only change is I added a Rocket Rage "Snake Skin" shock cord protector to protect the Nylon web used. |
I epoxied. the motor mount in place making sure to only epoxy the forward
ring. Be careful to avoid getting any epoxy on the rear mount area because you
will need to remove the tail cone for a later step.
| I then used the jig to hold the fins in place while I epoxied. them. After the epoxy set up on the Main fins, I removed the tail cone and applied generous filets on the motor tube joint and the inside airframe joint. I then added filets to the exterior of the fin/airframe joint but that is mostly cosmetic as most of the strength of the joint is on the inside. | 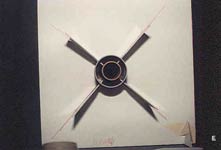 |
One problem I had was when I was adding the filets to the inside of the tube I got some epoxy on the area the tail cone fit into, I had to carefully chip, scrape and sand it off before the tail cone would fit properly. By the way, take good care of the tail cone because it will be the stage coupler when the Terrier booster becomes available. Which brings up one of the down sides of this kit. I am a big proponent of POSITIVE MOTOR RETENTION and due to the design on the tail cone/coupler it will be difficult to use any form of retention that is attractive or usable in the two stage configuration. Well, I started out using friction fit. I suppose I can remember how to do it.
Since I plan to fly my Mini BBX on I200's and in the two stage
configuration, I will probably be getting some very high altitude flights. So I
decided to build the BBX for Dual stage recovery. I already had an Olsen FCP-M1
and I didn't want to spend the money on the CPR3000 and another altimeter, so I
made an electronics bay with two sleeves and 1/8" bulkheads.
 |
 |
I used the PML plastic rivets to hold the electronics by in place in base of the payload bay. To protect the chutes and nylon shock cords from the deployment charges, I used parachute protectors from Rocket Rage.
I prefer to fly off of Rails so I added a couple of Blacksky rail guides. Be aware though, the screw passes through the Quantum tube and will block the piston for the motor ejection so make sure if you use them to place the forward guide low enough to leave room for the piston and chute. This will be lower than what is recommended by Blacksky, but it still works OK.
To finish the job, I painted the entire model with Krylon gray sandable
primer, I love the stuff! Painted the tail cone white, masked the cone area
then sprayed the silver, masked that area and then hit the whole thing in gloss
black. The red areas are a stick on vinyl that came with the kit. It is a lot
like "Trim Monocote" you can get at any hobby shop that deal in R/C
airplanes. The guidance section got a coat of brown per Peter Alway's data in
"Rockets of the World". Finally, I masked the areas that stay black
on the payload section and painted the rest silver. Note, in the PML
instructions, the payload bay gets silver first then mask off the silver areas
and paint black, but I have found that masking tape will sometimes effect the
silver paint. So I went with the black first.
 Brian's Mini-BBX on left Kerry's BBX on the right |
With the model finished and ready to go I went over to my friend, Kerry's place to take and couple of photos with his 4" BBX. The next day, I was off to the range at Hemet Valley Rocket Club (HVRC). The BBX's test flight was on a whimpy little G64 and the main chute to deploy out of the main airframe so that if the electronics had a problem, I would still get the main chute out on the motor's ejection. |
The boost was straight and true up to 664 ft. per the Olsen FCP-M1. The apogee charge went off as scheduled and the main chuted opened. At 400 ft. the nose cone popped as scheduled.
The evil "W" was starting to come up a little and the field at
HVRC is not a place I like to go on long walks, lots of soft sand and brush.
(Great for those hard landings though!)
| So I decided to load up an H instead of the I200. I moved the
main chute to the forward compartment to it would deploy at 400 ft. and put a
12" drogue into the main airframe to deploy at apogee. I used the motor
ejection as a backup. The BBX ripped off the rail and climbed on a pillar of smoke and fire absolutely straight up. Arced over at the top and the FCP-M1 did its job at apogee. The drogue came out and she started down. At 400 ft. the FCP-M1 did its job again and the nose popped off. Unfortunately, I hadn't used enough BP! The main stayed in the tube. |
 |
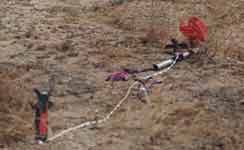 |
Well, remember what I said about the soft sand? Well, even without the main chute the soft sand and tough Quantum Tube saved the day. She landed with no damage to airframe or fins and only some scratches to the paint. Overall, the PML Mini BBX is a kit I enjoyed building and flying. I would recommend it to any Level 1 rocket jock. |
Positives:
High quality kit.
Very tough
Easy to follow directions
Tough Quantum Tube
No Spiral grooves
Optional Dual Recovery
Did I mention it's really tough?
Two stage option (I really hope!)
Negatives:
No way to do Positive Motor retention without ruining two stage option.
Terrier booster is not ready yet. (sigh....)
 |
 |
Flights
|
|
C.S. (October 26, 2001)
|
|
B.O. (August 1, 2001)