| Construction Rating: | starstarstar_borderstar_borderstar_border |
| Flight Rating: | starstarstarstarstar |
| Overall Rating: | starstarstarstarstar_border |
| Diameter: | 2.60 inches |
| Manufacturer: | Qmodeling  |
| Style: | Futuristic/Exotic |
Brief:
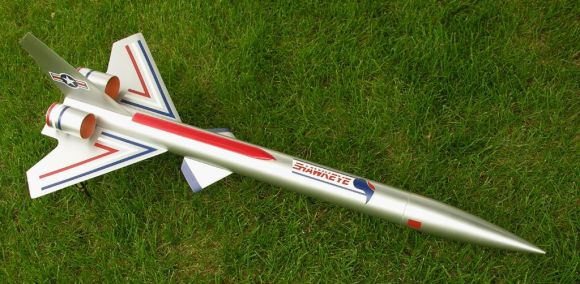
QModeling's Mega-Retro Series (MRS) Hawkeye is a kit for building a 4.78x
upscale of the classic Estes Hawkeye. Standing over 43in tall, this BT-80
monster is huge compared to the 1/2A original. Our finished kit weighed 16
ounces. Many of QModeling's MRS kits would probably appeal to 24mm enthusiasts
who want to fly big, lightweight rockets low and slow. This kit is also special
because apparently only 75 kits (in the BT-80 size) were planned for
production.
My kids and I won the Hawkeye in a EMRR contest. Especially for a small company like QModeling, their prize donation is a significant outreach which I think reflects very highly on them, and I hope it attracts lots of new customers. They deserve a lot of credit for supporting EMRR and the rocketry community in general.
Construction:
The kit was well packaged, and no parts were missing. There are 25 pages of
instructions, including several color diagrams to guide finishing and decal
placement, and dozens of assembly diagrams. The manual is organized by
subassembly (motor assembly, body and fins, finishing, and recovery system)
with estimated times for each. The instructions particularly emphasize
lightweight building techniques, perhaps not only to promote craftsmanship but
also because a 24mm motor in this bird doesn't have much power to spare. As a
skill level 4 rocket, it took us some time to finish assembly but nothing was
difficult. I appreciated the level of detail in the instructions and their
positive tone which included encouragements, ideas for enhancements, and praise
for steps completed.
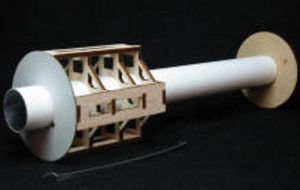 The first
subassembly is the motor mount and aft body tube. Here you assemble an unusual
balsa frame around the motor tube like a 3-dimensional jigsaw puzzle. Then this
assembly is glued inside the slotted aft body tube. Each balsa piece is flimsy
but there are so many interlocking joints, I suspect the final result will be
adequately strong.
The first
subassembly is the motor mount and aft body tube. Here you assemble an unusual
balsa frame around the motor tube like a 3-dimensional jigsaw puzzle. Then this
assembly is glued inside the slotted aft body tube. Each balsa piece is flimsy
but there are so many interlocking joints, I suspect the final result will be
adequately strong.
Next we assembled the fins then beveled and sealed them. For simplicity, we beveled only the leading edges, leaving outside and trailing edges flat. We also did not taper the thickness as suggested in an optional step in the guide.
The third portion of the instructions addresses attaching the fins to the body. After gluing the aft and central body tubes together, the fins get glued on. The four main fins fit nicely into the slotted body tube with interlocking notches from the motor mount balsa frame providing additional contact points. The root tabs on the fins pass through the tube slots and notch into the frame, but they do not make contact with the motor mount tube. For the "raceway", I reshaped the end to a parabolic point to get a form more pleasing to my eye.
Positioning the fins revealed a glitch in the instruction manual. The last page of instructions includes a cutout wraparound fin guide to mark alignment lines on the tube, along with instructions for its use. I dutifully cut out this template but found it to be way too small. I enlarged it to 149% on my copier in order to get a perfect fit. Later, I found that the QModeling website has a downloadable manual with the correct sized template on the back of the page I cut. The manual in my kit did not include this.
The engine pod tubes are easy to attach next. One of my pod tubes was 3/32" longer than the other. It also had sharp grooves cut in the tube surface near one end, spiraling about 8-10 times around the tube as if a tube cutting device had malfunctioned. I trimmed this tube to the correct length and filled in all the surface damage.
The remaining assembly steps are pretty familiar: nose cone, launch lugs, etc. A spare centering ring is inserted partway down the body tube to form a "parachute compartment". There is a washer for nose weight and the usual recovery systems (30" nylon parachute) to assemble.
Regarding nose weight, I found a serious problem. The instructions stated that I should add clay to the nosecone to ensure that the center of gravity (apparently with no motor) is 6-9 inches "from the Primary Fins". There is a figure to illustrate the 6-9in range. The problem is that the figure and instructions are unclear and not consistent. The two sets of primary fins ("stabs" and "wings" in their terminology) extend different distances up the body. Does the 6-9in measurement begin from the top, center, or bottom of the fins, and from which fins? From the figure, one can infer that measurement must be relative to a "stab" fin, and my reading of their language would be that "from" means "from the forward edge". However, the figure shows the measurement beginning at some vague point about 20% down the root length of the fin. The figure also shows the intended CG about 0.75in above a body tube seam. (This distance is inferred because the 0.75in measurement is given in an earlier step for placement of the small fins). However, this CG location is not nearly 6-9in from the front (or 20% down) of a stab fin. It is perhaps 9in from the center of the primary stab fin root. Thus, measuring 6-9in up in any attempt to mimic the figure would yield a CG point much further forward than suggested by the figure. I decided to ignore the "6-9in" number altogether and simply ensure that the CG fell about where shown in the figure.
Finishing:
Finding the gray/white stock paint scheme a little dull, the kids opted for all
silver. The decals are large, sturdy, and highly adhesive. Unfortunately, one
of the main wing decals is printed backwards. In a thread on The Rocketry
Forum, QModeling suggests a way to apply it upside down with white glue.
Instead, I cut the offending sticker in such a way that it could be reassembled
in the correct orientation, in two parts.
Pros: lightweight parts, some unusual design elements, thorough instructions, and opportunity for careful craftsmanship
Cons: one serious error in instructions, one missing/wrong-sized template, one decal misprint, one part needed minor repairs.
Construction Rating: 2 out of 5
Flight:
Only one engine is unconditionally recommended for the MRS Hawkeye: the F21-6W.
I think F21 motors are OOP and I had great difficulty finding a couple of
F21-4W to buy. Qmodeling also writes that one could use a E9-4 but only if the
launch conditions are dead calm, the rocket is very lightly built, and a 6-foot
launch rod is used. Thus, it is a real problem finding a suitable 24mm motor to
fly this rocket.
With our first F21-4W ignited, Hawkeye rose up into the sky amid a torrent of smoke and flame. Expecting very low and slow, I was surprised as Hawkeye jumped off the pad and accelerated into the sky with a loud, straight boost to perhaps 800 feet. The delay was a tad short with ejection just before apogee. The chute filled nicely and set the rocket down gently and undamaged. I like slow descents, and the chute seems to be one of the very best aspects of this kit.
The second flight on F21-4W was just like the first: a thrilling fiery shot up to perfect deployment and gentle landing. These flights were the highlights of a long day of launching...this bird is meant to fly! I'm going to try to gobble up some more high-thrust mid-power motors and take Hawkeye out again soon.
PROs: fantastic flights on F motors
CONs: currently difficult to find any suitable motor to fly
Flight Rating: 5 out of 5
Summary:
This is a tricky rocket to rate. Construction glitches and a scarcity of usable
motors are clearly drawbacks, but these were all easily overcome in my
experience and could not detract from an absolutely fabulous flight experience.
Overall Rating: 4 out of 5
 |
 |
Flights
|
|
|
|
Gregory A Henderson (December 3, 2022)
I was looking at rocket kit reviews and saw that you had a QMODELING HAWKEYE in 2008. Sadly, i didn't get that kit before the company got flooded and they never made it back.
Do you still have that built rocket? I would pay a good price for it, even if it needs rehab.
Gregory Henderson
NAR58651
TRA 3370