| Manufacturer: | Qmodeling  |
 Brief:
Mid power scale model upscaled from the Estes WAC Corporal.
Construction:
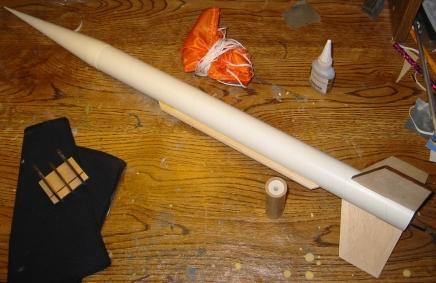
The model is based on the BT-60 and has a 24mm 'E' length engine mount which
makes the kit over 28 inches tall. The nose cone is injection molded of a soft
plastic with a laser cut wooden plug that also serves as a screw eye mount. The
fins, TTW fin mount braces, and fuel transfer conduit/tunnel are all laser cut
balsa. The top centering ring is laser cut wood, and the bottom ring is heavy
laser cut cardstock. Included is a 5 piece laser cut jig that combines fin
sanding unit, and a fuel transfer conduit shape pattern.
First off, I was pleased with the quality of the parts, many of which are produced 'in house' at Q Modeling. The nose cone is crisply molded, requiring only minor finish sanding, and the 3 light balsa fins and other laser cut parts fit perfectly. The engine hook is a hefty 1/8" wide and is of heavier gauge than those in most kits. It is also long enough to hold not only the motor, but also the engine block. (I make them this way when I bend my own hooks, so I am very impressed.) The shock chord is a 9' piece of heavy duty Kevlar®, and is securely mounted to the top of the engine tube coming through the top centering ring.
Despite the beveled fins and conduit, the kit is a solid skill level two in regards to assembly. I am impressed by the 18(!) pages of historical info, general rocketry modeling tips, great illustrations, painting instructions (three pages alone), launch tips, NAR safety code, and even instructions to build a 24mm spacer to fly the rocket on a D engine. Oh yeah, they also tell you, in very detailed and descriptive terms, how to build the kit. The instructions are clear and often point out common mistakes so that you can avoid them. It is obvious that the gang at Q Modeling know their rockets. One thing I really like is that each assembly section has a estimated time so that you can decide when to stop for the night.
The parts all go together smoothly, thanks to precise laser cutting, and clear instructions. On the first night, I assembled and installed the motor mount with integral TTW fin mounts. The structure is strong and surprisingly light. I was pleased to see the foil lined engine mount tube as this kit is begging for AT power!! (F21?) The next night I assembled, installed, and sanded the fuel conduit and assembled the nose cone. I am now in the process of fin sanding and the included fin sanding jig prevents this from being a nightmare although it does take some time.
As an aside, I am someone who finds it almost impossible to leave a design alone. I change engine mounts, recovery mounts, etc. on almost every kit I build, however, I am pleased to say that the only change I will be making to this kit is to add 1/4" elastic to the stock Kevlar®-shock chord. The kit contains 9' of heavy duty Kevlar®, but I just like having the extra spring of some elastic.
I only needed standard model rocket tools and supplies to assemble this kit: X-acto knife, sandpaper, Aliphatic Resin glue (yellow glue), medium CA, a pencil and a ruler.
Finishing:
The rocket is not yet finished. However, the straightforward 3FNC design,
plastic nose cone and three pages of finishing instructions should make
finishing a breeze.
Construction Rating: 5 out of 5
Flight:
The model has not yet flown. The manufacturer advises the following approximate
flight altitudes: 500’ D12-3, 850’ E9-4. Motor retention is via a
heavy duty motor hook. After flying with the E9. I plan on trying some AT E and
F motors.
With the TTW design, I expect a straight flight.
Recovery:
The model has not yet flown. The recovery system is every bit as you expect
from Top Flight Recovery: very light and strong. It includes a Top Flight
Recovery 30" Octagon, Thin Mil, Ripstop Nylon Parachute with sewn in
24" Nylon shroud lines, and a Nomex®
Heat Shield.
Summary:
I was pleased with this kit in just about every way. The directions were clear
and the laser cut parts made assembly enjoyable. The sanding jig is a great
idea, making sanding actually palatable. Due to it's good looks and simple, low
power style construction, I would recommend this kit for anyone who would like
to try mid power.
Other Reviews
- Qmodeling WACC By Bob Cox
( Contributed - by Bob Cox - 07/25/04) Overview The MRS-WAC Corporal is part of QModeling’s Mega-Retro Series, up-scaled versions of Estes classics built with very high quality components. Kit Specifications (from the QModeling web site) Height: 28.0" Weight: 5.8 oz (with recovery system) Fin Span Diameter: 6.88" Main ...
- Qmodeling WACC By Chan Stevens
Brief: Relatively tiny for the "Mega" line of Estes upscales, this WAC is a fine looking scale kit and great flyer. An excellent kit in every way even though at $50 list, scale builders on a budget might consider the ASP 24mm version (listing for $20). Construction: I ordered this kit online (actually won it on eBay) and the kit arrived Priority Mail 3 days later. ...
 |
 |
Flights
|
|
B.C. (February 2, 2005)
B.C. (August 3, 2005)
J.H. (June 13, 2006)
|
|
A.H. (January 30, 2005)