| Construction Rating: | starstarstarstarstar |
| Flight Rating: | starstarstarstarstar |
| Overall Rating: | starstarstarstarstar_border |
| Manufacturer: | LOC/Precision  |
Brief:
The LOC/Precision Syonic is a great looking rocket with a unique tail cone
assembly. The rocket is built around a single 54mm motor tube.
Construction:
Once I got home, I immediately opened the box to find it contained some very
high quality parts. There were 2 sections of LOC 5.38 paper airframe, four
flawless 1/4 inch plywood fins, a LOC 5.38 "long" nose cone, a
pre-slotted tail cone, paper coupler section with bulkplate, 2 54mm motor tubes
with coupler, a 1/2 inch paper launch lug, a section of 2 inch nylon elastic
recovery harness, various pieces of hardware,
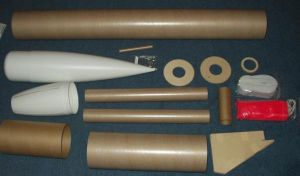 and 3
centering rings. I was especially impressed with the fit of the 3 centering
rings. Their fit was snug but not too tight. The centering ring that sits at
the top of the tail cone assembly was very unique. The edge of this ring is
notched so that it not only fits the inside of the tail cone assembly, the
forward edge of the ring will sit flush against the airframe tubing. The last
thing included with the kit was the standard set of LOC/Precision style
instructions for building the kit.
and 3
centering rings. I was especially impressed with the fit of the 3 centering
rings. Their fit was snug but not too tight. The centering ring that sits at
the top of the tail cone assembly was very unique. The edge of this ring is
notched so that it not only fits the inside of the tail cone assembly, the
forward edge of the ring will sit flush against the airframe tubing. The last
thing included with the kit was the standard set of LOC/Precision style
instructions for building the kit.
The last thing included with the kit was the standard set of LOC/Precision style instructions for building the kit. As usual with the instructions provided by this manufacturer, they assume that you have done a significant amount of building prior to attempting this kit. The Syonic kit also included an additional single sheet of instructions that described the assembly of the Tail cone for this kit and for the 5.5 and 7.5 inch V-2 kits. A dry fitting of the parts convinced me of a couple of things. First, this kit was bigger than I recalled it being. Second, my desire to upgrade the motor mount from 54mm to 75mm would require extensive re-work of the fins and destroy the unique integrity of the fins and tail cone reducing the rockets durability (I opted to keep it stock). Three, since I was going to stay with the 54mm motor mount, the 2 piece version supplied by the manufacturer would be replaced with a single length of phenolic tubing. Four, the nylon recovery harness would be replaced with tubular nylon, and lastly the paper coupler would be replaced with a phenolic coupler to add strength and be set up with an electronics bay for redundant dual deployment. This last modification would require an additional bulkplate and 5.5 inch centering ring. Fortunately, my rather large collection of parts, bits, and pieces would cover any of the modification needs. The only additional item that was added was a Slim Line 54mm motor retainer.
 I began
construction of the fin can/motor mount after airfoiling the plywood fins. The
first step was to tack a 3 inch-54 mm centering ring (made out of 1/2 inch
plywood) to the aft end of the motor tube. Once the epoxy has set up, the motor
tube assembly is inserted into the fin can. The aft end of the ring fits
snuggly and flush against the aft end of the pre-slotted tail cone. Prior to
gluing the tail cone into position, I used a round cutting burr on my Dremel to
create a groove on the inside of the plastic tail cone just above where the aft
centering ring would sit to add strength to the glue joint. I had some concern
as to how I was going to complete the tail cone assembly. The fins have a tab
on the leading and trailing root edge that allows them to lock into the tail
cone top and bottom of the tail cone. The leading edge tab is inserted in the
tail cone. The fin is then slid as far forward as possible so that the trailing
edge tab can be inserted in to the tail cone. The fin is then slid aft until it
seats fully against the aft end of the slot in the tail cone and the rearmost
centering ring. This arrangement certainly helps assure a strong integrated
tail unit. However, my usual practice of applying one fin at a time would not
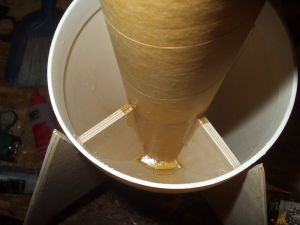
work in this case. I decided to dry assemble all 4 fins to the tail cone and
motor mount assembly first. I then made sure that all of the fins were aligned
correctly, placed the entire assembly over a coffee can suspended by the 4 fins
and poured West Systems Epoxy into the bottom of the tail cone.
I began
construction of the fin can/motor mount after airfoiling the plywood fins. The
first step was to tack a 3 inch-54 mm centering ring (made out of 1/2 inch
plywood) to the aft end of the motor tube. Once the epoxy has set up, the motor
tube assembly is inserted into the fin can. The aft end of the ring fits
snuggly and flush against the aft end of the pre-slotted tail cone. Prior to
gluing the tail cone into position, I used a round cutting burr on my Dremel to
create a groove on the inside of the plastic tail cone just above where the aft
centering ring would sit to add strength to the glue joint. I had some concern
as to how I was going to complete the tail cone assembly. The fins have a tab
on the leading and trailing root edge that allows them to lock into the tail
cone top and bottom of the tail cone. The leading edge tab is inserted in the
tail cone. The fin is then slid as far forward as possible so that the trailing
edge tab can be inserted in to the tail cone. The fin is then slid aft until it
seats fully against the aft end of the slot in the tail cone and the rearmost
centering ring. This arrangement certainly helps assure a strong integrated
tail unit. However, my usual practice of applying one fin at a time would not
work in this case. I decided to dry assemble all 4 fins to the tail cone and
motor mount assembly first. I then made sure that all of the fins were aligned
correctly, placed the entire assembly over a coffee can suspended by the 4 fins
and poured West Systems Epoxy into the bottom of the tail cone.
I placed the notch centering ring on top of the tail cone and dry fit it into position to assure the proper alignment while gluing. I allowed this to fully cure before removing the top centering ring. Once it was removed, a full set of internal and external fillets was applied (external, internal to the motor tube, internal to the exterior wall of the tail cone.
 The remainder
of the booster section assembly was pretty straight forward and followed the
instructions. The only 2 modifications I made were to add plywood
"backers" to be used a anchor points for rail buttons. One backer was
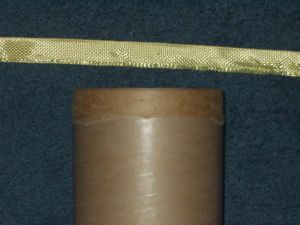
placed at each of the centering rings. I also inlaid a 1 inch band of Kevlar®
tape around the top exterior lip of the booster section. I covered this once
inch inlay with a 5 inch section of Giant Leaps Fiberglass sock. I feathered
the trailing edge of the Fiberglass with West Systems 410 microlight fairing
compound.
The remainder
of the booster section assembly was pretty straight forward and followed the
instructions. The only 2 modifications I made were to add plywood
"backers" to be used a anchor points for rail buttons. One backer was
placed at each of the centering rings. I also inlaid a 1 inch band of Kevlar®
tape around the top exterior lip of the booster section. I covered this once
inch inlay with a 5 inch section of Giant Leaps Fiberglass sock. I feathered
the trailing edge of the Fiberglass with West Systems 410 microlight fairing
compound.
I used this same technique to strengthen the lip of the Payload section of the rocket. I have found that this virtually eliminates any zipper damage caused by late or overly boisterous deployment events.
The only other real challenge was the electronics bay. The Syonic did not appear to have a lot of extra space in the payload bay for the deployment system. I decided not to build a standard removable electronics bay. I opted instead to build a bay that was accessible from the bottom of the payload coupler. I ran the coupler 6 inches deep into the payload bay but only ran the electronics bay 1.5 inch into the Payload section. This would allow me to place my vent holes approximately 1 inch above the payload/booster joint and still have plenty of space in the payload section for recovery harness and parachute.
Finishing:
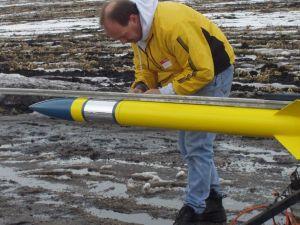
I painted the rocket in a color scheme similar to the one shown on the box.
Typical of LOC products, finishing was a breeze. The airframe and fins got a
light sanding. I primed it using Kilz primer; I top coated it with Krylon
bright yellow and used Krylon light blue for accent. I also applied a 10 inch
band of self adhesive silver Mylar to the electronics bay. Dry weight with
recovery harness and no motor was 10 pounds even.
Construction Rating: 5 out of 5
Flight:
I carried the Syonic to a launch in January 2004 but instead of launching it, I
helped support a fellow flier with his L3 certification flight.
So then on February 22, 2004, I prepped the rocket for flight and loaded her with an Aerotech J570. This is probably my absolute favorite "Easy Access" motor and may be my favorite of all time. They always seem to light with real authority and have serious lifting power! I selected a long delay as a backup to my electronic deployment system.
Onboard electronics included a PerfectFlite MAWD set for apogee and 900 feet main deployment and an Adept DDCS25 set for main deployment at 600 feet
The flight was absolutely picture perfect! The J570 roared to life and the Syonic flew straight as an arrow to 2392 feet!
Recovery:
Deployment was flawless and the rocket landed about 150 feet from the pad.
Flight Rating: 5 out of 5
Summary:

PROs:
- Unique Tail cone design looks cool, is streamlined and is strong.
- High quality parts. Nice overall fit and finish.
- Well designed and straightforward assembly.
- Can Fly on Large I motors (I-435) and up (KBA L1000).
- Instructions are not adequate for inexperienced builders--but this truly a Level 2 rocket. Most builders who have built a few rockets for Level 1 and 2 flights should have no problem assembling this kit.
- Nylon recovery harness. Some swear by it. I don't.
- The 54mm motor mount supplied by the manufacturer requires the assembly of two 14 inch sections of tubing. This limits motor length. I highly recommend that this assembly be replaced.
Overall Rating: 4 out of 5
 |
 |
Flights
|
|