| Construction Rating: | starstarstarstarstar |
| Flight Rating: | starstarstarstarstar |
| Overall Rating: | starstarstarstarstar |
| Manufacturer: | FlisKits  |
Brief:
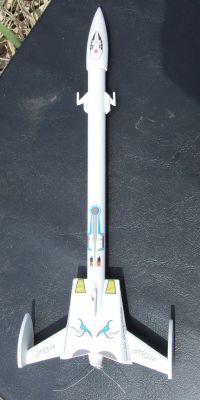
This is a downscale of the Sting Ray, with somewhat simplified construction. It's a sweet futuristic design and
another fine addition to the Micro to the Maxx line of kits.
Construction:
In your 3" x 5" baggy you'll find some good quality parts, all of which are tiny so be careful not to open
over, say, shag carpet. I build Micromaxx kits exclusively on our kitchen table (covered) under good light. Parts list
includes:
- Balsa nose
- BT-3 body tube
- BT-2.5 motor tube
- centering rings
- Laser cut basswood fins, trim details
- Cardstock skin
- Mylar streamer
- Kevlar® shock cord
- Waterslide decals
The instructions are a bit micro-sized, consisting of 18 steps sprinkled across a two-sided 8.5" x 11" sheet of paper. They are well written and illustrated, albeit a bit more cramped than the typical instructions for a larger kit. The kit is listed as a skill level 3, which might be a bit overstating it--other than folding an unusual shroud, it uses fairly standard techniques and is a simple single-color paint scheme. I was able to finish up construction in about 2 hours plus prep/paint work.
 You begin with a standard motor mount--motor tube, pair of centering rings, even a little
tiny motor block. Slip a Kevlar®
thread/shock cord in before bonding the forward centering ring. The aft centering ring must be carefully spaced in
order to align the motor tube in the BT-3 body tube with just enough exposed tube once the aft bulkhead is attached
later.
You begin with a standard motor mount--motor tube, pair of centering rings, even a little
tiny motor block. Slip a Kevlar®
thread/shock cord in before bonding the forward centering ring. The aft centering ring must be carefully spaced in
order to align the motor tube in the BT-3 body tube with just enough exposed tube once the aft bulkhead is attached
later.
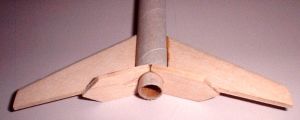
 With the motor mount inserted into the BT-3, you then bond the two fins 180 degrees apart.
They have tiny notches at the trailing root edge to align with the aft edge of the body tube. This is a very nice
touch, since you then attach a pair of plates to the back end to serve as a bulkhead. The perfectly set fins make this
really look clean and squared.
With the motor mount inserted into the BT-3, you then bond the two fins 180 degrees apart.
They have tiny notches at the trailing root edge to align with the aft edge of the body tube. This is a very nice
touch, since you then attach a pair of plates to the back end to serve as a bulkhead. The perfectly set fins make this
really look clean and squared.
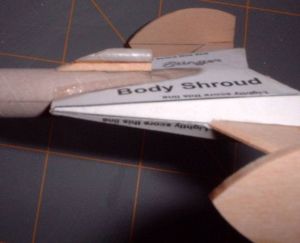
The trickiest part of construction is probably the wrap--you cut out a cardstock pattern, score a few fold lines, then glue together with white glue. Before the glue completely sets, it's a good idea to slide it down the body tube for a test fit. Once dry, permanently attach it to the body tube aligned with the aft bulkhead. Mine fit fairly well although I had to trim the aft edges a little bit and applied a white glue fillet around the elliptical seam with the body tube.
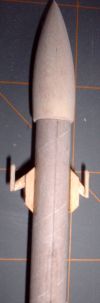 With the shroud in place, you then attach a couple of fin ends that act as little
rudders/stabilizers. These are laser cut from sturdy basswood and good glue fillets are in order here, as they could be
prone to breakage without them. Finally, there are a couple of tiny "gun" assemblies made from laser cut
basswood pieces which go towards the forward end of the body tube.
With the shroud in place, you then attach a couple of fin ends that act as little
rudders/stabilizers. These are laser cut from sturdy basswood and good glue fillets are in order here, as they could be
prone to breakage without them. Finally, there are a couple of tiny "gun" assemblies made from laser cut
basswood pieces which go towards the forward end of the body tube.
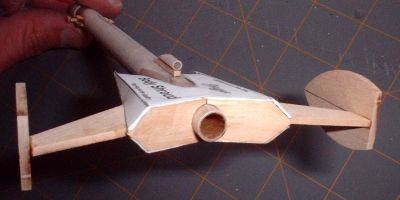
I usually don't waste review space mentioning launch lugs, but in this case it's worth a word or two. The standoff and lug are trimmed at a sharp angle with the lug sloped forward (longer) than the standoff. In my photo, I got this exactly backwards, more of a conventional approach. The proper version would have looked much better serving as a little mini bridge. Don't make my mistake--the right version is much cooler.
Finishing:
One cool aspect of MicroMaxx kits is that it's really easy to do a good job of surface prep, since there is so little
surface area to deal with. I pre-finish my tube with diluted Elmer's Fill 'n' Finish before construction, sanding down
with a good 220 grit sandpaper. Basswood was easy to work with, and a little 400 grit sanding was sufficient, saving me
even the light filler.
 First coat of paint was a light gray primer, just a light dusting. The main purpose of this
coat was to pull out the fuzzies that tend to come out when hitting plain cardstock with paint. Sanding off the
fuzzies, then a couple of coats of white primer, followed by a 400 grit wet sanding. Then it's ready for finished
paint.
First coat of paint was a light gray primer, just a light dusting. The main purpose of this
coat was to pull out the fuzzies that tend to come out when hitting plain cardstock with paint. Sanding off the
fuzzies, then a couple of coats of white primer, followed by a 400 grit wet sanding. Then it's ready for finished
paint.
I went with Rustoleum gloss white for the final coat since it tends to be a little glossier and smoother for me than Krylon. However, it takes a full 2-3 days to dry before I can decal, compared to 24 hours for Krylon.
The waterslide decals are very good quality and nice looking. The cover art shows where most of them go.
Once everything is cured, be sure to apply a wipe of Future clear acrylic or a couple of good spray clear coats as the white paint shows off any traces of smoke, dirt, grass stains, etc.
Construction Rating: 5 out of 5
Flight:
First flight was of course using the Quest MMX-II motor. Winds were pretty brisk--steady 10-12mph, gusting to 17. I
used a neat little setup Jim Flis showed me: a thin rod epoxied into the center of a spent 18mm casing, which had a
launch lug glued to the outside. I slid the casing and MMX rod down a standard 1/8" rod, and the motor casing
serves as a standoff as well.
The flight was straight and problem free, slightly weathercocking but not much at all. Micromaxx ejections almost always seem early, but in this case with the higher drag, it was just about right with nose cone up.
Recovery:
The streamer is more for decoration than to actually slow it down, but it did come out fine, landing in soft grass.
Flight Rating: 5 out of 5
Overall Rating: 5 out of 5
Other Reviews
- FlisKits Stinger By Robert Koenn (September 6, 2008)
Brief: Since Chan has done a second review of one of my reviews, I am giving a second review of the Stinger (I didn't know he had already submitted one when I wrote mine up). A couple of years ago I became interested in rockets that were built around the MicroMaxx engines from Quest. It actually wasn't so much flying them but more that the small size made for an interesting display ...
 |
 |
Flights
|
|